MS Excel 2007 - Lesson 10: Modify columns, rows and cells
When you open a new blank workbook in Excel 2007, cells, columns, and rows are set to default sizes. You can change the size of each cell, column and row, as well as insert new columns, rows and cells if needed.
Table of Contents
When you open a new blank workbook in Excel 2007, cells, columns, and rows are set to default sizes. You can change the size of each cell, column and row, as well as insert new columns, rows and cells if needed. In this lesson, you will learn different methods to modify column width and row height, as well as how to insert new columns, rows and cells.
Modify column width
- Position the cursor on the column row in the column heading and a double arrow will appear.

- Modify column width
- Left click, then drag the cursor to the right to increase the column width or left to reduce the column width.
- Release the mouse.
OR
- Left click on the column header of the column you want to modify. The entire column will appear highlighted.

- Click the Format command in the Cells group on the Home tab . A menu will appear.
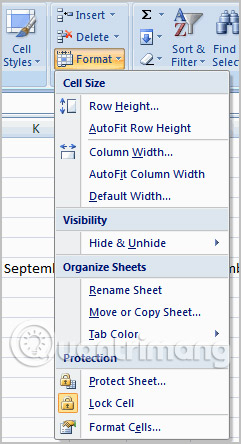
- Select Column Width to enter a specific column size.
- Select AutoFit Column Width to adjust the column so that its width fits all text in it.
If you see a pound sign (#######) in a cell, it means that the column is not wide enough to display the content contained therein. At that time, you just need to increase the column width to display the cell contents.
Modify row height
- Position the cursor on the row you want to modify and a double arrow will appear.

- Left click, then drag the cursor up to reduce the row height or down to increase row height.
- Release the mouse.
OR
- Click the Format command in the Cells group on the Home tab . A menu will appear.

- Select Row Height to enter a specific row size.
- Select the AutoFit Row Height to adjust the row width to fit the entire text contained in it.
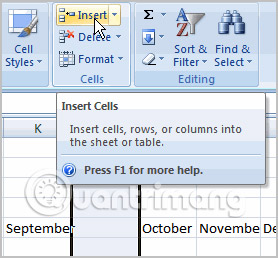
Insert rows
- Select the item below where you want the new item to appear.
- Click the Insert command in the Cells group on the Home tab . New item will appear.
New items always appear above the selected row.
Make sure you select the entire row below where you want the new item to appear, not just the cell. If you only select the box and then click Insert, only a new cell will appear.
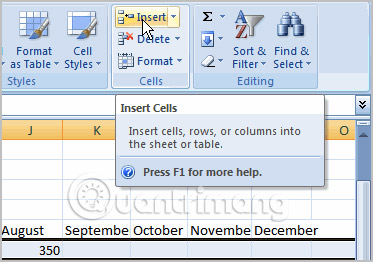
Insert column
- Select the column to the right where you want the column to appear.
- Click the Insert command in the Cells group on the Home tab . A new column will appear.
New columns always appear on the left of the selected column. For example, if you want to insert columns between September and October, select the October column , then click the Insert command .
Make sure you select the entire column to the right where you want the new column to appear, not just one cell. If you select only one cell and then click Insert, only a new cell will appear.
Delete rows and columns
- Select the row or column you want to delete.
- Click the Delete command in the Cells group on the Home tab .
Practice!
- Use the workbook Budget or any Excel workbook you have to complete this practice.
- Open a workbook.
- Insert a column.
- Insert a row.
- Delete a column.
- Change the width of the column with AutoAdjust.
- Change the height of a row.
- Close and save the file.
>> Next lesson: MS Excel 2007 - Lesson 11: Format the text
Was this article helpful?
Your feedback helps us improve.
Related Articles
 Excel 2019 (Part 5): Modifying Columns, Rows, and Cells11 minutes read
 How to handle cells, columns, rows in a spreadsheet in Excel3 minutes read
 How to convert columns into rows and rows into columns in Excel2 minutes read
 Complete tutorial of Excel 2016 (Part 6): Change the size of columns, rows and cells12 minutes read
 How to Freeze Cells in Excel3 minutes read
 How to change the size of rows, columns, cells equally in Word, Excel4 minutes read
Reader Comments 0
Sign in with email or Google to join the discussion.