How to Add Clip Art to Microsoft Word
This wikiHow teaches you how to insert clip art images in Microsoft Word for both Windows and Mac computers. While the clip art feature of previous Office products has been replaced by Bing images, it's still possible to find and insert...
Table of Contents
Method 1 of 2:
On Windows
-
 Open a Microsoft Word document. Double-click the Microsoft Word document to which you want to add clip art in order to open it.
- You can also create a new document by double-clicking the Microsoft Word program icon and then clicking Blank document.
-
 Click the Insert tab. It's in the upper-left side of the blue Word ribbon that's at the top of the Word window. This will open the Insert toolbar below the blue ribbon.
 -
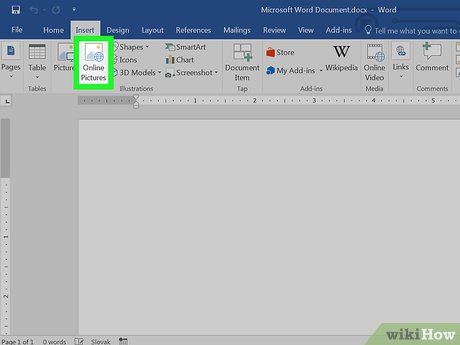 Click Online Pictures. You'll find this in the "Illustrations" section of the toolbar. A pop-up window will appear with a Bing search bar in it.
 -
 Enter a search term followed by clipart. Type the name of the kind of image you want to find followed by clipart, then press ↵ Enter. Doing so will search Bing for images matching your search.
- For example: to find clip art of elephants, you would type in elephant clipart and press ↵ Enter.
- You must have Internet access to search for images on Bing.
-
 Select an image. Click an image that you would like to use for your Word document. This will place a checkmark in the upper-left corner of the image, meaning you have it selected.
- You can select more than one image at once.
-
 Click Insert. It's at the bottom of the window. This will add your selected clip art to your Word document.
Method 2 of 2:
On Mac
-
 Go to Bing's image search. Go to https://www.bing.com/images/. This process will work on Safari, Google Chrome, and Firefox, though other browsers may not be supported.[1]
 -
 Enter a search term. Type in the name of an item for which you want to find clip art, then press ⏎ Return. This will search Bing images for matching images.
 -
 Click Filter. This funnel-shaped icon is on the far-right side of the Bing page, just above the image results. Clicking it prompts a series of tabs to appear below the search bar and above the top row of images.
 -
 Click Type ▼. It's a tab below the search bar. A drop-down menu will appear.
 -
 Click Clipart. This option is near the middle of the drop-down menu. Doing so will refresh your image search to display only clip art.
 -
 Select an image. Click an image that you would like to insert into your Word document.
 -
 Save the image. Hold down Ctrl and click the image, then click Save Image. The image will download to your Mac.
 -
 Open your Word document. Double-click the Microsoft Word document to which you want to add clip art in order to open it.
- You can also create a new document by double-clicking the Microsoft Word program icon and then clicking Blank Document.
-
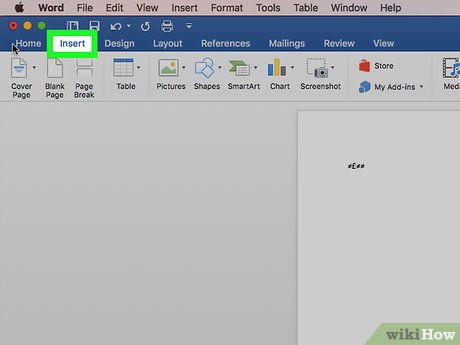 Click the Insert tab. It's in the blue ribbon near the top of the Word window. Doing so displays the Insert toolbar below the blue ribbon.
- Don't click the Insert menu item at the top of your Mac's screen.
-
 Click Pictures. You'll find this option on the left side of the toolbar. Clicking it prompts a drop-down menu.
 -
 Click Picture from File…. It's the bottom option in the drop-down menu.
 -
 Select your picture. Click the picture you downloaded from Bing images. This will select it.
- You may have to select the picture's download location (e.g., Downloads) on the left-hand side of the Finder window first.
-
 Click Insert. It's at the bottom of the window. This will insert your clip art into your Word document.
Was this article helpful?
Your feedback helps us improve.
Related Articles
 How to insert Clip Art in Word 2003, 2007 simply and quickly3 minutes read
 Review JBL Clip 3: Durable speaker, big sound4 minutes read
 Lesson 23: Insert Clip Art2 minutes read
 How to Add Clip Art to PowerPoint Easily2 minutes read
 How to insert images into Word 2010 content3 minutes read
 Link Download Microsoft Word 20193 minutes read
Reader Comments 0
Sign in with email or Google to join the discussion.