Fix 100% Full Disk error on Windows with the following 14 tips
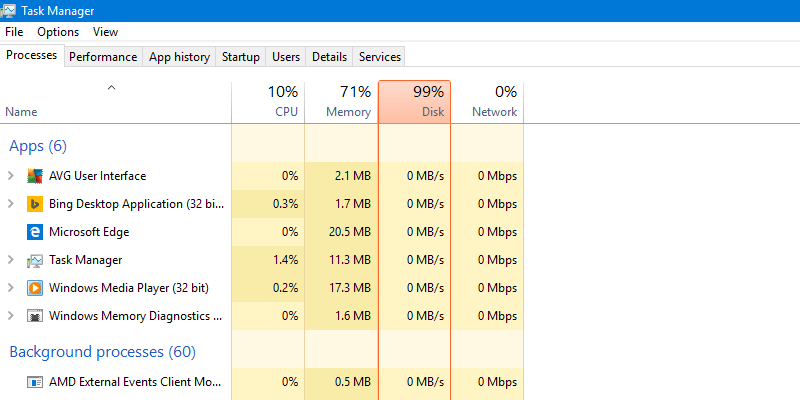
100% Full Disk error or 100 disk error is probably no stranger to Windows 10 / 8.1 users. Not only on Windows 8.1, but you can also get a 100% Full Disk error on Windows 7 or Windows 8. Every time you open Task Manager to see details of activities, the Disk tab is always red, with 99%, 100% or always account for 90% or more..
100% Full Disk error or 100 disk error is probably no stranger to Windows 10 / 8.1 users. Not only on Windows 8.1, but you can also get a 100% Full Disk error on Windows 7 or Windows 8. Every time you open Task Manager to see details of activities, the Disk tab is always red, with 99%, 100% or always account for 90% or more.
This error still occurs even when no processes are running in the background and the CPU is about 2-10%. So how to fix 100% Full Disk error , please refer to the following article of Network Administrator.
- Instructions to fix 100% Full Disk error on Windows 10
Instructions to fix 100% disk error by video:
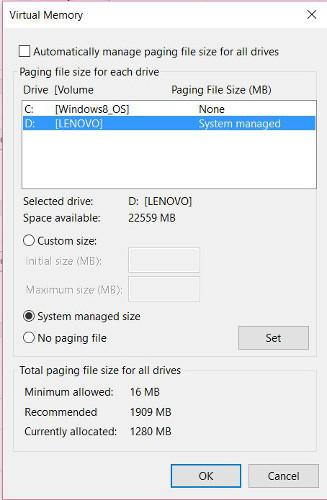
1. Set Virtual Ram manually instead of Automatically
To Ram in Automatically (automatic) mode is also one of the reasons why your computer has errors Full Disk. Instead of Auto mode, you should Set Hard RAM virtual . How to do the image below:
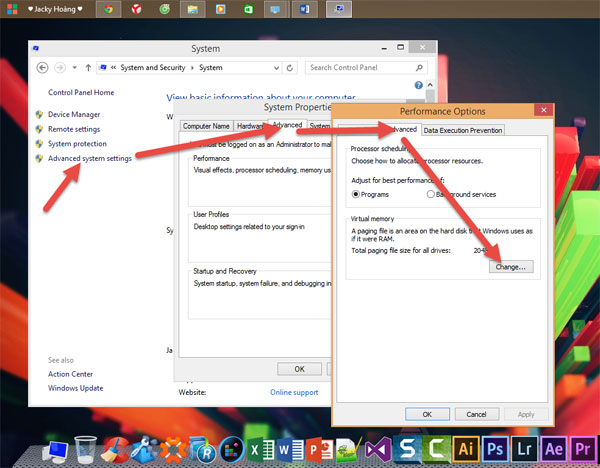
At Virtual Memory Tab, uncheck Automatically check paging file size for all drives . Select the drive to install your OS (usually C drive) . Then tick Custom size .
In Maximum size and Initial size section . You set hard for virtual Ram by half your real Ram. Here I have 4GB Ram, so I'll set it to 2GB Ram = 2048MB, similar to what you do with your computer.
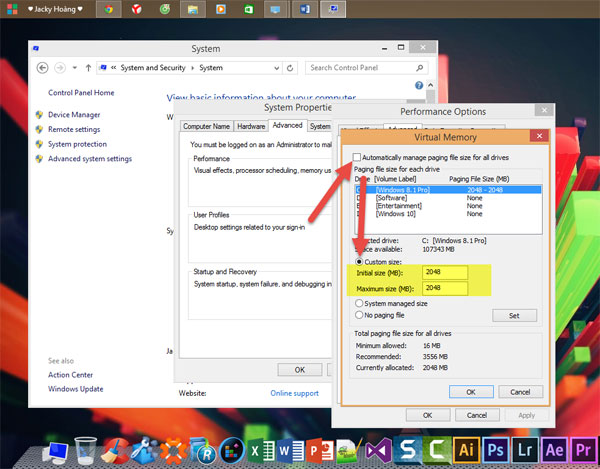
Finally press OK to save, and start the change to take effect.
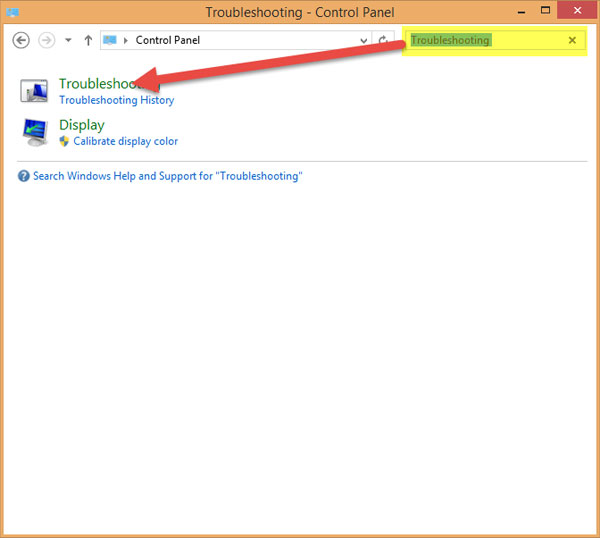
2. Handle the Troubleshooting
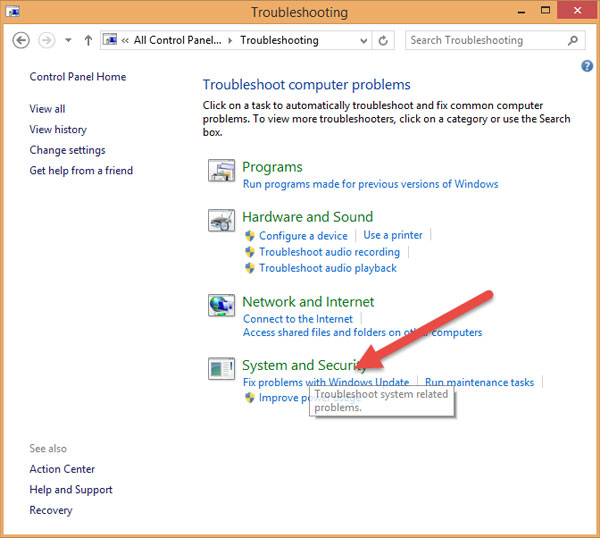
Go to Control Panel , type Troubleshooting in the search box and click Troubleshooting .
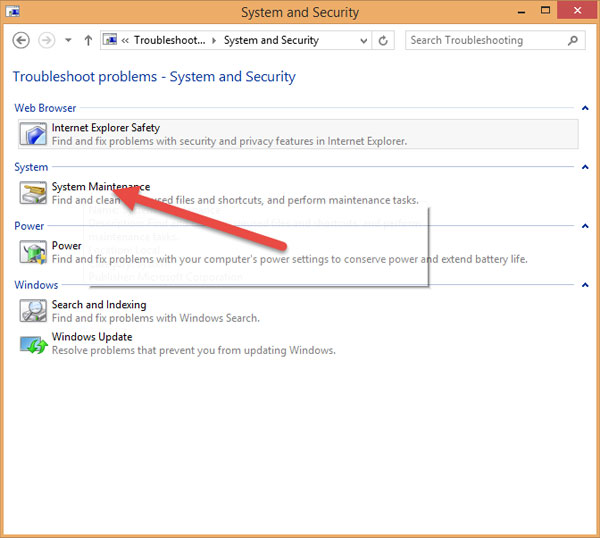
A new window will appear, double-click System and Security:
New window will appear, click System Maintenance:
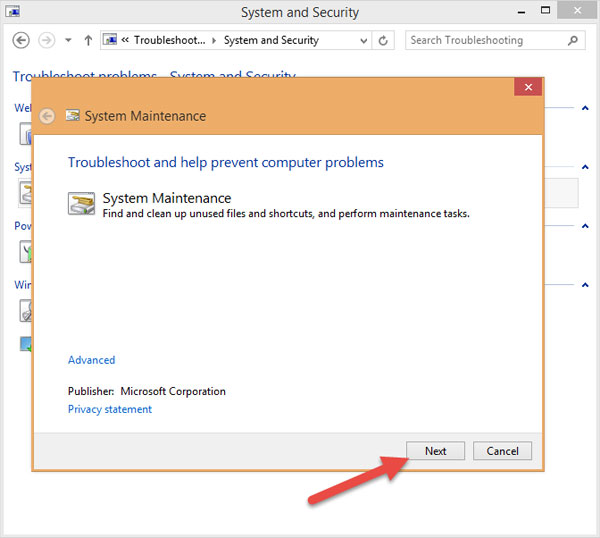
Click Next:
Then let it work when the System Maintenance message appears as shown, click on the item Try troubleshooting as an administrator:
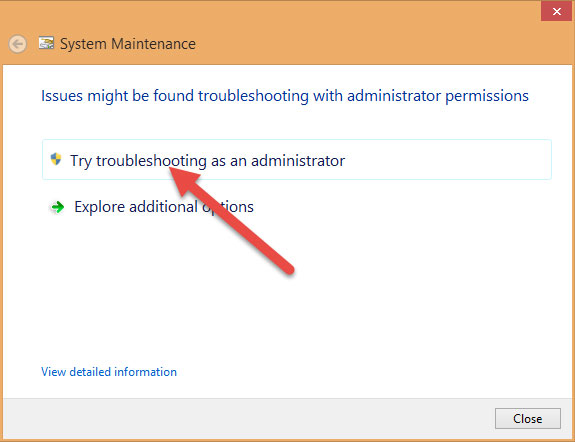
Then wait, wait for it to run until the word Close is clicked.
3. Turn off Maintenance
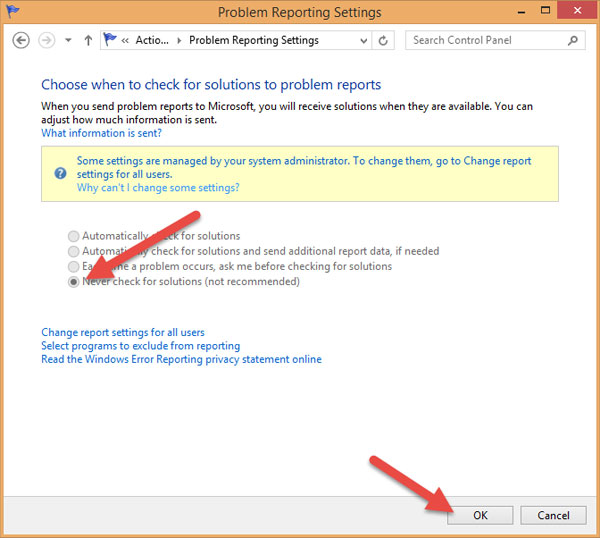
Also in Control Panel , select System and Security and Action Center:

Next click on the arrow for the Maintenance settings section, select Settings:
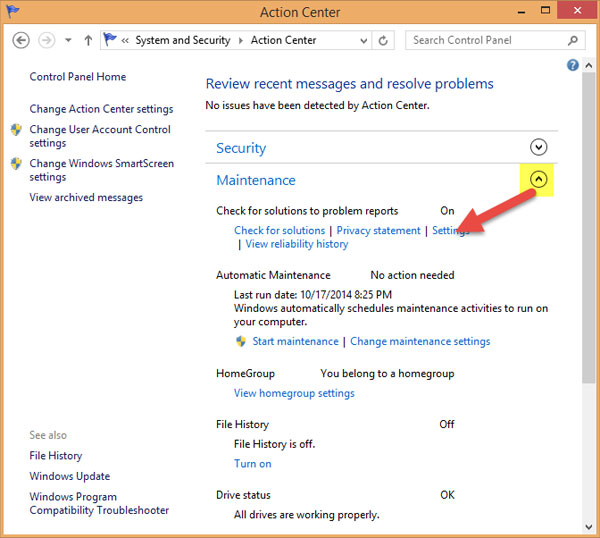
You click Never check for solutions (Not recommended) and OK:
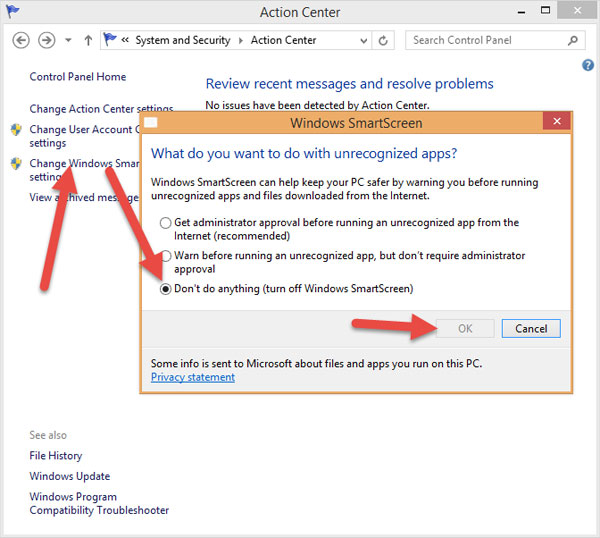
4. Turn off Windows SmartScreen
Still in the Action Center window, select Change Windows SmartScreen Settings , then click Don't do anything (Turn off Windows SmartScreen) .
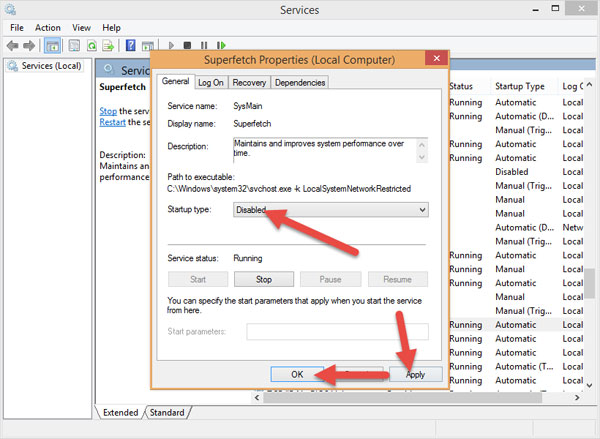
5. Turn off Service Superfetch
You press Windows + R key combination to open Run, type Services.msc . Then find Superfetch (press S and find it quickly), double-click it and select Disabled .
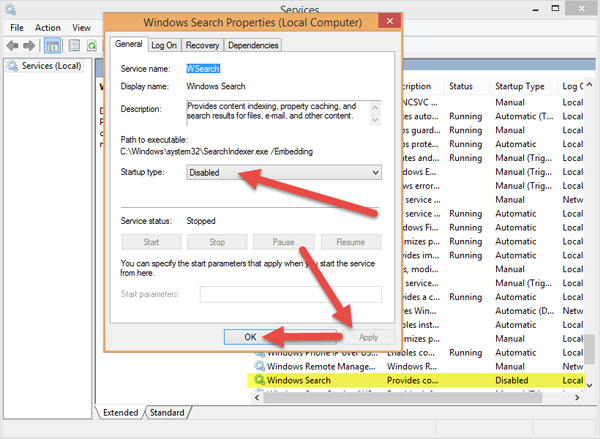
6. Turn off Service Windows Search
You do the same thing as above but look for Windows Search (press W and then search), double-click it and select Disabled .
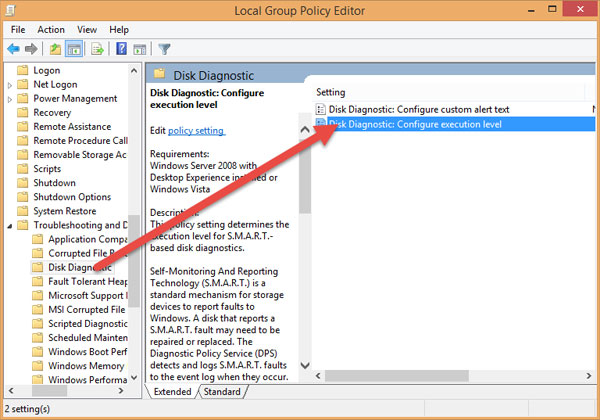
7. Turn off Disk Diagnostics: Configure execution level
You go to Run type gpedit.msc . Then find the following link:
Computer Configuration / AdminNistrative Templates / System / Troubleshooting and Diagnostics / Disk Diagnostics
Looking to the right window you will see Disk Diagnostics: Configure execution level , double click on it.
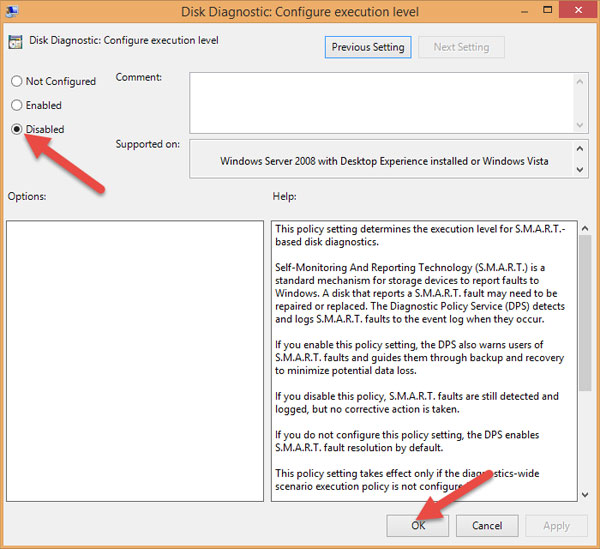
Select Disabled and OK to save.
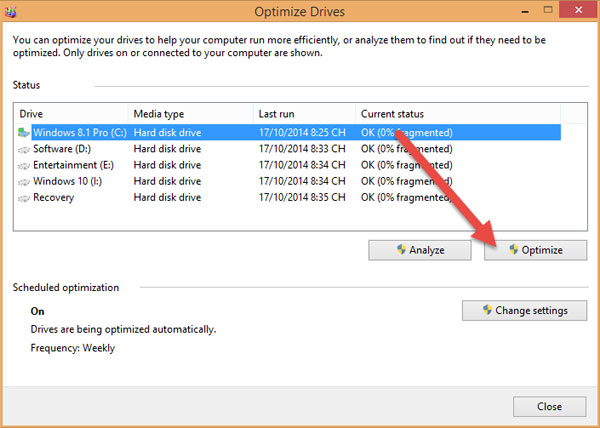
8. Defragment the hard drive
Currently there are many software to defragment hard drives but in this article I will use Windows tools.
Open This PC . Then click on any partition, then select Manage -> Optimize .
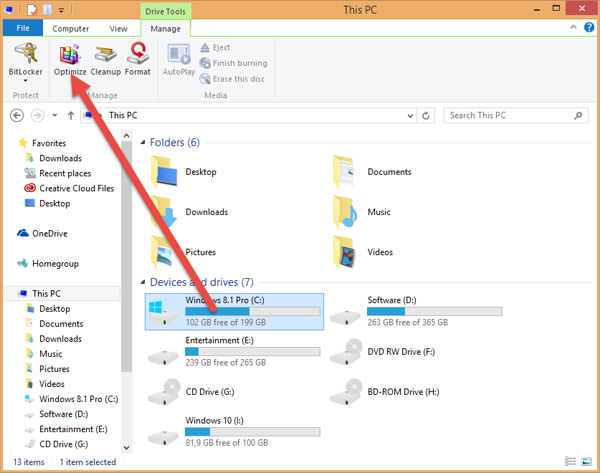
Select the partition you want to defragment (should choose the drive that installed the HDH drive first) and then click Optimize to proceed with defragmentation and partition optimization.
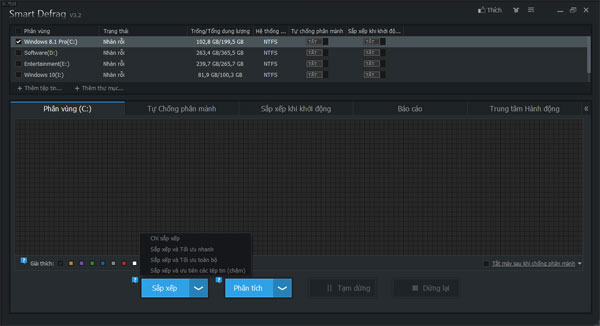
In addition, you can use 3rd party software such as Smart Defrag 3 , the advantage of this software is easy to use, support Vietnamese language and completely free, you can download and use used at:
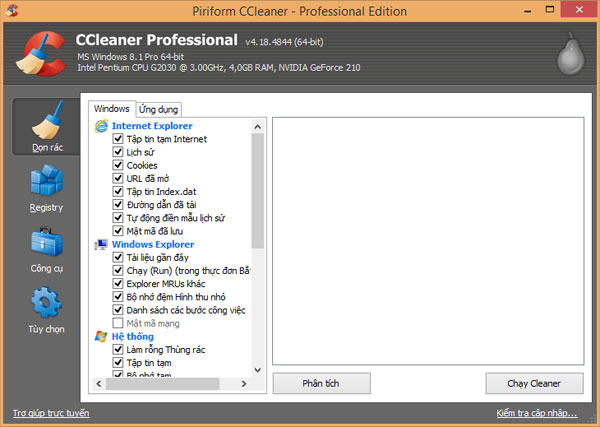
9. Use cleanup software and fix Registry errors
Open This PC , then you click on a partition where you install the operating system (usually C drive). Right-click> Properties> Disk Cleanup.

If you want faster, you can use CCleaner software, download here:
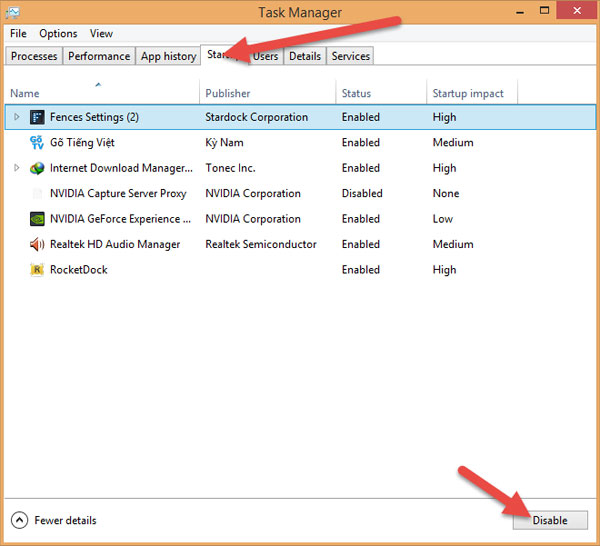
10. Remove unnecessary software, turn off software that you do not need to use when Windows starts
- To remove unnecessary software, you can use the available functions of Windows or 3rd party software such as Revo Uninstaller, CCleaner, .
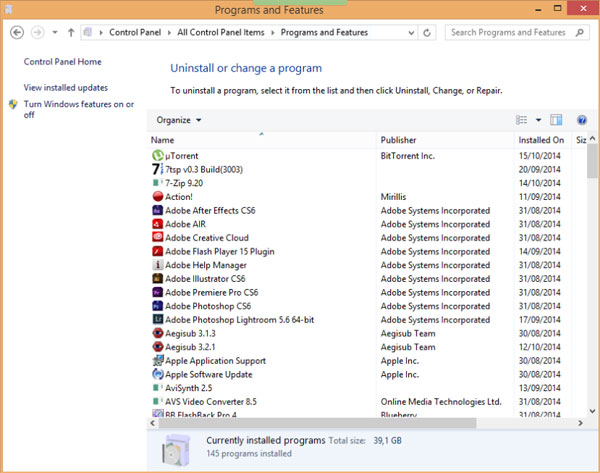
- If you turn off the software, you can use the Startup tool in the Task Manager bar, then Disable the software you find unnecessary (note not to disable the system's Driver ).
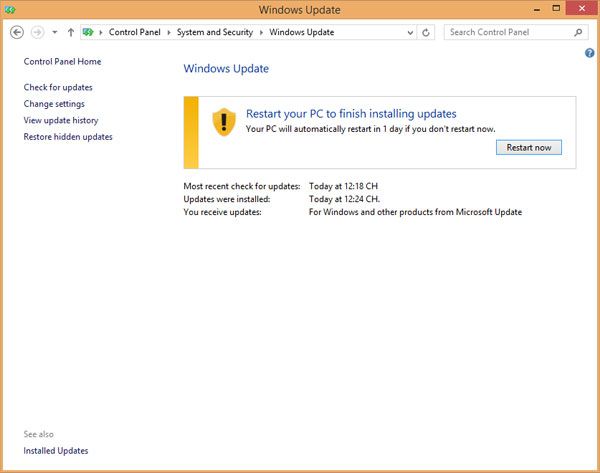
11. Windows Update
Download Mircosoft patches to fix your Windows errors.
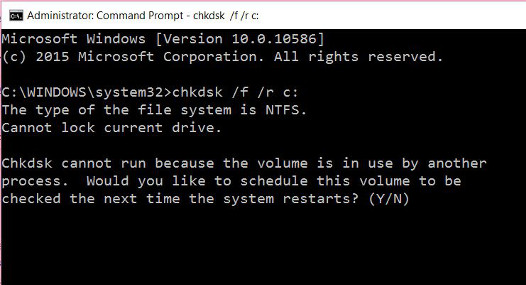
12. Run CheckDisk
1. Click Start, then enter cmd in the Search box. On the search results list, right-click Command Prompt and select Run as administrator.
2. On the Command prompt window, enter the following command to check and automatically fix errors on your hard drive:
chkdsk / f '/ r C:
Note : In the above command, replace "C" with the name of the main hard drive on your Windows computer.
3. At this point on the screen you will receive a message that the hard drive is in use, if you want to run CheckDisk, reboot the system. Press Y to restart your computer.
4. CheckDisk will run after your computer starts up. The process will take quite a long time, so you need to be patient. The process ends and the error will no longer appear.
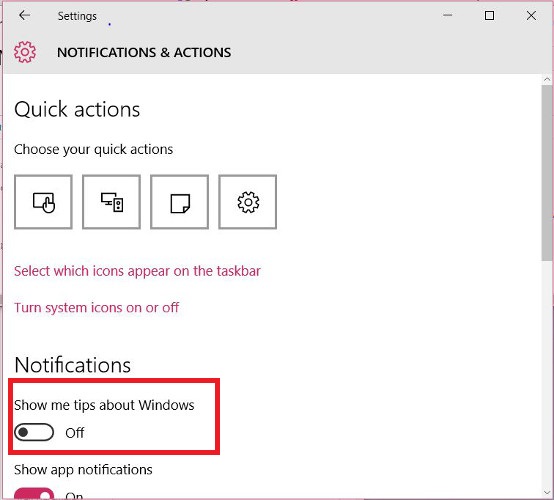
13. Disable Tips About Windows
Sometimes in some cases, users can disable Tips About Windows to fix errors.
To disable Tips About Windows, go to Start => Settings => System => Notification & actions . Switch the Show me tips about Windows option to OFF and you 're done.
14. Change Pagefile position
Pagefile is a file on the hard drive to support the ability to write "term" of RAM in the computer in case of need.
Your computer will prioritize the use of RAM to store data because its accessibility is faster than hard drive. However, when RAM is full or overloaded, Windows will automatically transfer data from RAM to Pagefile in the hard drive.
However, in some cases, the cause of Disk Usage error may be because Pagefile is used continuously.
To fix the problem, the first solution you can apply is to add more RAM. However, in order not to lose money, you can alternatively move the pagefile to a non-system hard drive. To do this thing:
1. Right-click My Computer or This PC , select Properties.
2. Next go to Advanced system setting s => Settings (under Performance) => Advanced => Change.
3. By default pagefile will be selected, select No paging file and then click Set .
4. Next select the hard drive you want to move the pagefile to, then click on 'System managed size' => Set.
5. Click OK and restart your computer.
After all, if the above methods do not work for you, "squeeze your mouth" upgrade the hard drive to SSD, make sure this 100% full disk error will disappear.
Refer to some of the following articles:
- 4 ways to fix USB errors without formatting: 'Windows was unable to complete the format'
- Here's how to create a Virtual Hard Disk on Windows 10
- Summary of several ways to start Windows 10 in Safe Mode
Good luck!