How to fix Scratch disk in Photoshop on Windows 10
If you've used Adobe Photoshop on a Windows 10 computer, you've probably encountered a Scratch disk error at least a few times. This error can make you uncomfortable and negatively affect the workflow.
However, this error is quite easy to fix and you can start Photoshop and run on PC immediately. In this article, we will learn what error Scratch disk is, how Photoshop uses it and how to fix this error.
Guide to fixing Scratch disk in Photoshop
- What is scratch disk?
- How to set up Scratch disk in Photoshop CC 2019
- How to fix Scratch disk error in Photoshop CC 2019
- 1. Convert another drive to the Scratch disk
- 2. Free up space on your hard drive
- 3. Delete Photoshop temporary files
- 4. Error scratch disk when cutting photos
What is scratch disk?
According to Adobe, Scratch disk is a (virtual) storage drive on a Windows 10 computer that is used as a temporary memory for Photoshop when the program runs.
The software uses the Scratch disk space to store the parts of the project you are working on, along with the status of the history table, which does not fit the RAM on the computer.

By default, Photoshop uses the boot drive as the main Scratch disk drive, but if there are multiple partitions or drives, you can configure any drive to use as a Scratch disk.
A Scratch disk error appears when you are working on a large project and the Photoshop drive used makes Scratch disk nearly full. You now understand the reason for the Scratch disk error, and how to fix it is easy.
How to set up Scratch disk in Photoshop CC 2019
Before starting to fix the problem, the article will show you how to set up Scratch disk in Photoshop CC 2019. Follow these simple steps to configure the disk Scratch:
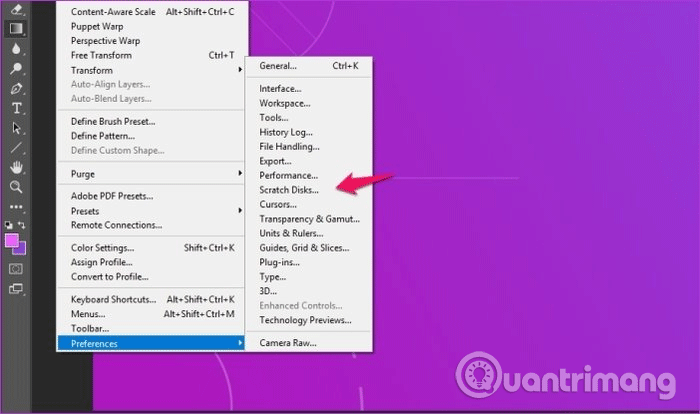
Step 1 . Open the Edit menu in Photoshop.

Step 2 . Then select the Preferences option at the end.

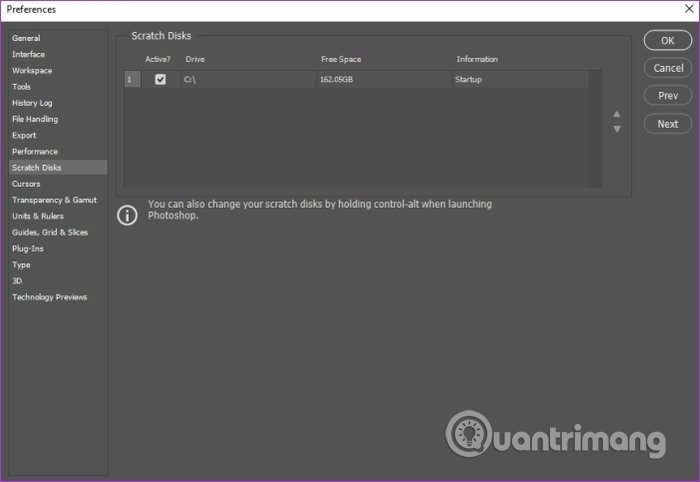
Step 3 . In Preferences , select Scratch Disk to open the Scratch Disk menu.

Step 4 . Here, select the drive you want to use as Scratch disk and click OK .

If there is only one drive on a Windows 10 computer, you can only use it as a Scratch disk. However, if you have more than one drive, you can choose a drive with a lot of free space to avoid errors. Scratch disk is full.
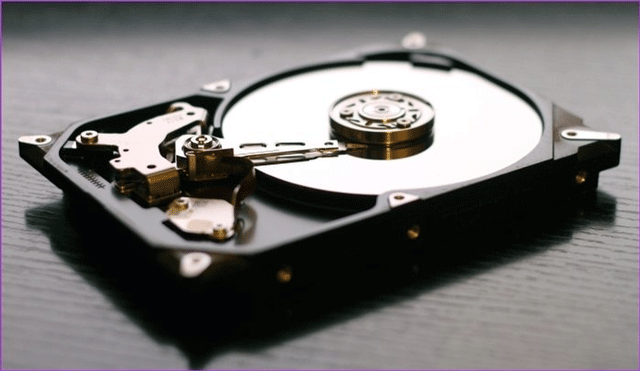
You should also use an SSD drive because the HDD is a Scratch disk. That will ensure that Photoshop continues to run optimally on the system and does not encounter any performance issues.
- Differences between SSD and HDD hard drives
How to fix Scratch disk error in Photoshop CC 2019
Now that you know how to configure the Scratch disk, here's how to fix the full Scratch disk error.
1. Convert another drive to the Scratch disk
First and easiest way is to assign a new scratch disk to Photoshop. You just need to follow the steps above and select another hard drive. You can even select multiple hard drives as backup disks.
2. Free up space on your hard drive
If you don't have your own hard drive, you can fix this by deleting unnecessary, junk files from the drive to get space for Photoshop. However, it is possible that you still get an error even if there is free space on the hard drive.
- Some tips to free up Windows 10 computer hard drive space

This happens because Photoshop requires free space to be fragmented on the Scratch disk. In that case, you need to defragment the drive using Disk Defragmenter. To do that, open the Start menu, search for the defragmentation utility and run it on the drive or partition mentioned.
3. Delete Photoshop temporary files
You will need to manually delete Photoshop temporary files in the following directory:
C:UsersYOUR USERNAMEAppDataLocalTemp This folder contains all temporary system files and temporary Photoshop files labeled Photoshop Temp along with numeric strings.

Before deleting the file, make sure you save the process in Photoshop if you don't want to lose the data. If it is not possible to delete the file and receive the message This action cannot be completed , close the program from Task Manager and try to delete it again.
4. Error scratch disk when cutting photos

If you have a Scratch disk full error when you are cropping, you may have accidentally entered the size and resolution value into the tool options bar or entered the value with the wrong unit. For example, if you enter a size of 1200 x 1600, but the unit is an inch instead of a pixel, this will create a large file resulting in an error of Scratch disk. The solution to this problem is to press the Clear option in the options bar after selecting the cutting tool and before cutting.
Now you know how to fix the Scratch disk error in Photoshop CC 2019. Hope the article is useful to you.
I wish you all success!