How to fix 'Scratch Disks Are Full' error in Photoshop
If your hard drive is full for whatever reason, the sensible approach is to delete some files. In fact, Photoshop will often show the Scratch Disks Are Full error, before the hard drive is at 100% capacity.
Table of Contents
No matter what software you use, errors will occur. Some errors can be difficult to diagnose and fix, while others are simpler. In this article, TipsMake will guide you how to fix the "Scratch Disks Are Full" error in Photoshop.
How to fix 'Scratch Disks Are Full' error in Photoshop
The methods below are in no particular order. So you can jump to any method and start there, even combining it with one of the other methods on the list.
1. Make some space on the main hard drive
If your hard drive is full for whatever reason, the sensible approach is to delete some files. In fact, Photoshop will often show a "Scratch Disks Are Full" error, before the hard drive is at 100% capacity.
This is because it is optimal to leave about 10 to 20% space on the hard drive, no matter what program you are using. In fact, Adobe recommends leaving 20GB of free space when using Photoshop. This may seem like a lot, but scratch disks often contain project pieces and historical data, so even 20GB can run out quickly.
There are two approaches taken here to create more space:
- Delete files from scratch disk.
- Move files from scratch disk to another place.
Regardless of which method you choose, there are a few that are typical for any job that involves using multiple hard drives. This applies to photography, graphic design, music, and other similar tasks:
Use a separate hard drive for system and program files, or at least partition a single drive.
Keep a smaller "active" hard drive (or partition) to allow you to run a single project. This way you can migrate the entire project once it's done.
Implement a storage strategy for the overall job. For example, you might have one partition for a project, storage for an existing client or school assignment on another partition, and cloud-based storage for old, established projects. complete.
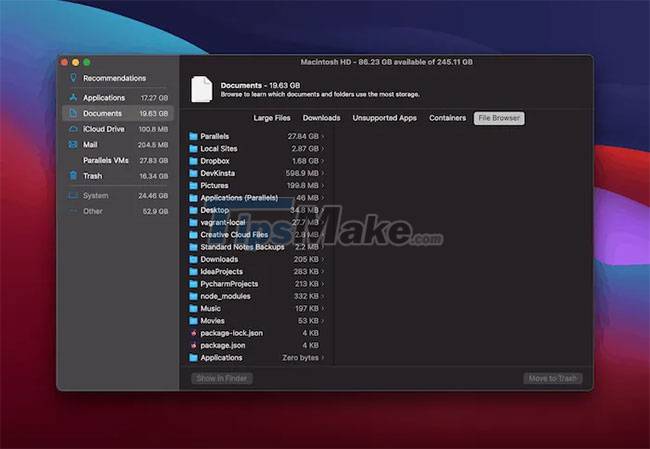
For macOS users, there is a dedicated Storage Management panel to help reclaim some free hard drive space.
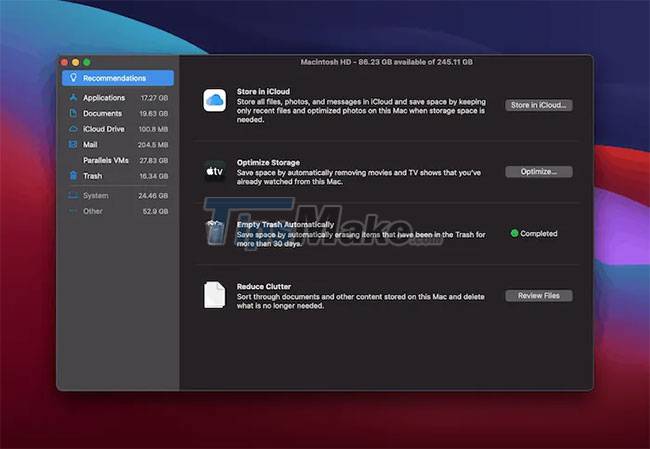
There are some cool features here, such as the Reduce Clutter section that lets you filter your hard drive in a number of different ways.
You can also implement automatic optimization, which will keep only the most recent files you use on your computer.
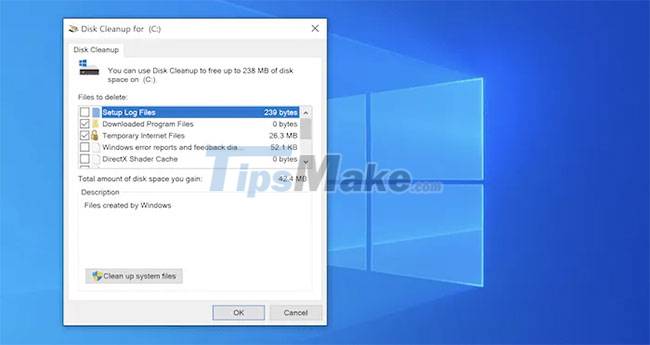
Windows has a similar control panel: Disk Cleanup . This is a simpler panel that lets you see the size of a specific group of folders, then empty them as needed.
2. Optimize hard drive space
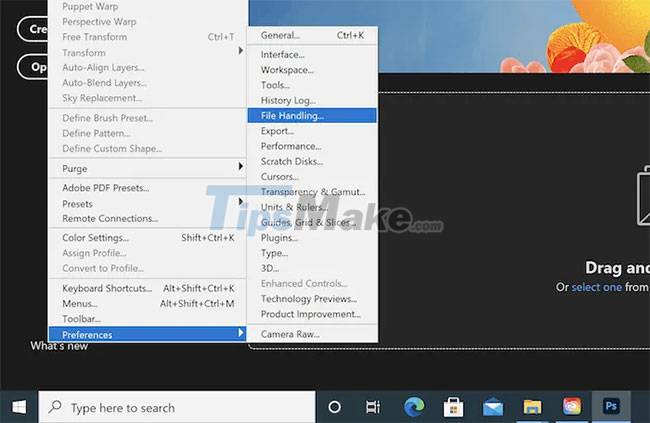
You have limited ways to affect scratch disks in Photoshop, but it's a useful option for dealing with small volumes of storage. You can do this through the Preferences > File Handling screen .
For macOS, go to Photoshop > Preferences > File Handling on the top toolbar.
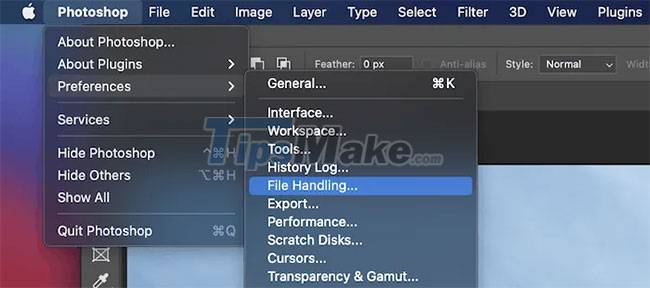
For Windows, it's in Edit > Preferences > File Handling .
Here, look for the 'Automatically Save Recovery Information Ever…' option and choose a longer time. You can disable this feature using the corresponding checkbox instead.
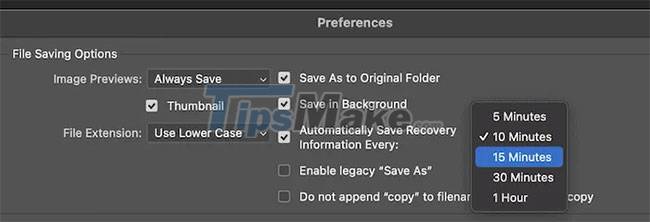
The drawback here is that you'll have less protection from the inevitable crash while working on a project. It's a way to keep the drive from filling up and causing the "Scratch Disks Are Full" error, though.
You can also limit the number of history states that the system will save. To do this, go to the Preferences > Performance panel .

In the History & Cache section , look for the History States value . You can change this value to a lower (or higher if desired).
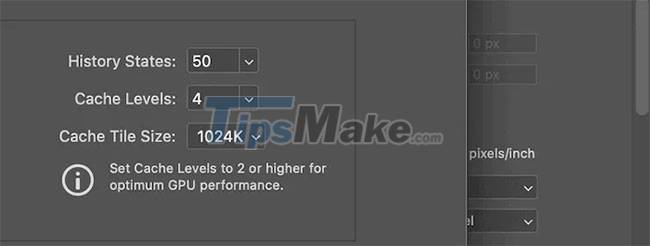
Of course, lower values will mean less space is used to store information and risk less cached state to fall back on.
3. Specify the correct scratch disk in Photoshop
You'll also want to make sure you've selected the correct scratch disk for Photoshop. If deploying on a hard drive, you will need to specify a suitable scratch disk.
For example, if you put a scratch disk on your smallest drive, the drive will fill up quickly and cause an error. However, if you choose another drive with a larger capacity, you will have loads of space to store data without ever seeing an error.
To do this, you need to hold down the keys when launching Photoshop.
- Windows: Control + Alt
- macOS: Command + Option
You should see the Scratch Disk Preferences panel appear.
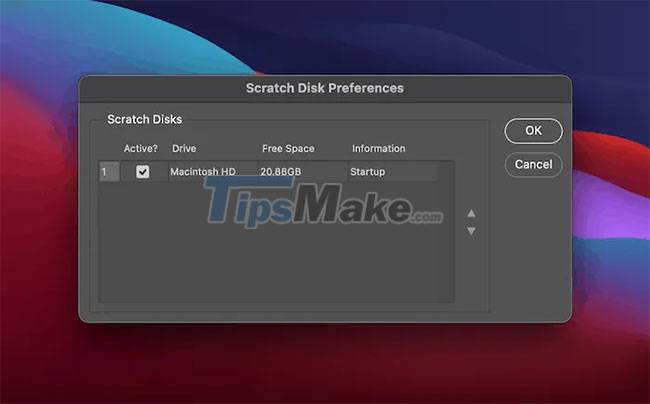
Here, select a more suitable drive and click OK to save the changes. You should choose the fastest drive with the most free space available.
4. Reset Photoshop options
If the system is affected by a problem when using Photoshop, this may corrupt the preferences file. This can affect the space allocation for the scratch disk and display the "Scratch Disks Are Full" error.
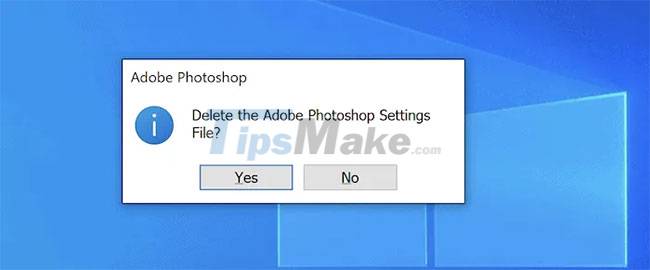
To solve this, you need a two-pronged attack. First, remove the options. There are a few ways to do this. The simplest is to hold down a key combination when you launch Photoshop:
- macOS: Command + Option + Shift
- Windows: Control + Alt + Shift
This will bring up a small dialog box asking if you want to delete the preferences file.
You can also use the Preferences screen to delete files. For macOS, go to Photoshop > Preferences > General and for Windows, go to Edit > Preferences > General .
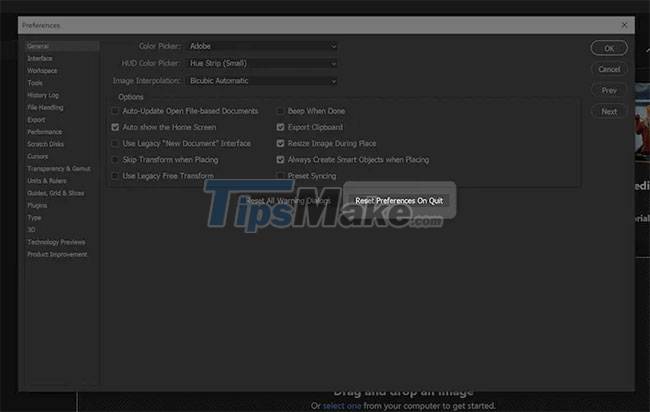
Here, select Reset Preferences on Quit , then click OK to confirm. You will not be able to change the selection and the preferences file will be recreated on the next launch.
Note that you can also reset the options manually, which is the most 'complete' method according to Adobe. You should exit Photoshop before trying this, and if you're on a Mac, find a way to show hidden files.
Next, access the following path on your computer.
- Windows
Users/[yourusername]/AppData/Roaming/Adobe/Adobe Photoshop [version]/- macOS
Users/[yourusername]/Library/Preferences/From this location, drag the 'Adobe Photoshop [version] Settings' folder to another location, then open Photoshop. This will reset your preferences, then recreate the required file.
Good luck with your troubleshooting!
Was this article helpful?
Your feedback helps us improve.
Related Articles
 How to fix Scratch Disks Are Full error in Photoshop7 minutes read
 How to fix Scratch disk in Photoshop on Windows 106 minutes read
 Points to know about the new Scratch 3.0 version6 minutes read
 Basic Scratch tutorial for beginners4 minutes read
 Link Download Scratch 4615 minutes read
 Adobe Photoshop full version officially launched on iPad, fully functional and Apple Pencil compatible2 minutes read
Reader Comments 0
Sign in with email or Google to join the discussion.