Instructions for fixing 100% Full Disk error on Windows 10
Many Windows 10 users get a 100% Full Disk error similar to Windows 8 / 8.1. Moreover, just how hard is the HDD, SSD is not, how to fix the Full Disk error on normal HDD devices?
Table of Contents
In recent days, there have been many cases where Windows 10 users have a 100% Full Disk error similar to Windows 8 / 8.1. And most of these errors appear on hard drive - HDD computers, with SSDs not seeing this phenomenon. So what to do to solve this error on machines using normal HDD? TipsMake.com will guide you how to fix this 100% Full Disk error on Windows 10 below.
- Read the article to fix 100% Full Disk error on Windows
Method 1: Customize virtual memory Virtual Memory:
How to do the same as with previous Windows versions, right-click This PC> Properties (1)> Advanced system settings (2)> select the Advanced tab (3)> Settings (4)> select the Advanced tab ( 5)> click the Change button (6):
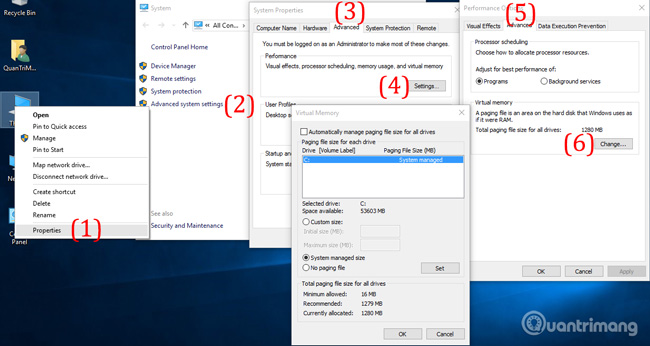
Uncheck Automatically manage paging fie for all drivers and set yourself to Custom size :

For example, for computers with 4GB of RAM, you can set 1000 - 4000 , and if you have more RAM, raise the Maximum size ( 2000 - 6000 or 3000 - 6000 for example).Then click Set and OK, restart the computer and check if the 100% error condition has been resolved.
Method 2: Turn off Superfetch service:
If you do the above way but the phenomenon of 100% Full Disk still exists, try this way.Open Windows Services (click start> type services.msc ) and find the Superfetch service:

Right-click the Superfetch service and select Stop , then go to the Properties of the service and change the settings as shown below:
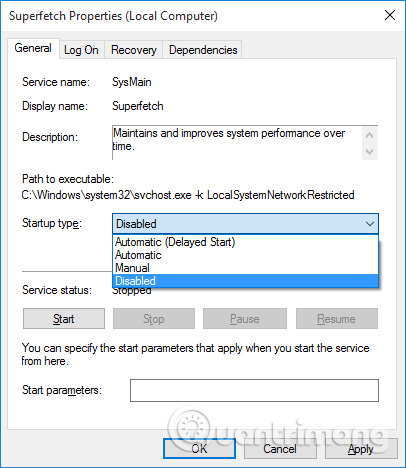
Select Disabled instead of Automatic . Restart the computer and . Boom, the problem of 100% Full Disk has been resolved. Good luck!
Was this article helpful?
Your feedback helps us improve.
Related Articles
 Fix 100% Full Disk error on Windows with the following 14 tips9 minutes read
 Instructions on 3 ways to fix Full Disk error 100% on Windows most effectively3 minutes read
 5 steps to fix 100% Full Disk error on Windows3 minutes read
 How to create disk full BAT file repair Windows 106 minutes read
 12 steps to fix Full Disk error 100% on Windows 1011 minutes read
 Fix Full Disk error 100%, 99% on Windows20 minutes read
Reader Comments 0
Sign in with email or Google to join the discussion.