Photoshop for everyone: Create a sea scene
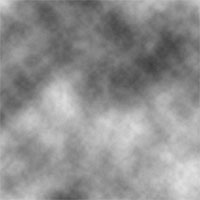
- Open a new document - Press D to get the color as default (black / white) - Choose Filter - Render - Clouds, get the results shown in Figure 1- Select Filter - Stylize - Find Edges- Choose Image -.
 (Figure 1)
- Open 1 new document
- Press D to get the default color (black / white)
- Select Filter - Render - Clouds, as shown in Figure 1
- Choose Filter - Stylize - Find Edges
- Choose Image - Adjustments - Levels with parameters:
+ Channel: RGB
+ Input Levels: 0, 2.90, 255
+ Output Levels: 0, 255 - Figure 2.
- Choose Image - Adjustments - Hue / Saturation to adjust the color:
+ Edit: Master
+ Hue: 36
+ Saturation: 100
+ Lightness: 0
+ Click the Colorize button - Figure 3.
- Click OK, we get the result as shown in Figure 4.

Figure 2

Figure 3
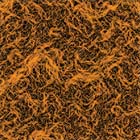
Figure 4
Lam Khe