Draw birds catching prey
In this exercise we only use the Bezier Tool, Shape Tool and the coloring tool of Corel Draw. The drawing of prey bird consists of 3 steps with 16 movements as follows.
In this exercise we only use the Bezier Tool tool, Shape Tool and the coloring tool. The drawing of prey bird consists of 3 steps with 16 movements as follows :
Step 1 : Draw the grass
- Select the Bezier Tool to draw. Use the Shape Tool to adjust the nodes to look like grass.
- Draw a few more stems placed on the right or left side of the grass.
- Color green grass, arbitrarily colored flowers (pictures 1, 2).
Step 2 : Draw the bird
- This is the hardest part, we have to draw three parts: belly; tail, back and head; foot.
- Draw the abdomen first, so that we can easily draw in the horizontal direction.
- The way to draw is the same as step 1, still use the Bezier Tool then use the Shape Tool to adjust it to fit, then paint 10% to 20% black, press Delete to delete the lines (Figure 3 ).
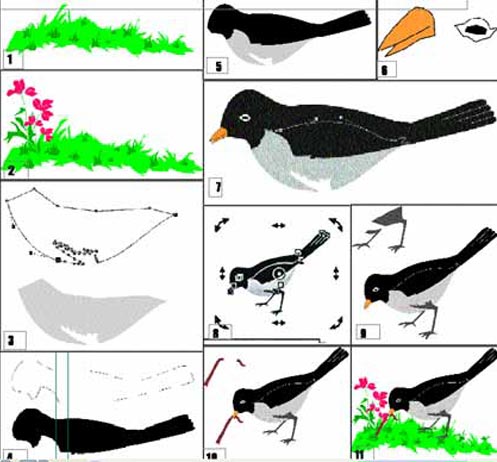
- Draw the back and the head, black (figure 4, 5).
- Draw eyes and bird beaks.
- Bird beak colored according to the formula M: 40%, Y: 80%, fill the border of the black beak (Figure 6).
- Draw a few more lines in the tail, draw a curve from the bottom to the neck to create bird wings (Figure 7).
- These roads are white.
- Group these parts rotate about 30 degrees (Figure 8).
- Draw the legs, for the legs under the abdomen (Figure 9).
Step 3 : Draw the bait
Bait is a earthworm
- We draw two parts, one part below the upper mine, and the second part is on the lower mine. To give the bird a sense of bait (figure 10).
- Fill the earth with brown soil.
- Sort the steps again, we get the result as shown in Figure 11.
Lam Khe