4 ways to change user account type in Windows
In addition to creating multiple users, Windows 10 also allows you to limit what others can do on the shared PC, by providing multiple account types, specifically standard user accounts and admin accounts.
If you have created multiple user accounts to share your computer, you may want to change the account type for other users from Administrator to standard user to restrict their access. The following article will guide you through the steps to do this on both Windows 10 and 11.
Difference between standard user and administrator on Windows
The Administrator account gives you unrestricted access to everything on the system. On the contrary, you cannot use the Standard account to manage system files or install any new applications on your computer.
The differences between Standard and Administrator accounts don't stop there. Existing programs that require admin rights also cannot be operated using a Standard account. You can't adjust any settings that affect your entire PC, like creating a new user account.
When you share your PC with others, it makes sense for these restrictions to apply. Of course, if you trust them enough, you can also grant admin rights to their Windows 10 or 11 account.
By default, any additional users you create in Windows are standard accounts. It's easy to check if a Windows account has admin rights or not. However, as long as you're logged in as an administrator, you can grant advanced permissions by changing the account type.
1. Change account type on Windows from Settings
The Settings app has become the destination for personalizing your computer. It gives you access to most of the basic settings you need, unlike the Control Panel, which can overwhelm new users. So this is the method most people prefer to change the account type.
Follow the steps below on a PC running Windows 10. If your PC runs Windows 11, you can skip to the next tutorial:

Step 1: Press Windows key + I to open Settings.
Step 2: Next, go to Accounts > Family & other users .
Step 3: Look under Other users and select the account for which you want to change permissions. Now, click Change account type .
Step 4: You will receive a pop-up window on the screen displaying the current permissions of the selected user account. Click on it and select Administrator or Standard User to make changes accordingly.
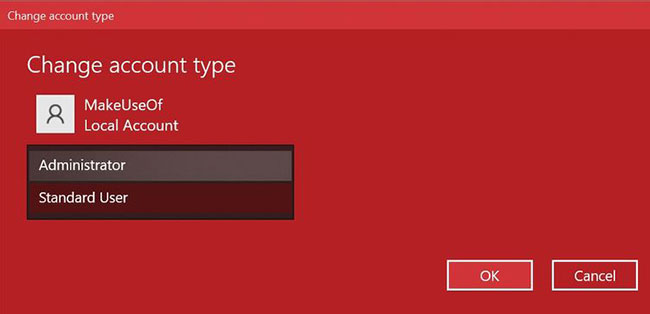
Make sure to click OK to apply these changes. Now, you can log in to this account without losing admin rights. Pretty simple, right?
The steps you have to follow on a Windows 11 PC are similar, but the user interface of the Settings app will be a bit different. Here's what you need to do:
- Press Windows + I on your keyboard or search for "Settings" to launch it.
- Select Accounts from the left sidebar. Then, scroll down and click Other users on the right.
- Click the drop-down menu next to local account to access more options and select Change account type .
- When you get the pop-up window, click the drop-down menu under Account type , then choose between Administrator and Standard User .

If the other account is part of your family group, you'll need to go to Settings > Accounts > Family instead of Other users and repeat the remaining steps to do the same. Also, consider performing fixes if you cannot set your Windows account as Administrator.
2. Switch account groups in Windows using Netplwiz
Netplwiz is a dedicated control panel for managing all user accounts on a computer. It is a system executable file that can only be accessed if you are logged in as admin. Back in the days when there was no dedicated Settings app for Windows devices, Netplwiz was a popular choice for switching between account groups, i.e. standard users and admins.

Step 1: Enter netplwiz in the Start menu search field and click on the most suitable result to open the User Accounts panel later. Here you will be able to see all your user accounts. Select the one for which you want to change privileges, then click Properties.
B2: Now, go to the Group Membership section and you will find available account groups. Click on your desired selection and select Apply.

Unlike the Settings app, Netplwiz will display a third option that helps expand account types. These are very specific permissions that you want to grant to other users.
For example, you can select the Power Users option , which gives the account limited administrative rights. Or, you can choose Guest if you want Windows to restrict them even more than standard users.
3. Switch Windows account type from Control Panel
Control Panel has been an indispensable part of Windows devices for a long time. That was the de facto settings panel for Windows computers until there was a dedicated Settings app in Windows 10.
Control Panel still has its place, as you can use it to make advanced system-level changes that the Settings app currently cannot accomplish. Follow these instructions to learn how to change your old account type to the old style:
Step 1: Enter control panel in the Start menu search bar and select the most suitable result.
Step 2: Select Change account type (this option has a shield icon).
Step 3: Next, select the account you want to change permissions for. You will have many options for the selected account. Click Change the account type to continue.
Step 4: Here, choose one of the two available options, then select Change Account Type to apply the changes.

You may be familiar with all of these menu items if you have used older versions of Windows. But anyway, it's a simple process.
4. Use Command Prompt to change account type in Windows
Command Prompt, also known as CMD, is the built-in command line interpreter on Windows PCs.
With the right CMD commands, you can perform a variety of tasks on your computer. The program is essentially a programmer's paradise, but you don't need coding skills to change the account type with a simple command line. These two steps are all you need to keep in mind.
Step 1: Enter command prompt in the Start menu search bar. Select Run as administrator instead of launching directly.
Step 2: To change the account type to admin, enter the following command and press Enter.
net localgroup administrators [USERNAME] /addStep 3: To switch back to the standard user, use this line of code instead and press Enter on the keyboard.
net localgroup administrators [USERNAME] /del
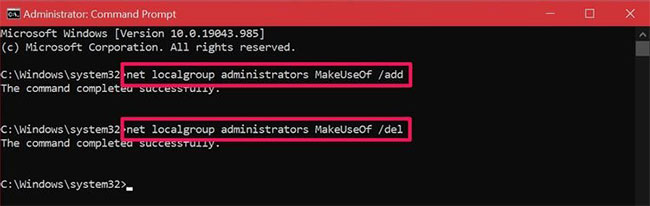
If you get an error stating access denied when executing the command, it indicates that you are not running CMD with admin rights. As long as you know this command, you don't have to mess around with system menus like other methods. Hope you can get the hang of it quickly!
- Guide 5 ways to delete User accounts on Windows 10
- How to determine the type of account in Windows 10
- How to change user account picture in Windows 11
- How to Change User Account Name in Windows 10
- 3 How to change the user account picture on Windows 11
- How to change user accounts in Ubuntu Bash Shell Windows 10
- Steps on how to create a local user account in Windows 10
- How to automatically log in to a user account on Windows 11/10
- How to change the account name, account name in Windows 10
- Instructions for changing username on Windows 10
- Install CentOS on Windows 10 WSL
- What is the USO Core Worker Process or usocoreworker.exe? Are they viruses?
- How to exclude files and folders with Robocopy in Windows 10
- Fixed a bug with C drive with yellow exclamation on Windows 10
- How to disable SMB3 in Windows 10
- 3 ways to remove a Windows 10 computer from a domain that no longer exists
- How to create a yellow circle around the mouse cursor on Windows
- How to open the camera on laptop Windows 7/8/10
- How to change the Start button on Windows 10
- How to install Owncloud server on Windows 10 (WSL)
-
 Is your Copilot account temporarily suspended? Here's how to recover it.
-
How to permanently delete your Facebook account on your phone and computer.
-
How to unlock your Acer laptop quickly and effectively when you forget your password.
-
How to download Office 365 for free for life, with automatic renewal.
-
How to unlock a laptop safely and easily after forgetting the password.
-
Quick guide to registering for Garena on a computer
 Is your Copilot account temporarily suspended? Here's how to recover it.
 How to permanently delete your Facebook account on your phone and computer.
 How to unlock your Acer laptop quickly and effectively when you forget your password.
 How to download Office 365 for free for life, with automatic renewal.
 How to unlock a laptop safely and easily after forgetting the password.
 Quick guide to registering for Garena on a computer