Table of Contents
This guide provides a clear overview of windows 11, including 1. How to Disable UAC on Windows 11 Using Control Panel, 2. How to Turn Off User Account Control with Registry Editor. Use it to understand the topic, compare the available options, and make a more informed decision.
However, the frequent UAC prompts that pop up can be annoying when you're trying to troubleshoot software or other problems on your PC. If you need to temporarily disable the UAC prompt, here's how you can disable it on Windows.
1. How to Disable UAC on Windows 11 Using Control Panel
You can disable the User Account Control prompt from the classic Control Panel. From here, you can not only turn off UAC, but you can also configure and choose when to receive notifications about changes to your computer.
To turn off User Account Control using Control Panel:
1. Press Win + R to open Run.
2. Type control and click OK to open the Control Panel.
3. In Control Panel, click User Accounts.
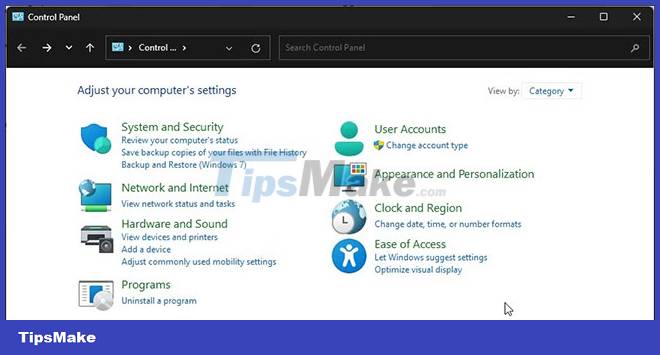
4. Click User Accounts again.
5. Next, click Change User Account Control settings .

6. By default, User Account Control is set to only notify you when applications try to make changes to the computer.

7. To disable this feature, drag the slider all the way to the bottom and set it to Never notify.
8. Click OK to save the changes. Click Yes if last prompted by UAC.
Note that when you disable UAC, Windows won't notify you if an application tries to install software or make any changes to the computer. Also, the prompt won't appear when you try to make changes to your PC.
If you need to re-enable UAC, open User Account Control settings and set the slider to the second level (notify me only when the app tries to make changes to the computer).
Note that if you're trying to make changes from a non-admin account, you'll need to enter your admin password to disable or enable UAC.
2. How to Turn Off User Account Control with Registry Editor
You can also use Registry Editor and modify system policies to disable User Account Control on your Windows computer. Here's how to do it.
Note that modifying registry entries is risky. Incorrect modifications can cause your system to fall into an unbootable state. Make sure to create a system restore point before continuing with the steps below.
1. Press Win + R to open Run.
2. Type regedit and click OK to open Registry Editor. Click Yes if prompted by UAC.
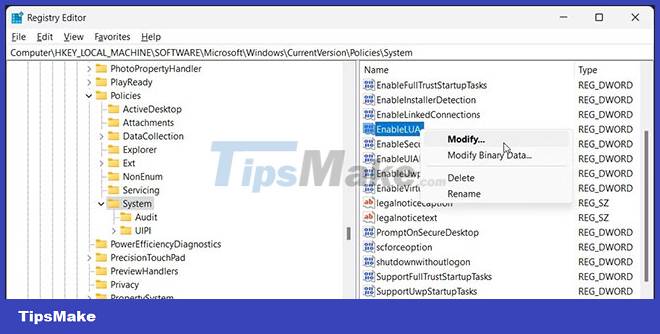
3. In Registry Editor, navigate to the following location. You can also copy and paste the following path into Registry Editor:
ComputerHKEY_LOCAL_MACHINESOFTWAREMicrosoftWindowsCurrentVersionPoliciesSystem4. In the right pane, locate and right-click the DWORD EnableLUA value.
5. Select Modify.
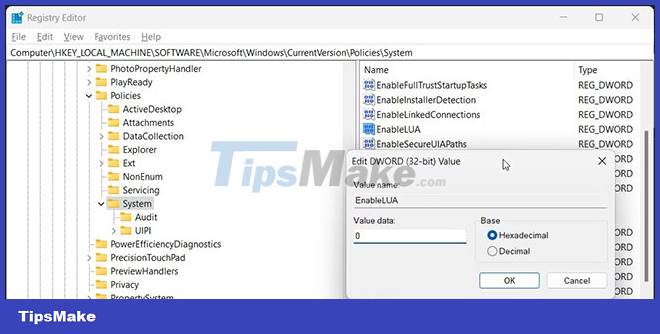
6. Enter 0 in the Value data field and click OK to save the changes.
7. Restart your computer to apply the changes.
8. To enable UAC, modify the DWORD EnableLUA value and set it to 1 . Click OK to save the changes.
3. How to Disable User Account Control with Command Prompt
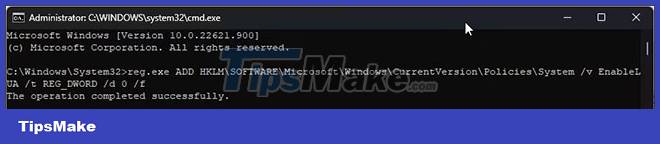
If you need to turn UAC on and off frequently, you can modify the registry entry using the Command Prompt. Make sure to open the command in Command Prompt with admin rights to avoid any errors.
To turn off UAC using Command Prompt:
1. Press the Win key and type cmd.
2. Right click on Command Prompt and select Run as administrator .
3. In the Command Prompth window, type the following command and press Enter :
reg.exe ADD HKLMSOFTWAREMicrosoftWindowsCurrentVersionPoliciesSystem /v EnableLUA /t REG_DWORD /d 0 /f4. The above command makes the same modifications as you did with the Registry Editor before. It modifies the DWORD EnableLUA value and sets it to 0 . Once done, restart your PC to apply the changes.
If you need to re-enable User Account Control, execute the following command:
reg.exe ADD HKLMSOFTWAREMicrosoftWindowsCurrentVersionPoliciesSystem /v EnableLUA /t REG_DWORD /d 1 /fAs you can see, the above command has the value of d set to 1 . This will enable UAC through the Registry Editor.
4. Turn Off User Account Control Via Group Policy Editor
If you need to disable UAC for multiple computers over the network, it is better to use the admin capabilities of the Group Policy Editor. This is how you can disable UAC using gpedit.
Note that Group Policy Editor is only available on Windows Pro, Edu and Enterprise versions of the operating system. If you use Home edition, follow these steps to enable gpedit on Windows Home.
Next, follow these steps to disable UAC using the Group Policy Editor:
1. Press Win + R to open Run.
2. Type gpedit and click OK to open the Group Policy Editor.
3. In the Group Policy Editor, navigate to the following location:
Local Computer Policy > Computer Configuration > Windows Settings > Security Settings > Local Policies4. Next, click Security Options.
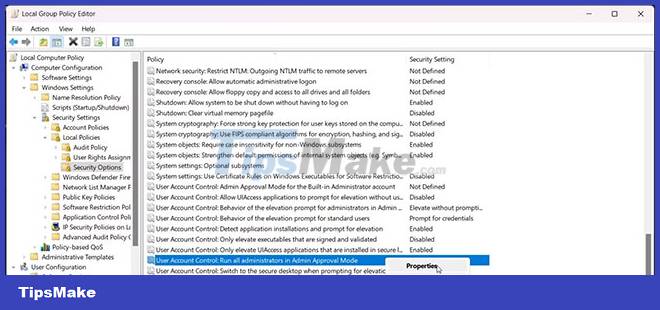
5. In the right pane, locate and right click on User Account: Run all administrator in Admin Approval Mode .
6. Select Properties.
7. In the Properties dialog box, select Disabled.

8. Click Apply > OK to save the changes.
9. Similarly, if you need to re-enable UAC, set the User Account: Run all administrators in Admin Approval Mode policy to Enabled. Click Apply > OK to save the changes.
Conclusion
Understanding Windows 11 makes it easier to compare options, avoid common mistakes, and apply the information in this guide more effectively. Review the relevant requirements before making changes or choosing a solution.
FAQ
What is Windows 11?
By default, User Account Control is set to only notify you when applications try to make changes to the computer.
Why is Windows 11 important?
Understanding Windows 11 helps you evaluate features, compatibility, performance, and potential limitations before you choose a product or follow a procedure.
What should you consider when using or choosing Windows 11?
Consider your specific goal, compatibility requirements, available features, cost, security, and the practical recommendations described in this guide.
Related Articles
 How to Turn Off Notifications of User Account Control in Windows?3 minutes read
 How to Disable User Account Control (UAC) on Windows3 minutes read
 Click: How to Turn Off User Account Control (Uac) Notifications4 minutes read
 Click: How to Turn Off User Account Control in Windows 75 minutes read
 Turn Off the Administrator Account in Windows 73 minutes read
 Guide 5 Ways to Delete User Accounts on Windows 106 minutes read
Reader Comments 0
Sign in with email or Google to join the discussion.