Word 2013 Complete Guide (Part 3): How to store and share documents
When creating a new document in Word, you'll need to know how to save the document to be accessible and edited later. As with previous versions of Word, you can easily save files on your computer
Table of Contents
In addition, if you want, you can also save the file to the cloud service using OneDrive .You can even export and share documents directly from Word .
See more videos: Instructions on how to save and share Word documents
OneDrive was formerly called SkyDrive . There is basically no difference in the way OneDrive works - it's just a new name that is set for an existing service. In the next few months, you can still see SkyDrive in some Microsoft products.
A. Save and Save As
Word provides users with two options to save any file: Save and Save As . In general, these two options work similarly, except for some important settings.
- Save : When creating or editing any document, you will use the Save command to save the changes. In most cases you will use this command. When saving a file, the first step is to just name the file and find the location to save the file. After completing the editing process, click the Save command to save the file on the same location and the same name.
- Save As : Use this command to create a copy of the document while keeping the original. And when using the Save As command you will have to put another title and find another location to save the copy.
I. Save a document
Whenever you open a new project or make some changes on your Word document, the most important thing is to save the document. Keeping documents as early and often will help you no longer have to worry about losing documents. In addition, you should also pay attention to the location of the document to be able to find and open documents more easily.
1. Navigate and select the Save command on the Quick Access Toolbar .

2. If the first time you save the file, the Save As window will display on the Backstage view .
3. The next step you need to do is to select the location to save the file and name the file . Click Browse to select a location to save the file on your computer or you can click OneDrive to save the file on OneDrive.

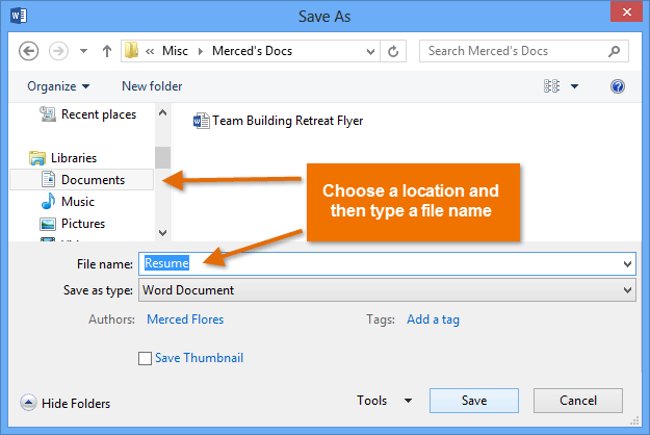
4. Now the Save As dialog box will appear. Please select the location where you want to save the document.
5. Name the file and then click Save .
6. Documents will be saved. You can click the Save command again to save the edit on the document. In addition, you can access the Save command by pressing Ctrl + S.
II. Use Save As to create a copy
If you want to save the document to another version while keeping the original, you can create a copy . For example, if your file is called Sales Report , you can save the copy as Sales Report 2 and you can optionally edit the document on the new version that the original remains.
To do this, click the Save As command on the Backstage view. And take the same steps as when you save a file, select the location to save the file and name the new file.

III. Change the location to save the default file
If you don't want to use OneDrive , because the OneDrive is selected as the default storage location, you can change the default storage location to Computer .
1. Click the File tab to access the Backstage view.

2. Click to select Options .

3. The Word Options dialog box will appear on the screen. Select Save in the left pane, then check the box next to the Save to Computer by default option. Click OK and the default storage location will be changed.

B. AutoRecover
Word 2013 automatically saves the document to a temporary folder while you use the Word document. If you accidentally forget to save the changes on the document or if Word is suspended, then you can restore the file using AutoRecover .
Use AutoRecover:
1. Open Word 2013 up. If the autosaved version of the file is found, the Document Recovery panel will appear in the left pane.
2. Click Open to open the available files. And your document will be restored.

By default, Word will automatically save every 10 minutes . If you edit a document in less than 10 minutes, Word may not create an autosaved version.
- If you can't find the file you need, you can browse all autosaved files from the Backstage view . Select the File tab, then click Manage Versions, then click Recover Unsaved Documents .

C. Export the document
By default, Word documents will be saved in .docx file format. However, in some cases you may need to use other file formats, such as PDF or Word 97-2003 documents . The easiest way is to export your documents from Word to other available file formats.
I. Export documents in PDF format
Exporting your document as an Adobe Acrobat document, also known as a PDF file, is especially useful in the case of sharing a file for any user who does not use Word. A PDF File will allow recipients to view - but not edit - the content of the document.
1. Click the File tab to access the Backstage view.
2. Select Export then select Create PDF / XPS .

3. At this time, the Save As dialog box will appear. Select the location where you want to save the exported document, place any name you want and click Publish .

By default, Word will export all pages in the document. If you only want to export the current page, click Options in the Save As dialog box. The Options options dialog box will appear. Select Current page , then click OK to finish.

If you want to edit a PDF file, Word allows you to convert a PDF file to an editable document . Let's take a look at the article How to convert PDF files to Word simply, without our font errors to learn more.
II. Export documents to another file format
In addition, you can export documents to other file formats, such as Word 97-2003 documents in case you want to share with other users who are using older versions of Word, or into .txt file if your document is plain-text .
1. Click the File tab to access the Backstage view.
2. Select Export , then select Change File Type .

3. Select a file format then click Save As .

4. On the screen, the Save As dialog box will appear. Select any location you want to save the exported document, put a name and click Save .

In addition, you can use Save as type : drop-down menu in the Save As dialog box to save the document into different file formats.

D. Share documents
Word 2013 allows users to easily share and collaborate on documents using OneDrive. Previously, if you wanted to share a file for other users, you would have to attach that document file in the email. Although convenient, the system also creates multiple versions of the same file, which is difficult to sort.
When sharing documents from Word 2013, you are actually allowing others to access the same file correctly. This allows you and the people you share to edit the same document without tracking multiple versions.
To share documents, the first step you need to take is to save the document on OneDrive .
Share documents:
1. Click the File tab to access the Backstage view, then click Share .

2. The Share window will appear. Click on any Share option to share your document.

Having fun!
Was this article helpful?
Your feedback helps us improve.
Related Articles
 Word 2013 Complete Guide (Part 11): How to create hyperlink links4 minutes read
 Word 2013 Complete Guide (Part 10): Bullets, Numbering, Multilevel list in Microsoft Word9 minutes read
 Complete guide Word 2016 (Part 2): Get familiar with OneDrive, create, save and share documents15 minutes read
 Word 2013 Complete Guide (Part 8): Using Indents and Tabs9 minutes read
 Word 2016 Complete Guide (Part 25): How to check and protect Word documents3 minutes read
 Complete guide Word 2016 (Part 1): Familiarize yourself with the Ribbon interface8 minutes read
Reader Comments 0
Sign in with email or Google to join the discussion.