Learn about Windows Server 2012 (Part 3)
On Windows Server 2012, you can install a Role or Feature on a Virtual Hard Disk that contains the inactive Windows Server installation.
1. Configure Windows Firewall
Some administrators often control Windows Firewall through setting up Group Policy , but for some other Firewall you have to configure it in the usual way (especially small firewalls).
If you need access to Windows Firewall you can access it by opening Server Manager and then selecting Windows Firewall with Advanced Security on the Tools Menu, as shown below.

2. Add Roles and Features
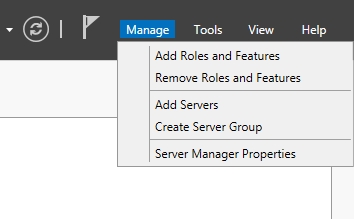
The process of adding a Roles and Features on Windows Server 2012 is relatively simple, not complicated. The easiest way is to open Server Manager and then select the Add Roles and Features command on the Manage Menu as shown below.

Do this so that Windows launches the Add Roles and Features Wizard .
In some cases, using the Wizard on Windows Server 2012 is similar to previous versions of Windows Server, but there are some differences.
When the Wizard starts, click Next to bypass the Welcome screen. On the next screen you will see a request if you want to install Remote Desktop Services or if you want to install a Role or a Feature .
Unless you are configuring the server to run Remote Desktop services, you select the Role Based or Feature Based Installation option . Click Next to continue.
On the next screen you will see some differences of Windows Server 2012 compared to previous versions of Windows Server.
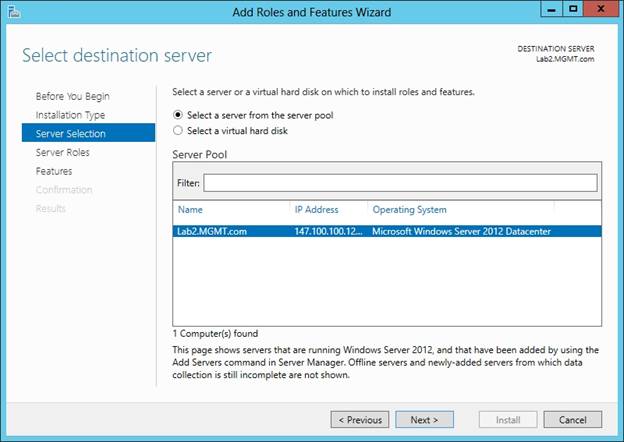
On this screen you will be asked where you want to install Role or Feauture. Although this is a seemingly simple question, the Wizard will give you a few different options, as shown in the illustration below.

In earlier versions of Windows Server it was assumed that if you installed a Role or a Feature, then you performed the installation on the local server (Local Server).
Windows Server 2012 still allows you to perform Role and Feature installation at the local server.
Simply click Next on the screen above, then the Wizard will assume that the Role or Feature you choose will later be installed on the local server (Local Server). Although this installation is the default, it is not the only option.
In Windows Server 2012, Server Pool is simply a collection of servers managed through Server Manager . Any other server is not added to the created Pool Server.
If you add any additional servers to the Server Pool, the server will appear directly under the currently selected server.
Other options that appear on the captured screen are optional to select a Virtual Hard Disk. On previous versions of Windows Server, you need to install Role and Feature on a working copy of Windows.
On Windows Server 2012, you can install a Role or Feature on a Virtual Hard Disk that contains the inactive Windows Server installation.
When you click Next , you will see a screen showing all the different server roles you can install.
On Windows Server 2008, there is not only a Server Role list. When you make a selection, click Next , and the Feature interface will appear on the screen. Here you can choose the features you want to install.
When you click Next again, you will see a confirmation screen that provides information about the feature you installed. Finally click Install to perform the installation.
3. Add Server to the Server Pool
In the previous section, I mentioned that on Windows Server 2012 you can add a server (server) to the Server Pool to manage servers through Server Manager.
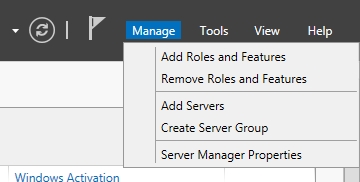
If you want to add additional servers to the Server Pool, open Server Manager and then select the Add Server command from the Menu Manage as shown below:

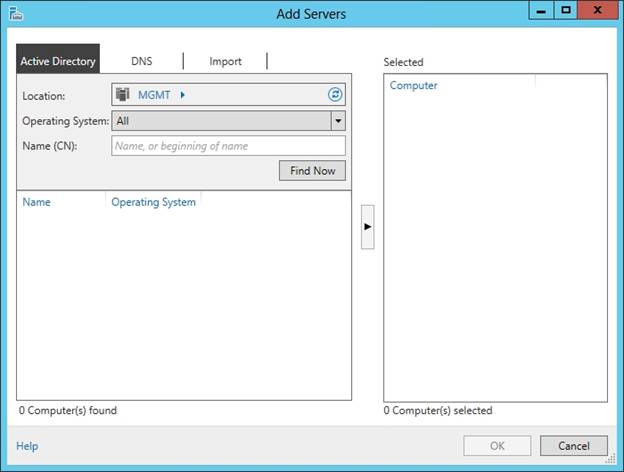
When you do, on the screen you will see the dialog box shown below:

As you can see in the figure, Windows provides three different ways to add servers to the Server Pool.
In most cases, you can use the Active Directory tab. This tab allows you to specify the computer name that is registered in the Active Directory database. You can see in the image above, Windows gives you the option of specifying the location of the computer, and you can even filter the search results of the operating system.
Another option is to identify computers with the full Domain name or IP address. You can do this via the DNS tab. The DNS tab is quite useful for adding existing computers on your network, but that computer is not in Active Directory .
Finally, the Import tab is used to import large numbers of computers. This method allows you to add all computers to a file, then import files instead of having to enter each computer one by one. After adding, the servers in the Pool will be accessed via Server Manager , as shown below.

You can refer to some of the following articles:
-
10 new features in Windows Server 2012
-
Learn about Windows Server 2012 (Part 1)
-
Learn about Windows Server 2012 (Part 2)
Good luck!