How to initial setup Windows Server 2019
After downloading and installing Windows Server 2019, you will go to the initial setup process. Let's find out details through the following article!
Table of Contents
Add local users
Step 1. Run PowerShell with admin rights and configure the following:
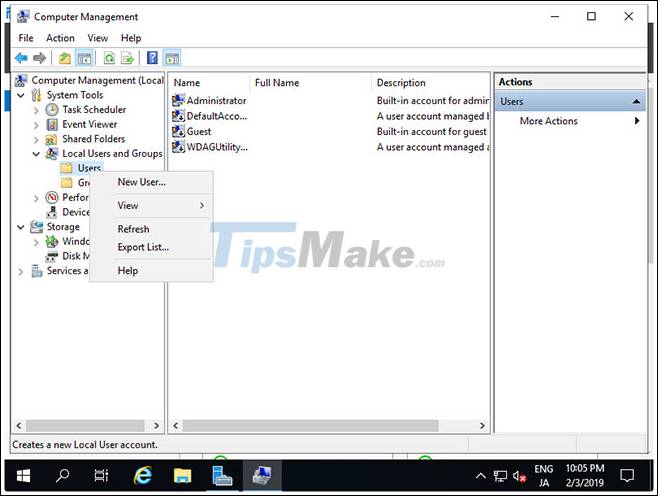
Windows PowerShell Copyright (C) Microsoft Corporation. All rights reserved. # for example, add [Serverworld] user # [P@ssw0rd01] ⇒ the password you set (replace it you like) # [PasswordNeverExpires] ⇒ set password never expire(if set default expiration, do not specify this option) PS C:UsersAdministrator> New-LocalUser -Name "Serverworld" ` -FullName "Server World" ` -Description "Administrator of this Computer" ` -Password (ConvertTo-SecureString -AsPlainText "P@ssw0rd01" -Force) ` -PasswordNeverExpires ` -AccountNeverExpires Name Enabled Description ---- ------- ----------- Serverworld True Administrator of this Computer # add [Serverworld] user to [Administrators] group PS C:UsersAdministrator> Add-LocalGroupMember -Group "Administrators" -Member "Serverworld" # verify PS C:UsersAdministrator> Get-LocalUser -Name Serverworld Name Enabled Description ---- ------- ----------- Serverworld True Administrator of this Computer PS C:UsersAdministrator> Get-LocalGroupMember -Group "Administrators" ObjectClass Name PrincipalSource ----------- ---- --------------- User RX-7Administrator Local User RX-7Serverworld Local # if remove an user, do like follows PS C:UsersAdministrator> Remove-LocalUser -Name "Serverworld" Step 2. Run Server Manager and open Tools> Computer Management .

Step 3. Right-click on Users under Local Users and Groups on the left and select New User.
Step 4. Enter the Username and Password for the new user, then click the Create button . Other items are optional for setup.

Step 5. Once created, the new user is displayed on the list as follows.

Step 6. If you want to set admin rights for the new user, right click on the user and open Properties .

Step 7. Scroll to the Member of tab and click the Add button .

Step 8. Assign the Administrators group as follows.

Step 9. Make sure that the Administrators group is added to the list and click the OK button to complete the installation.

Change admin username
If you want to change the admin account name for some reasons such as security, you can change it as follows.
Step 1. Run PowerShell as admin and configure as follows:
Windows PowerShell Copyright (C) Microsoft Corporation. All rights reserved. # for example, change the name [Administrator] to [ServerworldAdmin] PS C:UsersAdministrator> Rename-LocalUser -Name "Administrator" -NewName "ServerworldAdmin" PS C:UsersAdministrator> Get-LocalUser # changed Name Enabled Description ---- ------- ----------- DefaultAccount False A user account managed by the system. Guest False Built-in account for guest access to the computer/domain Serverworld True Administrator of this Computer ServerworldAdmin True Built-in account for administering the computer/domain sshd True WDAGUtilityAccount False A user account managed and used by the system for Windows Defender Application Guard scen.Step 2. Run Server Manager and open Tools> Computer Management .
Step 3. Open Local Users and Groups> Users on the left and right-click on Administrator , then select Rename on the right. Then, change to whatever name you like.

Step 4. Admin name has been changed.

Change the computer name
The computer name is automatically assigned by default, so please change it.
Step 1. Run PowerShell as admin and configure as follows:
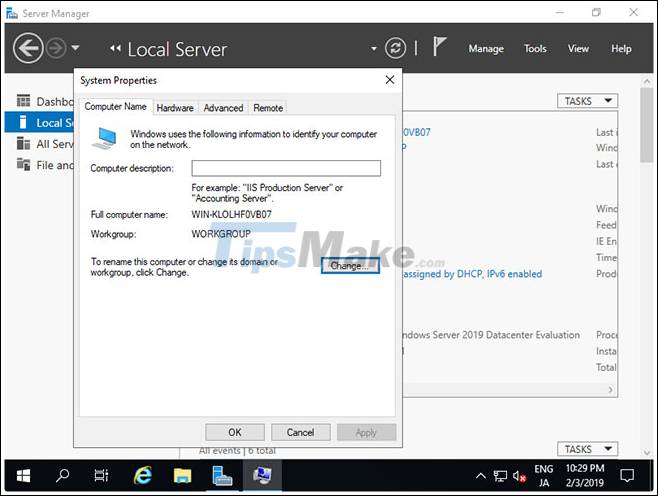
Windows PowerShell Copyright (C) Microsoft Corporation. All rights reserved. # for example, change Computer Name to [RX-7] PS C:UsersAdministrator> Rename-Computer -NewName RX-7 -Force -PassThru HasSucceeded OldComputerName NewComputerName ------------ --------------- --------------- True RX-7 RX-9 WARNING: The changes will take effect after you restart the computer RX-7. # for example, change Primary DNS Suffix to [srv.world] PS C:UsersAdministrator> Set-ItemProperty "HKLM:SYSTEMCurrentControlSetServicesTcpipParameters" –Name "NV Domain" –Value "srv.world" -PassThru NV Domain : srv.world PSPath : Microsoft.PowerShell.CoreRegistry::HKEY_LOCAL_MACHINESYSTEMCurrentControlSetServicesTcpipParameters PSParentPath : Microsoft.PowerShell.CoreRegistry::HKEY_LOCAL_MACHINESYSTEMCurrentControlSetServicesTcpip PSChildName : Parameters PSDrive : HKLM PSProvider : Microsoft.PowerShell.CoreRegistry # restart Computer to apply changes PS C:UsersAdministrator> Restart-Computer -Force # verify PS C:UsersAdministrator> (ipconfig /all)[0.9] Windows IP Configuration Host Name . . . . . . . . . . . . : RX-7 Primary Dns Suffix . . . . . . . : srv.world Node Type . . . . . . . . . . . . : Hybrid IP Routing Enabled. . . . . . . . : No WINS Proxy Enabled. . . . . . . . : No DNS Suffix Search List. . . . . . : srv.worldStep 2. Run Server Manager and select Local Server on the left, and then click the Computer Name section on the right.

Step 3. Navigate to the Computer Name tab and click the Change button .
Step 4. Enter any computer name you like in the Computer Name field and click the More . button .

Step 5. Enter the domain name that this computer belongs to.

Step 6. A restart of the computer is required to apply the changes.

Step 7. The computer name is changed to normal.

Was this article helpful?
Your feedback helps us improve.
Related Articles
 Steps to initially set up a new SSD on Windows 104 minutes read
 Use IIS to set up FTP Server on Windows11 minutes read
 How to install DNS Server on Windows Server 20194 minutes read
 How to set up your own Git server on Linux7 minutes read
 How to setup web based code server in Linux6 minutes read
 7 great ideas using Raspberry Pi as a server6 minutes read
Reader Comments 0
Sign in with email or Google to join the discussion.