Table of Contents
This updated guide examines Learn About Windows Server 2012 (Part 2) and organizes the essential facts, background, and practical takeaways in clear American English.
For example, in a virtual server (server) environment, users or administrators often change the name if the server name (server) (name used by Windows to identify the server - server) does not match the virtual machine name (display name) Marketing in Hyper-V Manager).
1. Rename Server (server)
Although Windows Server 2012 automatically assigns each server a random name. However, Admin, the user wants to change with any name for meaning.
For example, in a virtual server (server) environment, users or administrators often change the name if the server name (server) (name used by Windows to identify the server - server) does not match the virtual machine name (display name) Marketing in Hyper-V Manager).
To rename a Server, you move the mouse pointer to the lower left corner of the screen to display the tile Start.
Right-click on the tile and select System . Now Windows Server 2012 will display the System dialog box. This dialog box is similar to the dialog box on Windows Server 2008 and 2008 R2. You can see as shown below:

Next click on the Change Settings link, Windows will display System Properties. Select the Computer Name tab and then click Change.
Enter the new name you want to change and select OK.
Finally, restart the computer to apply the changes.
2. Assign an IP address to the Server (server)
The process of assigning an IP address to a Server on Windows Server 2012 is similar to that on Windows Server 2008 and Windows Server 2008 R2.
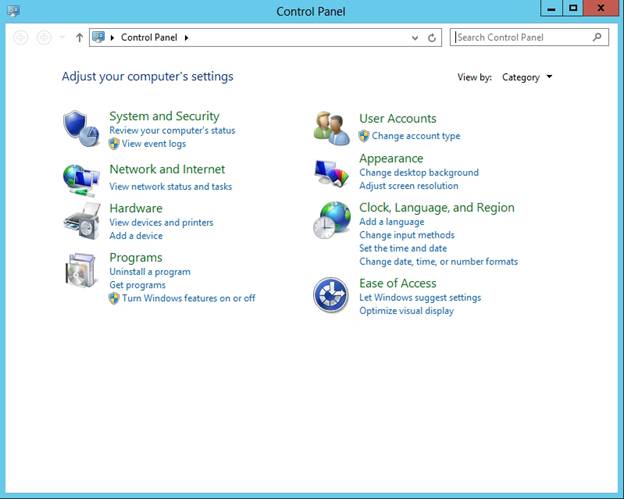
First move your mouse to the lower left corner of the screen to display the tile Start. Right-click on tile Start and select Control Panel.
After the Control Panel opens, click Network and Internet . Next, click on Network and Sharing Center , then select Change Settings Adapter.
At this point, Windows will display a series of Network Adapter. Right-click on the adapter you want to assign an IP address and select Properties .
Scroll through the list of network components and select Internet Protocol Version 4 (/ IPv4 TCP) then click Properties.
Now a new interface will appear on the screen allowing you to enter any Adapter IP address. After you have entered the IP address, click OK.
3. Connect a Server to a Domain
The process of connecting a Server on Windows Server 2012 to an Active Directory Domain is similar to the steps of renaming a Server.
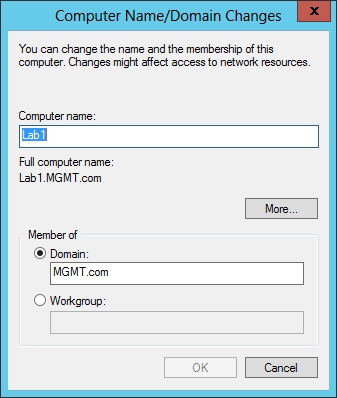
To connect the Server to a Domain, move the mouse pointer to the lower left corner of the screen. Then click on tile Start , select System .
When the System dialog box appears, click Change Settings . Now Server will display System Properties . Select the Computer Name tab and select Change.
When the Windows Displays dialog box for the Computer Name / Domain Change s is displayed on the screen, enter the Domain name and click OK.
Windows will locate the Domain and notify you of the Admin information set. When the domain is connected, you will be prompted to restart the server.
4. Disable Internet Explorer Enhanced Security Configuration
In Windows Server 2012, Microsoft uses a mechanism called Internet Explorer Enhanced Security Configuration to close Internet Explorer .
If you do not need to use Internet Explorer Enhanced Security Configuration, you can disable Internet Explorer Enhanced Security Configuration.
To disable Internet Explorer Enhanced Security Configuration, open the Server Manager , then click the S Server Local tab. Then, the console will display the properties of Server Local . Click the Unknown link next to Internet Explorer Enhanced Security Configuration, as shown below.
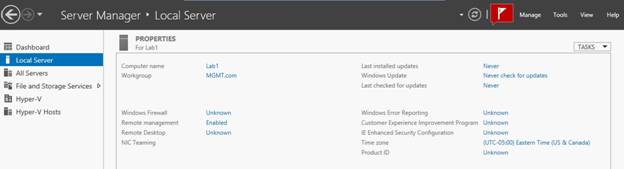
A dialog box will now appear that allows you to enable or disable Internet Explorer Enhanced Security Configuration.
You can refer to some of the following articles:
-
4 Ways to Reset Windows to its original state
-
2 steps to open virtual keyboard in Windows XP / 7/8 / 8.1
-
Backup and restore data on Windows Phone 8.1
I wish you and your family a happy and prosperous New Year!
FAQ
What is Learn About Windows Server 2012 (Part 2) about?
It provides a structured overview of Windows Server 2012, explains the main context, and highlights practical takeaways for readers.
Why does this topic matter?
Understanding the main concepts helps readers evaluate the issue, avoid common mistakes, and make better-informed decisions.
How should readers use this information?
Use the guidance as a practical starting point, confirm details that may have changed, and follow current product, safety, or security recommendations.
Related Articles
 Learn About Windows Server 2012 (Part 3)7 minutes read
 Learn About Windows Server 2012 (Part 1)6 minutes read
 Learn Windows Server 2012 (the Last Part)7 minutes read
 Microsoft Windows Powershell and SQL Server 2005 SMO - Part 28 minutes read
 Configure Windows Server 2008 to Remotely Access Ssl VPN Server17 minutes read
 Microsoft Windows Power Shell and SQL Server 2005 SMO - Part 48 minutes read
Reader Comments 0
Sign in with email or Google to join the discussion.