How to install DNS Server on Windows Server 2019
From Microsoft, the Domain Name System (DNS) is one of the industry standard protocol sets that includes TCP / IP, along with DNS Client and DNS Server that provide name resolution services that map names to the IP addresses of computers. .
Table of Contents
In today's article, TipsMake will explain how to install DNS Server on Windows Server 2019 and then perform other additional configuration. Before proceeding, make sure that you have configured a static IP address on your server.
Install DNS Server on Windows Server 2019
Configure DNS Server to provide hostname resolution or IP address!
On the CUI settings, set up as follows:
Step 1. Run PowerShell as admin and enter the following code to install DNS Server.
Windows PowerShell Copyright (C) Microsoft Corporation. All rights reserved. # install DNS with admin tools PS C:UsersAdministrator> Install-WindowsFeature DNS -IncludeManagementTools Success Restart Needed Exit Code Feature Result ------- -------------- --------- -------------- True Yes SuccessRest. {DNS Server, . WARNING: You must restart this server to finish the installation process. # restart computer to apply changes PS C:UsersAdministrator> Restart-Computer -Force On the GUI settings, set up as follows:
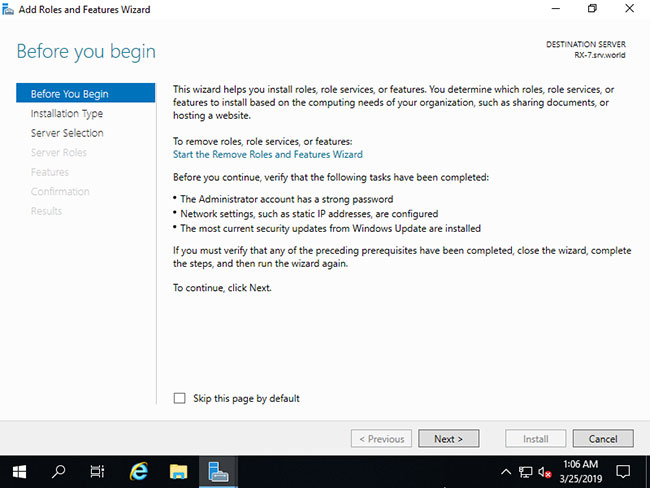
Step 2. Run Server Manager and click Add roles and features .

Step 3. Click the Next button .
Step 4. Select Role-based or feature-based installation .

Step 5. Select a Host for which you want to add services.

Step 6. Check the box DNS Server .

Step 7. Additional features required to add DNS Server. Click the Add Features button and then click Next .

Step 8. Click the Next button .

Step 9. Click the Next button .

Step 10. Click the Install button .

Step 11. After finishing the installation process, click the Close button .

Add the Forward Lookup Zone to the DNS Server
Step 1. Run Powershell as administrator and configure it as follows.
The following example adds a Forward Lookup Zone with the Zone-Name setting "srv.world" , Zone-File "srv.world.dns" . In general, give your domain name or part of your domain name to Zone-Name.
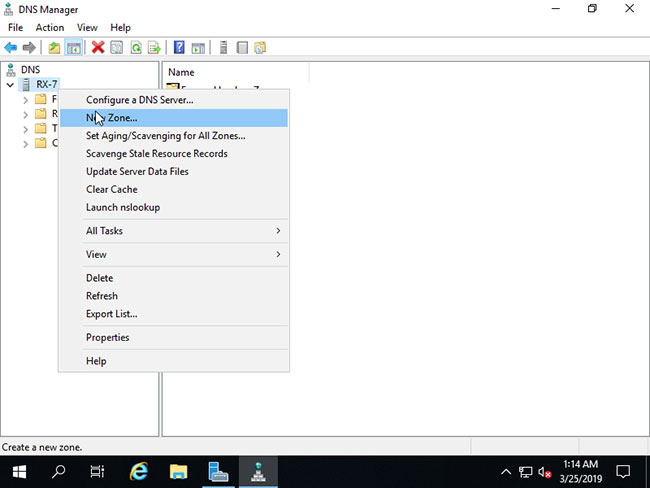
Windows PowerShell Copyright (C) Microsoft Corporation. All rights reserved. PS C:UsersAdministrator> Add-DnsServerPrimaryZone -Name "srv.world" -ZoneFile "srv.world.dns" -DynamicUpdate None -PassThru ZoneName ZoneType IsAutoCreated IsDsIntegrated IsReverseLookupZone IsSigned -------- -------- ------------- -------------- ------------------- -------- srv.world Primary False False False False PS C:UsersAdministrator> Get-DnsServerZone # [srv.world] has been added ZoneName ZoneType IsAutoCreated IsDsIntegrated IsReverseLookupZone IsSigned -------- -------- ------------- -------------- ------------------- -------- 0.in-addr.arpa Primary True False True False 127.in-addr.arpa Primary True False True False 255.in-addr.arpa Primary True False True False srv.world Primary False False False False TrustAnchors Primary False False False False # if remove it, run like follows PS C:UsersAdministrator> Remove-DnsServerZone "srv.world" -PassThru Confirm [Y] Yes [N] No [S] Suspend [?] Help (default is "Y"): Y ZoneName ZoneType IsAutoCreated IsDsIntegrated IsReverseLookupZone IsSigned -------- -------- ------------- -------------- ------------------- -------- srv.world Primary False False False FalseStep 2. Run Server Manager and select Tools> DNS .

Step 3. Select Hostname in the left panel and right click on Hostname to bring up the menu and select New Zone .
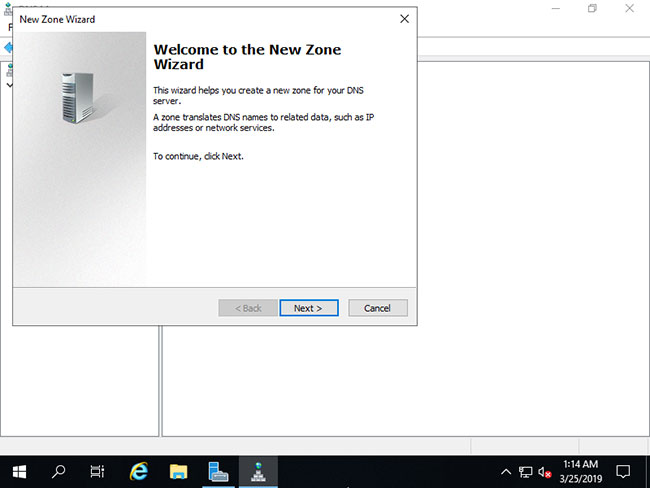
Step 4. Click the Next button .
Step 5. Check the Primary zone box and click the Next button .

Step 6. Check the Forward Lookup Zone box and click the Next button .

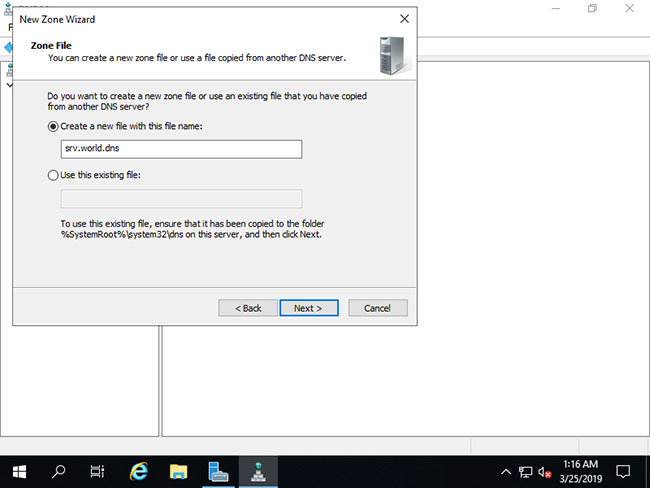
Step 7. Enter a name in the Zone name field . As described on the screenshot below, please give the domain name or part of the domain name to this Zone name.

Step 8. Set zone-file-name and click Next button . You can keep the default name for zone-file-name.
Step 9. Click the Next button and keep the default options.

Step 10. Click the Finish button .

Step 11. A new zone has been created in the Forward Lookup Zone.

Was this article helpful?
Your feedback helps us improve.
Related Articles
 Instructions for installing Windows Server 2016 on Windows 103 minutes read
 Instructions for installing Windows Server 2012 step by step5 minutes read
 How to install IIS in Windows Server 20122 minutes read
 Steps to install Windows Server 2022 on a virtual machine4 minutes read
 How to install a VPN on Windows Server 20194 minutes read
 How to install and use IIS on Windows Server 20194 minutes read
Reader Comments 0
Sign in with email or Google to join the discussion.