Table of Contents
This updated guide examines How to Installing and Configuring DNS Server on Windows Server and organizes the essential facts, background, and practical takeaways in clear American English.
Install DNS Server on Windows Server 2016
The fastest way is to install the DNS server role on Windows Server 2016 using the following PowerShell command (run it with admin rights):
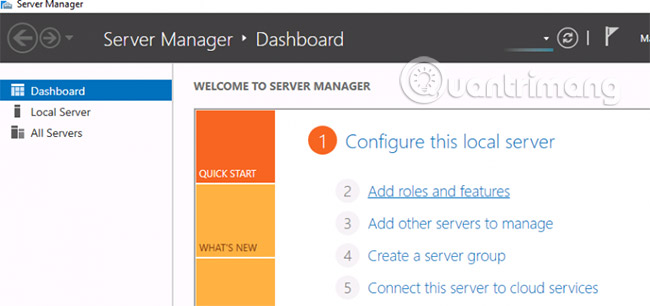
Install-WindowsFeature DNS -IncludeManagementToolsYou can also install the role DNS server from the Server Manager GUI . Open Server Manager and click Add Roles and Features.
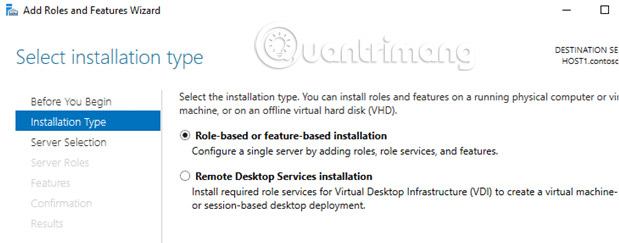
Choose Role-based installation or Feature-based installation options and click Next.
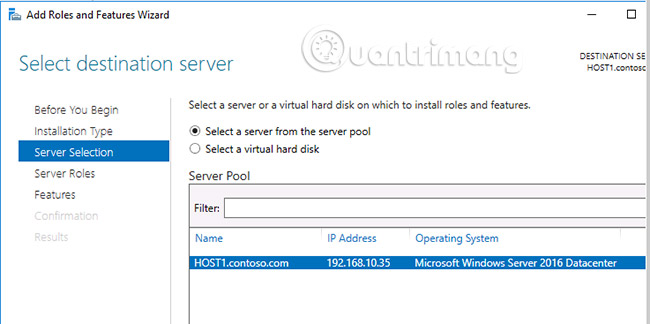
Here you need to select the server to which you want to install DNS Server (usually the current server).
From the Server Roles list , select DNS server and click Next. Click Add Features on the popup window - in this case, the DNS management console and PowerShell DNS module will be installed automatically. If you want to manage this DNS server remotely, you cannot install these tools.
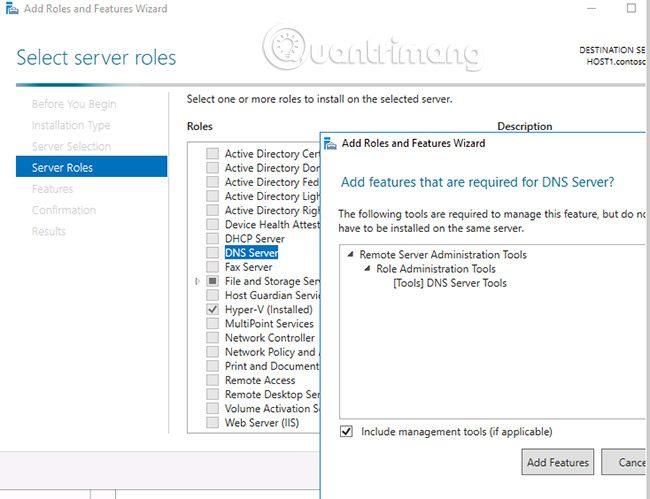
Now you can see that the DNS entry is selected.

There are no additional features required for this step, but we want to make sure that the DNS Server Tools are selected. To check this, click Remote Server Administration > Role Administration Tools. Then click Next.
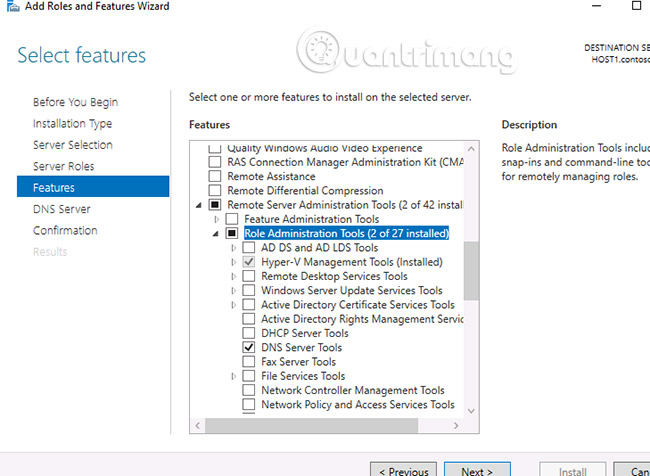
Here just click Next.
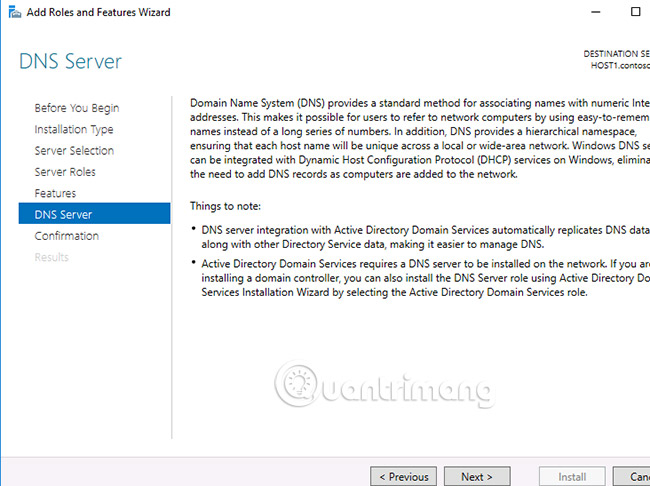
To confirm the installation, click Install.

The installation process starts and may take several minutes to complete.
When the DNS Server installation is completed successfully, click Close.
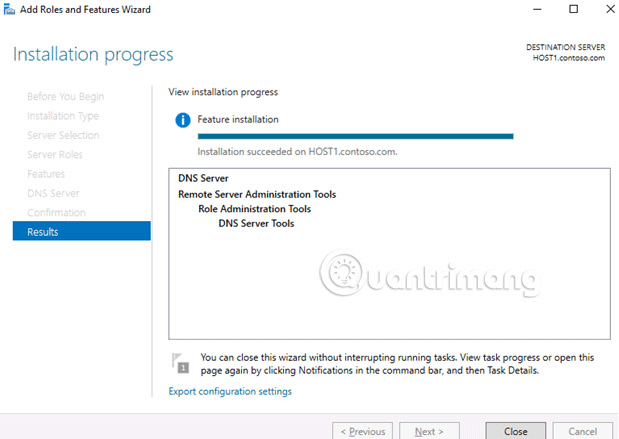
Configure DNS Server on Windows Server 2016
DNS configuration is similar to installing it, which means you don't need to be too bothered or ask any administrator to help you do that, because you can do this yourself, with The following instructions are detailed in this article.
1. When the DNS server is installed, open the Server Manager window , click the Tools tab in the drop-down menu that appears and click the DNS icon to open it. Here, the server's name in the example is set to the tactig-dc01.
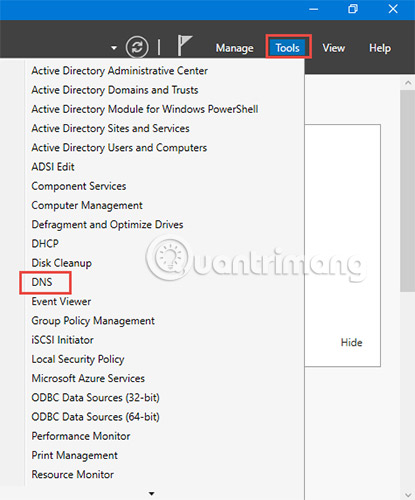
2. First, what we need to do is create a zone. It is part of the DNS that logs are restored. To do this, right-click the DNS server name on your computer and click New zone.
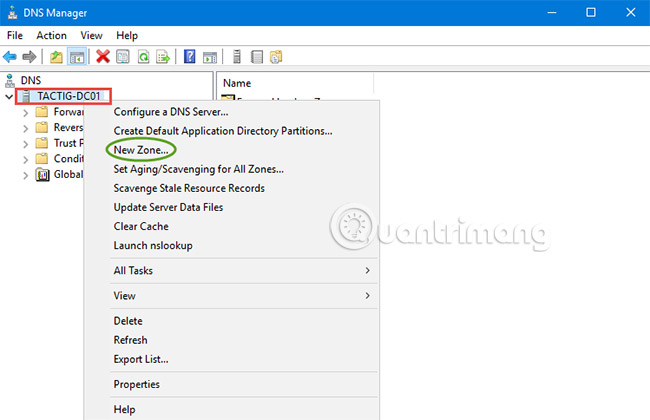
3. Skip the welcome page and on the next page, you will see three types of areas available.
- Primary zone: The area is rewritten, not copied from somewhere.
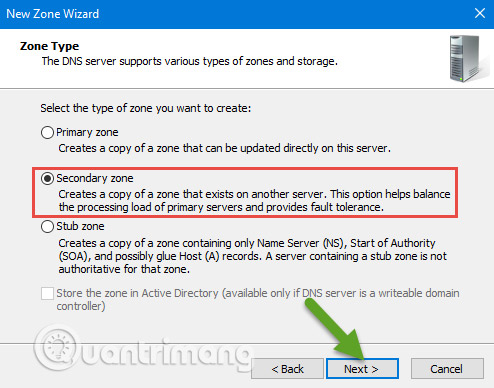
- Secondary zone: A copy of another area. When you create a secondary zone, you should copy the records from another source.
- Stub zone: This area provides information about any server holding a particular area.
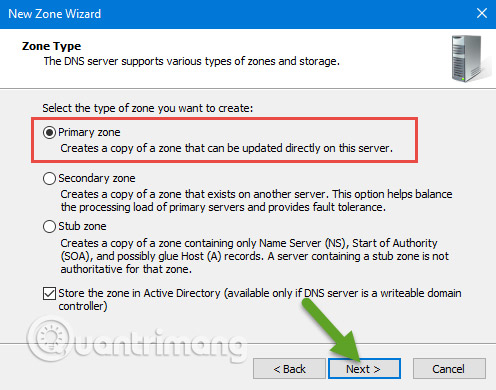
For example, if we want to create a primary zone, we will click on the primary zone, then click Next.
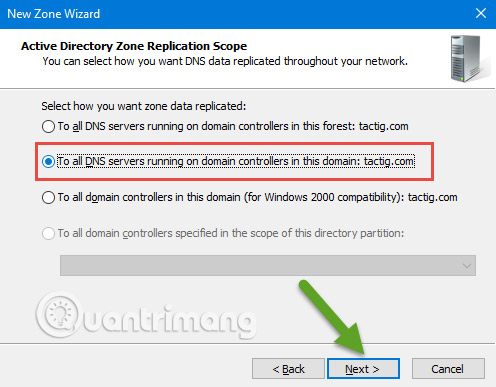
4. In the next page, you will be asked about the copy method.
- First option, To all DNS servers running on domain controllers in the domain:, is used when you want to copy with the primary domain and subdomains in the entire domain. Note that this will increase network traffic.
- The second option, To all DNS servers running on domain controllers in the domain:, is used when you want the DNS server to copy all DNS servers in your own domain.
- Third option, To all domain controllers in the domain this (for Windows 2000 compatibility): is used when you want your server to only copy domain controllers in your own domain.
Please select the second option and then click Next.
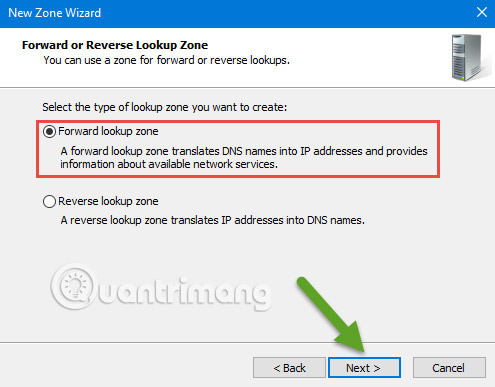
5. On the Forward or Reverse Lookup Zone page , select Forward lookup zone . Forward lookup zone will translate DNS name to IP address and the second option, Reverse lookup zone , will translate IP into DNS name. Just select Forward lookup zone and click Next.Reverse lookup zone will be configured later.
6. Specify a name for the area, then click the Next button .
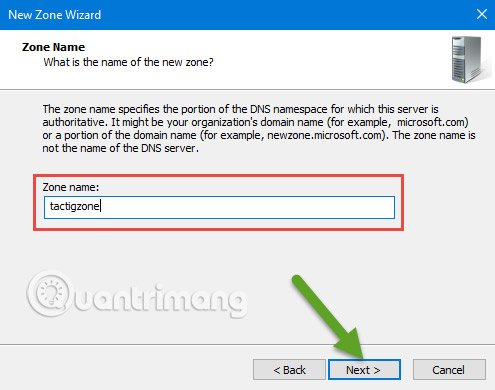
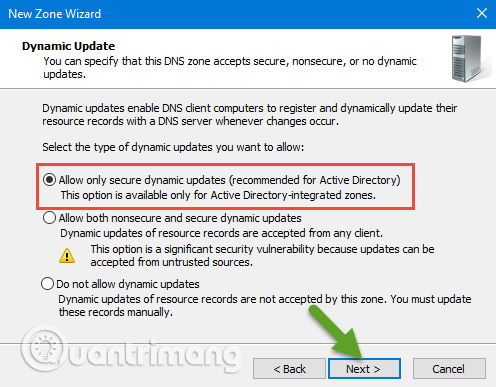
7. How do you want the content in your area to update? The recommended option only allows security updates. This option will help you not be affected by DNS servers and spyware (spyware). Please select the first option and click Next.
8. After continuing, your primary zone will be created, just click the Finish button to begin working.
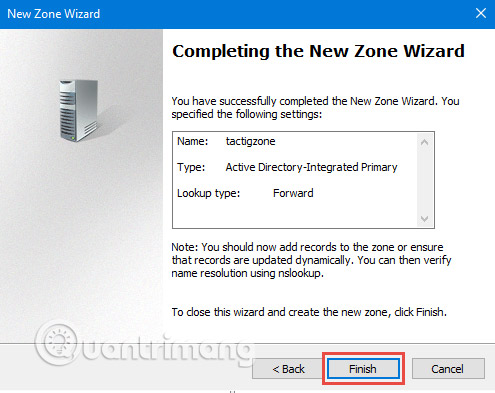
Now the area has been successfully created, but the DNS configuration has not been fully completed and the secondary zone mentioned earlier is a copy of another area. That means you should copy the content from another source. Now, the article will show you how to create a secondary zone.
Create a secondary zone
You need another server, where the DNS server is installed on it. For example, naming the new DNS server is tactig-dns02. The new server that you try to use as the second DNS server must be a member of Active Directory Directory Services .
1. Now, we will work on the tactig-dns02 server , open the DNS Manager tool and right-click on Forward lookup zone, click on the New zone and skip the welcome page by clicking Next. In the Zone Type page , select Secondary zone.
2. On the Forward or Reverse Lookup Zone page , select the option Forward lookup zone. It will change the DNS name to the IP address. Then click the Next button .
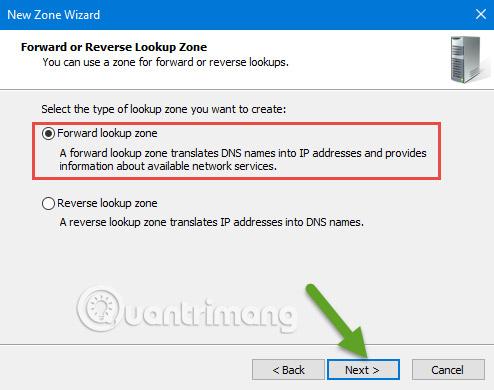
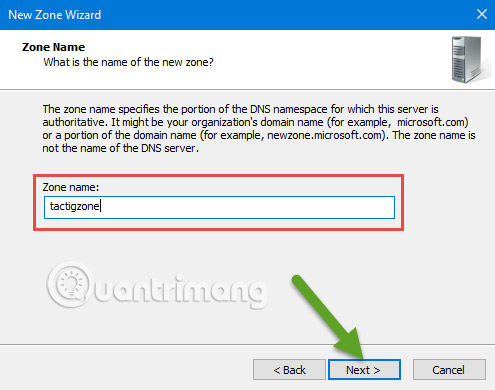
3. Specify a name for the area. Enter the name of the area you created previously as the primary zone. Here you will have a copy of the primary zone in the secondary zone.
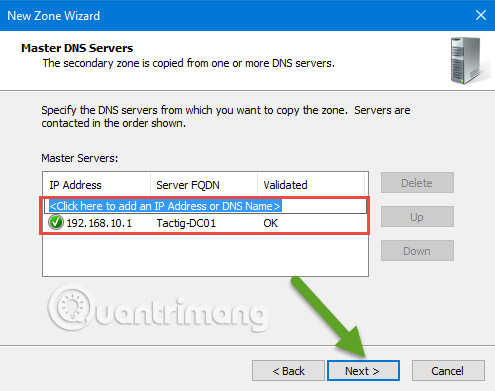
4. In the Master DNS Servers page, you need to specify the master server Master server. The master server is the server you want to copy the content to the new secondary zone. Enter the IP address of the Master server and the IP will be resolved. If the IP is correct, a green checkmark will appear next to the IP address box, then click the Next button .
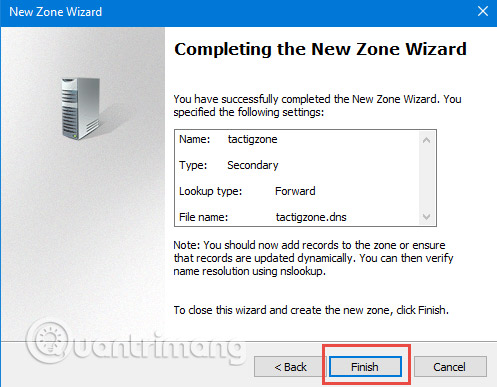
5. When the Secondary zone is created, simply click the Finish button and finish.
6. Now, click on the new area you just created, you will see a red x sign (meaning no content is present) and it will not work exactly as it was mentioned before you Copy content from one place to another.
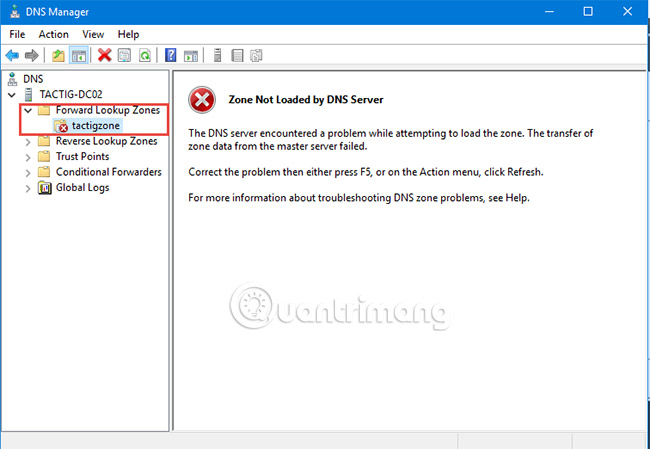
7. Go back to the tactig-dns01 server , expand the Forward lookup zone mode and right-click the area where you want to retrieve the copy, then select Properties.

8. Here, select the Name Servers tab and add the server where you installed the secondary zone. When you add the name in the list, you can copy the content. To do this, click the Add button .
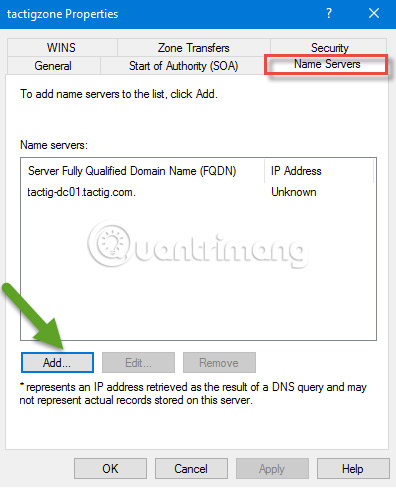
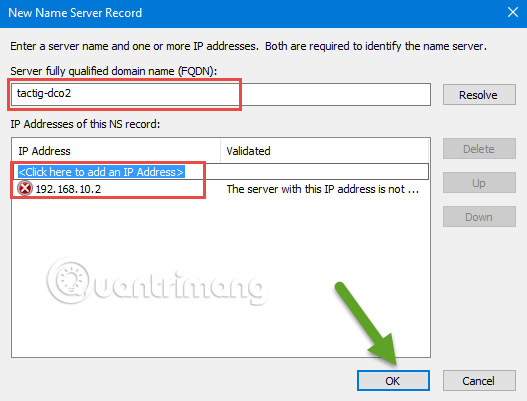
9. Enter the fully qualified domain name (FQDN) in the box as shown and the server's IP address below it. When you resolve the server, a message will appear. Don't worry because the message will tell you that your server is not authorized for that area. However, because you only want to make a copy of that area, click the OK button .
10. Now go back to the tactig-dns02 server, right- click the area you created and select Transfer from Master.
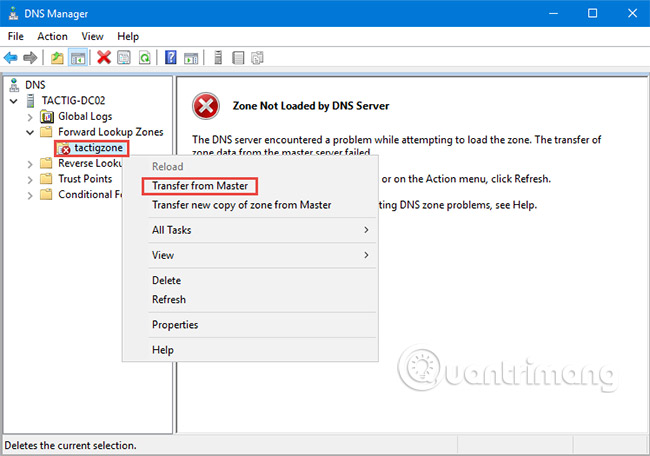
11. Refresh the page by clicking on the Refresh button and you will see all the records you can see in server zone tactig-dns01. Now the secondary zone has been created and configured properly.
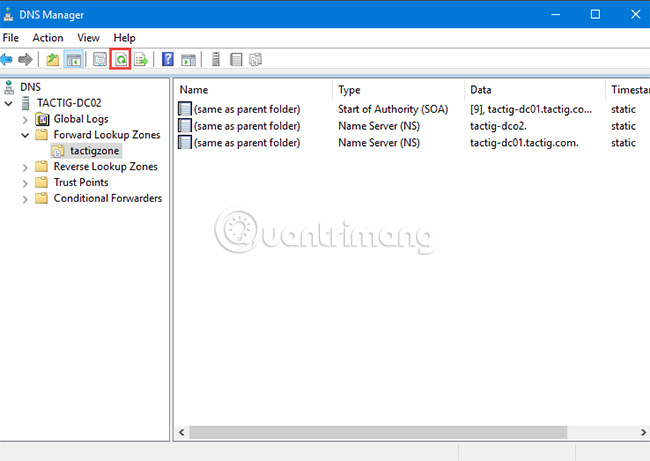
Learn about Reverse Lookup Zone
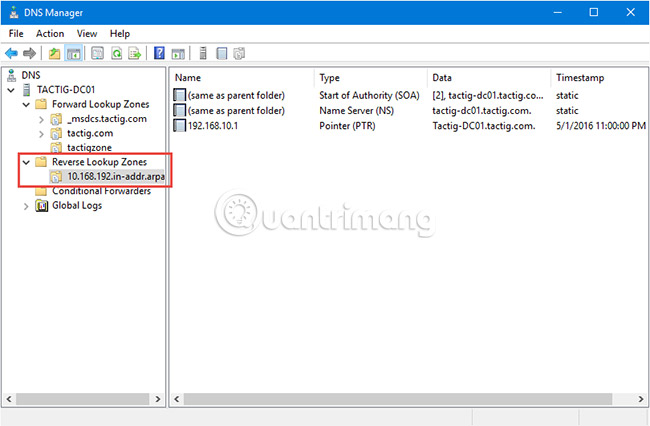
The next important point in configuring DNS is that you should learn what Reverse Lookup Zone is. Reverse Reverse Lookup Zone with Forward Lookup Zone means that it changes the IP address to a DNS name, ie when you provide an IP address, it will give you a DNS name. To do this, you only need one DNS server and for example will use the original DNS server (tactig-dns01).
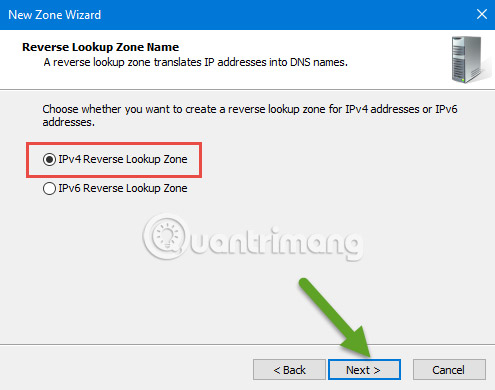
1. Reverse Lookup Zone is created as the primary and secondary zones to expand server names. Right-click the Forward Lookup Zone and select New Zone. When the new page appears, skip the welcome page and select Primary zone and click Next. Keep the default options in the next step and click Next. Here, select IPv4 Reverse Lookup Zone or IPv6 reverse lookup zone and click Next. For example, I will use the IPv4 version but you can choose the area you want to use as you like.
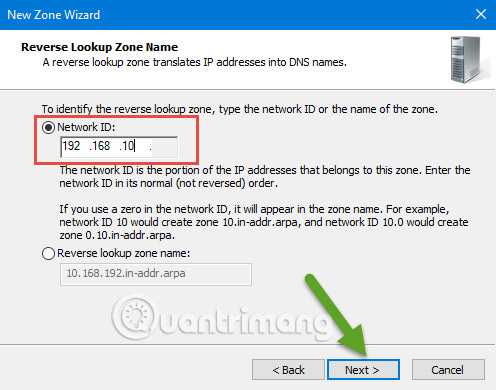
2. At this time, Network ID (network ID) is essential. Please specify Network ID and then click Next (Network ID is your network IP address).
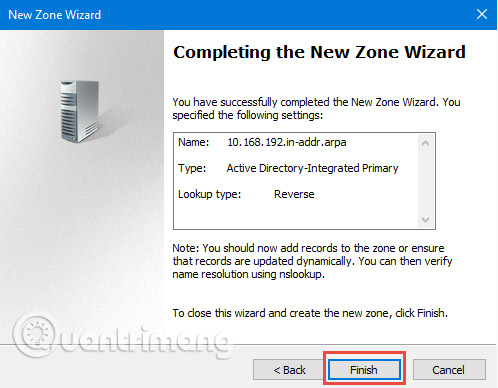
3. Select the Allow only secure dynamic update option and click the Next button , then complete the next steps to complete the configuration.
4. Run PowerShell with admin rights. Type the following command and press Enter:
ipconfig /registerdns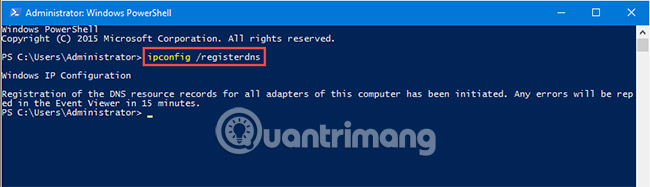
5. Refresh Forward Reverse Zone, you will see that an IP address has been added. All work is complete!
DNS configuration is complete. But this is the basic configuration of DNS, and the advanced configuration steps for DNS will be much more complicated, repeat it several times until you get used to the operation. If there are any other questions, please leave a comment in the comment section below.
Good luck!
:
- Instructions for installing Active Directory on Windows Server 2008
- How to change DNS server on Chromebook
- How to install the Print Server in Windows Server 2012
FAQ
What is How to Installing and Configuring DNS Server on Windows Server about?
It provides a structured overview of Windows Server 2016, explains the main context, and highlights practical takeaways for readers.
Why does this topic matter?
Understanding the main concepts helps readers evaluate the issue, avoid common mistakes, and make better-informed decisions.
How should readers use this information?
Use the guidance as a practical starting point, confirm details that may have changed, and follow current product, safety, or security recommendations.
Related Articles
 Instructions for Installing GIT and Configuring GIT on5 minutes read
 Instructions for Installing MS SQL Server5 minutes read
 Instructions for Installing and Configuring Microsoft Security11 minutes read
 Installing, Configuring, and Testing Exchange 2007 Ccr on Mailbox8 minutes read
 Installing, Configuring, and Testing Exchange 2007 Ccr on Mailbox10 minutes read
 Installing and Configuring Exchange 2007 from the Command Line12 minutes read
Reader Comments 0
Sign in with email or Google to join the discussion.