These great new features of Adobe Photoshop CC 2018 the Designer should not be missed
Adobe has added a lot of new features in Photoshop CC 2018, surely photographers and designers will enjoy it.
New feature of Adobe Photoshop CC 2018
- 1. Improvements in Select and Mask
- 2. Color and Luminance Range Masking feature
- 3. Access Lightroom image in Photoshop
- 4. New Properties Table
- 5. Brushes table
- 6. Copy and paste shortcuts
- 7. Fonts
- 8. Step by step instructions
- 9. Pen Curvature Tool
- 10. Smart scaling
- 11. Features working with 360-degree images
- 12. Some other features
1. Improvements in Select and Mask
Select and Mask functions are used to change the background of an image. Photoshop CC 2018 has improved this feature. Open the image you want to edit and go to Select > Select and Mask , use the Quick Selection Tool ( W shortcut) to select the image you want to preserve and the Refine Edge Brush Tool (shortcut R ) to clean the edge of the image.
To see how it works and compare this feature in the previous version, watch the video below:
2. Color and Luminance Range Masking feature
Now photographers shooting in raw mode can use Adobe Camera Raw's new Color and Luminance Range Mask.
With Luminance (light ratio adjustment in color), users can darken or lighten parts of images. And the Color feature is used to adjust the saturation of a specific color in the image. These features are also available in Lightroom. Converting colors to gray and black and white tones is now easier with Photoshop CC 2018.
3. Access Lightroom image in Photoshop
With Photoshop CC 2018, you can easily access Lightroom photos from Photoshop. Adobe will no longer support the standalone version of Lightroom, and instead launch two versions of the program into Creative Cloud.
Lightroom is now called Lightroom Classic CC and is available for all Creative Cloud registration accounts. This version is not integrated into Photoshop.
The second and newer option, Adobe Lightroom CC, is a cloud-based version of the program and will be integrated into Photoshop. Lightroom CC also allows users to upload photos directly to the cloud account by visiting Lightroom.adobe.com website or using a mobile device application.
Lightroom CC is available for Creative Cloud users and basic Photography account users. If you are using a Creative Cloud subscription, you will have to pay more for its application. Lightroom CC provides 1TB of memory for a fee of $ 9.99 per month. The price per additional terabyte is 10 dollars.
In the integrated version of Photoshop, when opening Photoshop for the first time, you will see three options to open existing files: Recent, CC files and LR Photos, click on LR Photos to access the Lightroom files.

To access Lightroom photos after exiting the Start screen, use the Photoshop CC search function 2018. Go to Edit> Search (or Ctrl + F ) to search for Lightroom images from within Photoshop. The search function will display images based on visual content even when not tagged. (For some reason, Windows users who currently run the 64-bit version of the operating system do not have access to this search function.)
4. New Properties table
Some tables are more streamlined in Photoshop CC 2018, this arrangement can help users save a lot of time when doing repetitive tasks. The Properties Panel adds some new features. You can now adjust text and characters like colors, fonts and sizes.
Although this may seem like a minor update, it saves space for Photoshop users by using a smaller screen due to opening fewer tables. In addition, it keeps some of the main settings in the same position on the screen for easy use.
5. Brushes table
With Photoshop CC 2018, the Brushes palette has been renamed to the Brush Settings panel and the Brush Presets panel is now called Brushes.
In the new Brushes palette, you can see all the installed brushes (including the custom brushes). Photoshop CC 2018 also gives access to new brushes created by Kyle Webster. New brushes include dry media brushes (dry colors), brush wet media (wet colors) and special effect brushes. Adobe also has a range of free brushes.
There are many small but convenient changes to save time when using the Brush palette. For example, when choosing the Brush tool, instead of having to open the Brush panel or go to the Brush picker in the menu at the top of the screen, the user just right-clicking on an image will open the Brush panel and choose a brush or adjustment brush size and hardness.

If there are multiple brushes installed on your computer, you can easily drag and drop these brushes into separate groups. In addition, you can zoom in and out of the brush to appear more or less on the board and adjust the view settings to see the brush strokes, and the name in the table.
- Top 10 websites provide a free Photoshop brush
6. Shortcuts for copy and project files
In the latest version of Photoshop, users can copy and paste layers between documents with standard shortcuts ( Ctrl / Cmd + C and C Ctrl / Cmd + V ).
Instead of dragging layers or changing tabs to a tabbed view, you just need to use the shortcut now. If you want to paste the layer in the same location exactly as in the first document, just use the Ctrl / Cmd + Shift + V shortcut.
7. Fonts
Photoshop CC 2108 provides a variety of fonts for designers to choose from to suit their designs. Users can adjust the size and tilt of the letters exactly as they want. Select the text and open the Properties panel ( Window> Properties ), then use the slider to adjust each setting.

There are several fonts available in Photoshop CC 2018, but you can download fonts and install them in Photoshop.
- 5 websites to find and download free fonts
8. Step by step instructions
Photoshop CC 2018 introduces a completely new table called Learn Panel. To open it, go to Windows > Learn . This new table is very useful for beginners to use Adobe Photoshop, which provides information on how to use the program right in Photoshop software.

Tutorials are divided into four categories: photography, retouching, combining images and graphic design. These tutorials are very few and basic, but we can expect Adobe to add more in the future.
When selecting a tutorial, the application will guide you to use the latest Photoshop features. It also has practice so you can practice after reading the theory.
Next to the Learn Panel , Photoshop also added Rich Tooltips . When hovering over the tool in the Tool Panel, Photoshop will display a window with a tutorial on how to use it.
9. Pen Curvature Tool
Photoshop CC 2018 brings the new Curvature Pen Tool to be able to easily draw curved shapes. This tool is extremely intuitive when creating curves. The Pen Curvature tool is available in the regular Pen tool menu, just click instead of clicking and dragging to draw a curve.
There are many other new features like 360-degree panoramic photo editing, smooth brush making, open sharing features, support for Microsoft Surface users, etc.
This is one of the biggest upgrades Adobe has released in the past, bringing many features for photo editors, graphic designers, and new users of Photoshop.
10. Smart scaling
You have the same image in two separate documents.
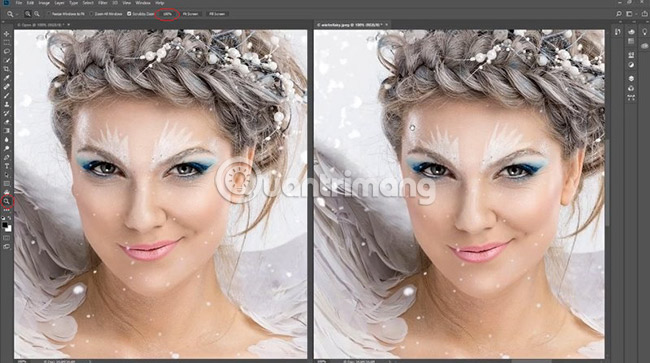
First, put both images at 100%.
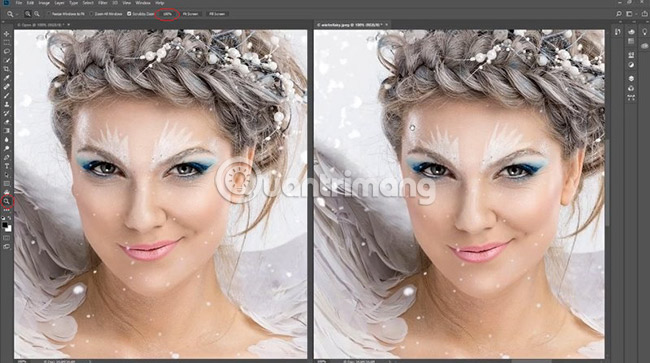
Select the image on the left and choose Image > Image Size.

Increase its rate to 300%.
In Resample, we will use Preserve Details (enlargement) .

Preserve Details (enlargement) is really the best feature users have had before, with images being resized in Photoshop.
Click OK to apply the settings to the picture on the left.
Select the image on the right and choose Image> Image Size .
Increase its rate to 300%.
With this image, in Resample, you will use the Preserve Details 2.0 . This new feature uses machine learning, also called deep learning or artificial intelligence, to actually rearrange images.
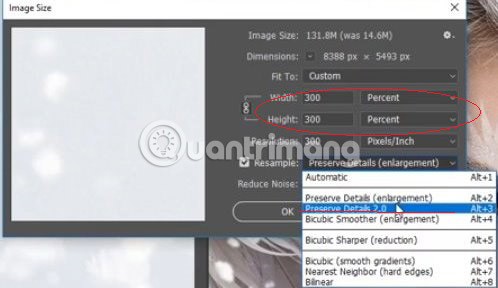
Click OK to apply the settings to the image on the right.
Now both images are scaled up to 300%. With the image on the left, you used Preserve Details (enlargement) . With the image on the right, you used the Preserve Details 2.0 .
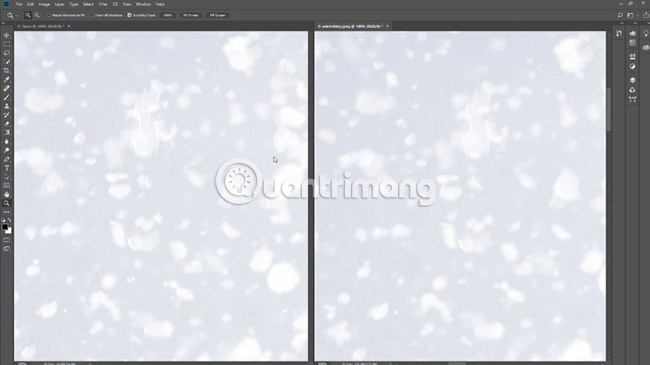
Select the image on the left.
Hold H.
Click and drag.
Use Birdseye to see close-ups.

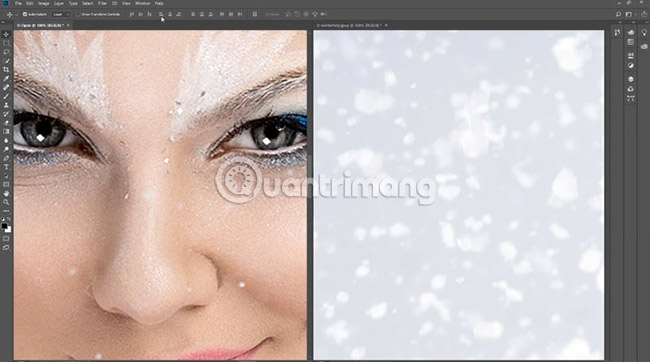
You have to give the right picture about the same size to be comparable.
Select Window> Arrange> Match All .

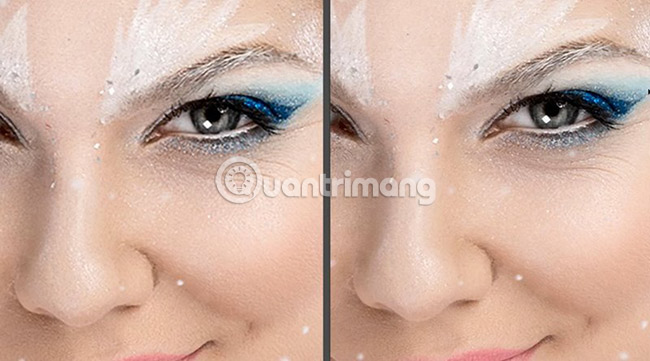
Now you have two images side by side and you can compare the details.
Perhaps the biggest visible difference is around the eye area (the image on the right has many more distinct details).
Of course, the real difference can only be discovered using higher magnification.
11. Features working with 360-degree images
This is a picture taken by Russel Brown. This photo was taken with a Ricoh Theda placed on a DJI Phantom unmanned aircraft.
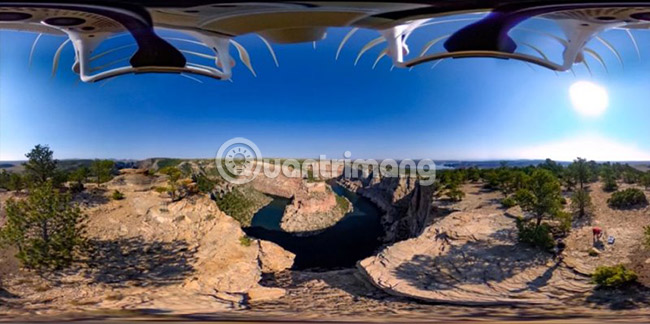
Now, users are able to work with images like this right inside Photoshop.
Turn these photos into real panoramas.
Go to 3D> Spherical Panorama> New Panorama Layer From Selected Layer (s) .
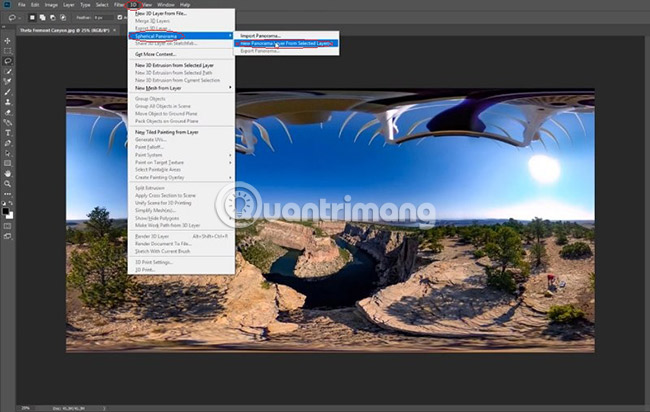
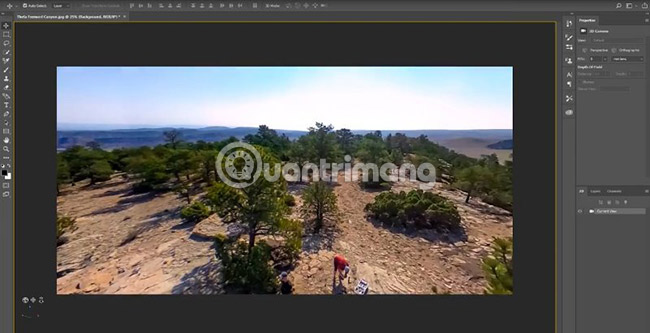
We will now have a true panorama that we can rotate and see everything around.
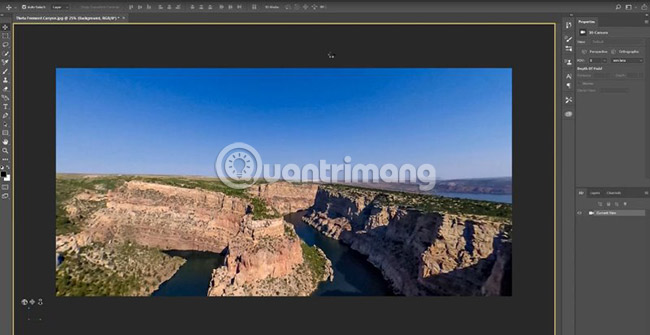
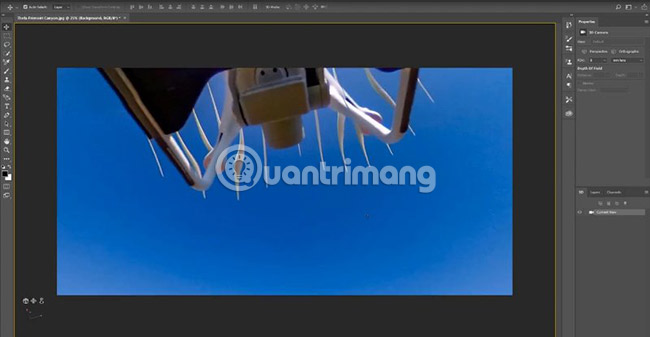
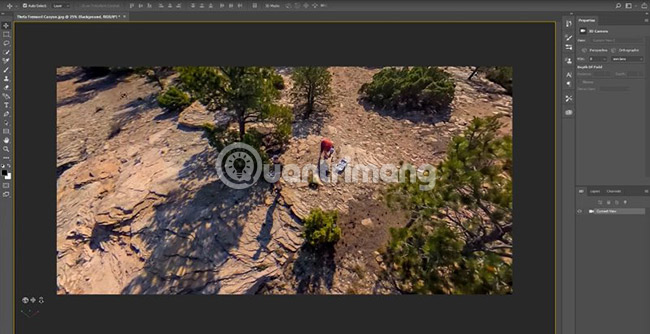
Take the following object (the image of the drone) out of the picture.

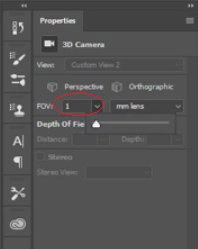
First, set the Field of View (FOV) to 1 .
Select the Selection tool .
Select the object to be processed.
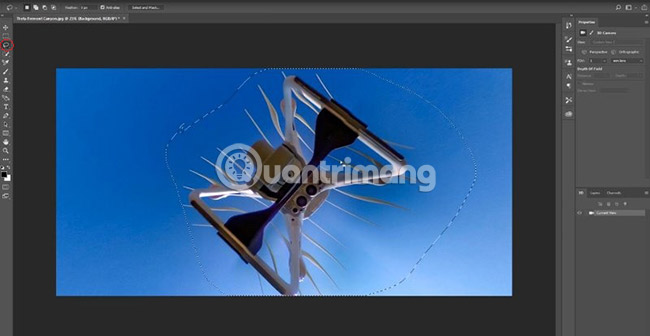
You will have to use Content-Aware fill.
Click Shift + Backspace or Shift + Delete (if you're using a Mac).
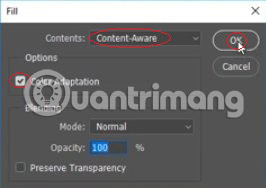
Make sure that Color Adaptation and Content-Aware are selected.
Click OK.
The object has disappeared.
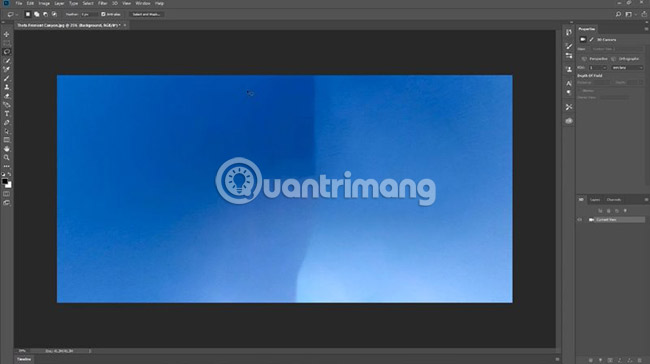
You still need to take the rest of the object out of the image.
Move to the rest to remove.
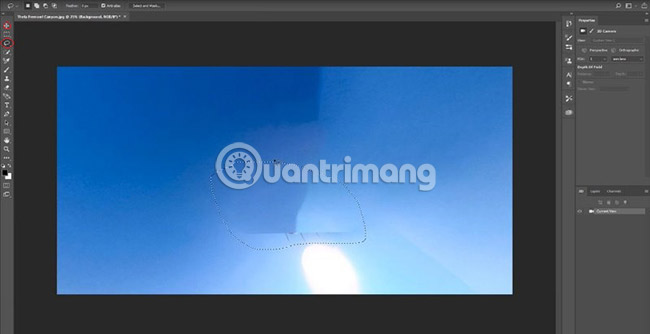
Select the lasso tool .
Select around the rest you need to remove the note.
Again, use Content-Aware fill.
Click Shift + Backspace or Shift + Delete (if you're using a Mac).
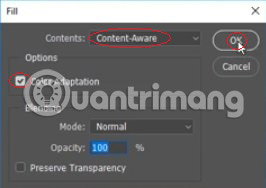
Make sure that Color Adaptation and Content-Aware are selected.
Click OK.
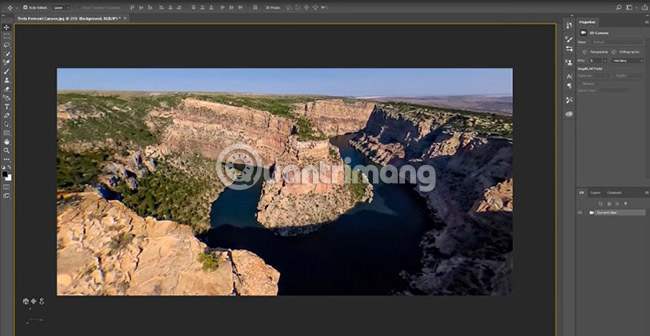
The object has been completely removed.

Now, the object has been removed, and the viewer can move around the image and enjoy the panorama without obstructing the vision.
Images can also be exported by going to 3D> Spherical Panorama> Export panorama .
This panoramic photo can be uploaded to Facebook and displayed in VR 360 format.
12. Some other features
There are many other new features that the article would recommend to readers.
- Drawing: The symmetrical tool allows you to duplicate the strokes in many ways.
- The contour is adjustable (making it thicker and changing colors), so you can see it easier while working with the Pen tool .
- Ability to copy and paste layers along with their properties.
- The Curvature tool in Pen gives users a more natural way to draw curves.
- Brush Presets, now retain color and other properties from the tool's preset values.
- Make smooth brush and jitter while drawing freely.
- Variety of fonts: You can adjust all font properties on the move.
See more:
- 45 smart Photoshop tips you need to know (Part 1)
- How to combine photos in Photoshop from 2 different images
- 10 common problems in Photoshop and basic remedies