Instructions for using Photoshop for newbies
When you first open the Photoshop application, you can be confused for a few seconds and then, contact the Freelancers - freelance designers to learn about how to use it. But be assured you won't have to do this alone because of me.
When you first open the Photoshop application, you can be confused for a few seconds and then, contact the Freelancers - freelance designers to learn about how to use it. But be assured you won't have to do this alone because of me.
This power design software has valuable tools that can change all but Photoshop is not just for professionals. With my little help, I hope you can learn how to create beautiful and attractive photos.
To begin with, we have 12 of the most useful tools in Photoshop, and what do I explain? In what position? Usage and some of the best tips tips.
Note: The version used in the article is Adobe Photoshop CC 2015.
- Download Adobe Photoshop CC
If you are using Adobe Photoshop CS5 , you can refer to this series of tutorials: How to use Photoshop CS5 - Part 1: Toolbox
Category
- The Layer Tool
- The Color & Swatches Tool
- Custom Fonts & The Text Tool
- Custom Brushes & The Brush Tool
- The Select Tool
- The Move Tool
- The Zoom Tool
- The Eraser
- The Crop Tool
- The Fill Tool
- The Eyedropper Tool
- Blending Options
How to use Adobe Photoshop? Photoshop tutorial for newbies.
You can refer to: Photoshop shortcuts help you work faster (part 1)
1. The Layer Tool
Define
On a layer can be used for photos, text, brush sets, background colors, textures and accents.
I like how to compare layers like glass layers stacked on top of each other, until the last layer you will create the finished product. Each layer can be altered at a small point without affecting the overall layout of the image. This will save time when editing each part in detail.
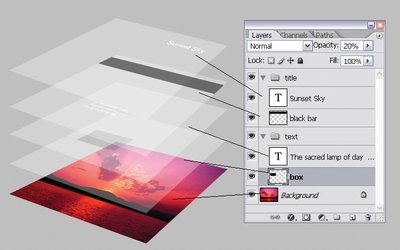
Layers are the most important part of Photoshop. I think they are one of the reasons many people feel frustrated about themselves. But once you understand how they work, I believe you will find it easier.
Location
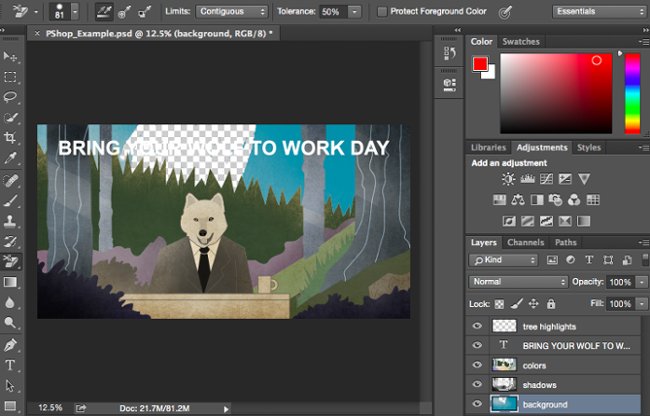
By default it has its own module in the right corner of the Photoshop screen. Click on the Layer in the top menu bar.
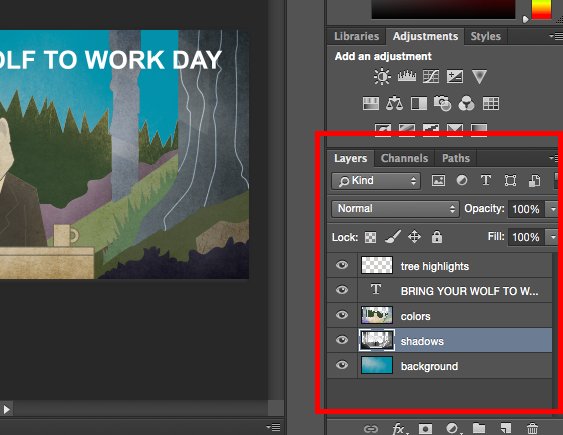
Tips
Always give each layer a name so that it can keep abreast of the sequences to avoid tangles, especially useful when doing projects with a large number of layers.
To add or delete layers
Select Layer > New > Layer .
Select a layer
The selected layer will display in blue. To edit a part of the image, you need to select it.
Pay attention to the eye icon next to each layer. Click on the icon to turn on / off the eye, thus changing the visibility of the layer you are editing.
Duplicate a layer
First, select one or more layers in the Layers panel. Next, drag one or more layers and click Create a New Layer . Alternatively, click the left mouse button on the Layer to select Duplicate Layer or Duplicate Group. Enter the name of the layer and press OK.
2. The Color & Swatches Tool
Define
The Color and Swatches tool allows you to use, change, copy and store color for your content. It is truly an outstanding feature that makes images come alive and uniform in color.
Location
It is the default module in the upper right corner of Photoshop.
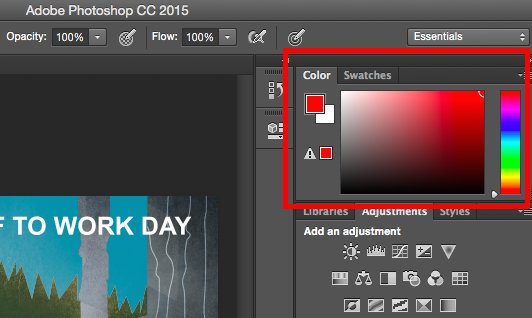
In addition, the Color tool is located at the bottom of the left toolbar, represented by two overlapping color boxes.
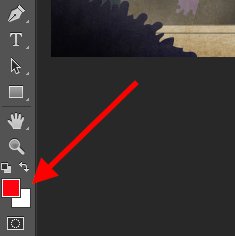
Create color
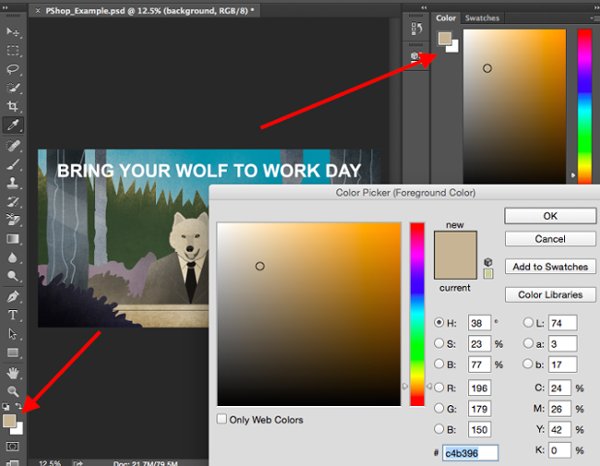
Open Color Picker by double-clicking on the box above the Color module or on the left menu.
From there, you will see a series of colored columns along with the slider. You can adjust to create arbitrary colors. Moreover, if you know the hex value of the color, or enter it in the # box to find the color automatically. You can select the array of colors based on RGB or CMYK values.
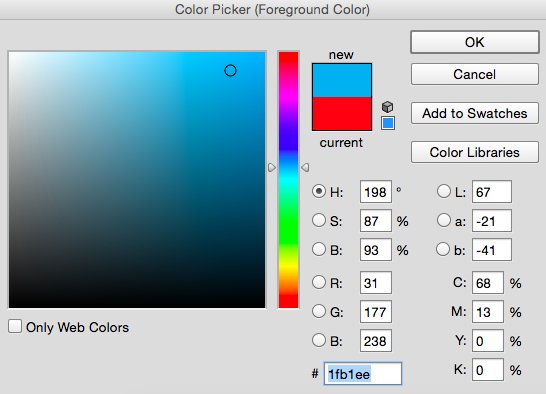
Any color you create can add Swatches if you click on Add to Swatches.
Tips
Create and save colors like "Swatches" for reuse for later edits.
3. Create fonts and Text Tool
Define
The Text tool allows adding custom fonts from data and access advanced font settings.
Location
At the left corner of the screen near the end.
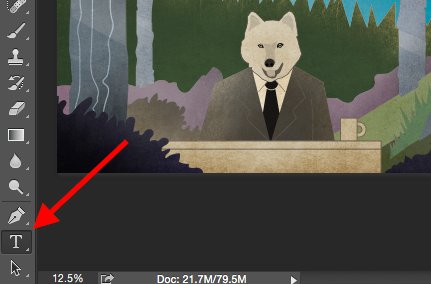
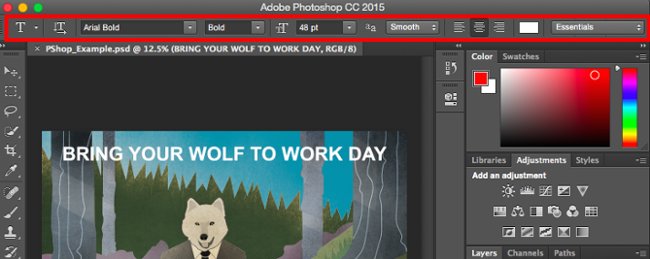
When you click on the Text tool icon, all the settings and custom fonts will display at the top of the screen. These options allow you to change the font, font size and spacing between letters, height, width, color and style. And make sure that you have selected the layer you want to edit.
Add text to photos
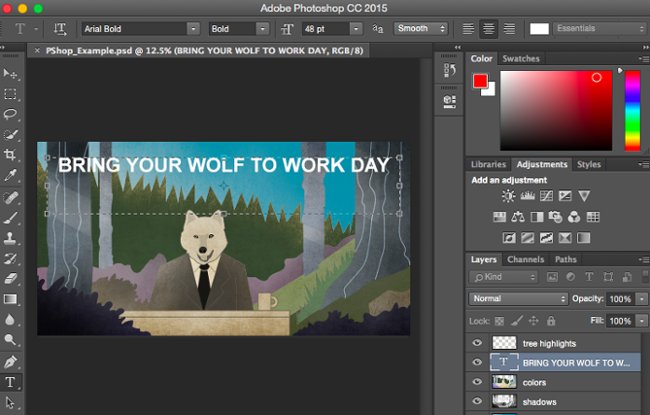
The Text tool works just like the other Text tool you used. Select the T icon in the left bar, drag the Textbox to the position you want and now be creative.
Whenever you create a textbox, Photoshop adds a layer. You can choose colors, sizes, ., other options to change.
4. Custom Brushes & The Brush Tool
Define
Like Fonts, you can add and edit as you like. In the Brush tool there are features like changing the size, shape and strokes to get a number of different visual effects.
Brush is a good way to add eye-catching highlighting to content. In Photoshop, you'll have to start with Brush tips. You can use it to sharpen and create basic visual effects.
Location
Located in the left toolbar.
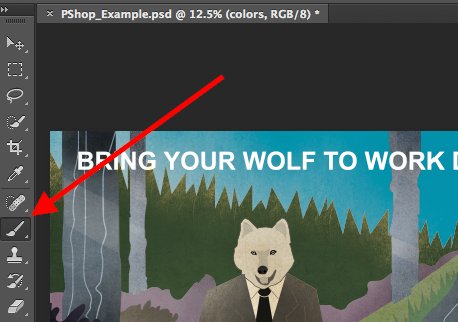
When choosing the Brush tool, all the settings and brush options will appear at the top of the screen. These settings allow you to adjust the brush size, opacity, .
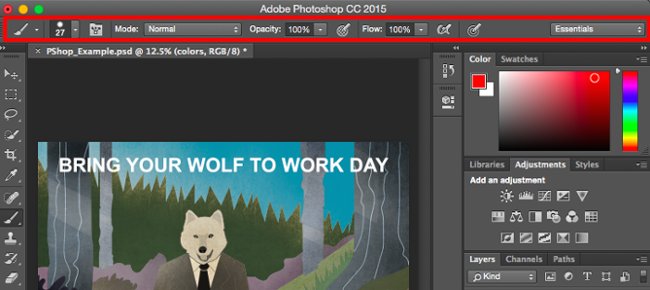
Use the Brush tool
The right tool to create design highlights for content. I recommend that when using the Brush tool create a layer to avoid overwriting other details. The color can be selected from the Swatches library or the custom color.
Changing the Brush settings can give design a unique style and even amaze others. Don't be afraid to play with the brushes a bit.
5. Select Tool
Define
When used correctly, this tool allows detailed selection, graphics, copy, cut, and paste into images.
Location
On the left toolbar.
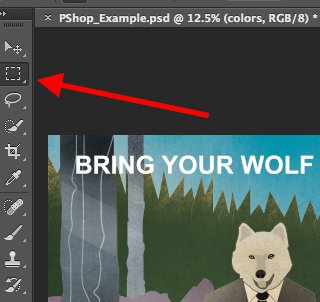
The Select tool is known to be one of the most basic tools, but does not mean that the tool is ineffective. The need for this tool is that it only works when the layer is selected. So if you want to cut or copy an area on Layer 4, choose Layer 4, which means it is highlighted in the Layers bar. And the selected area is marked by a dashed, flashing line.
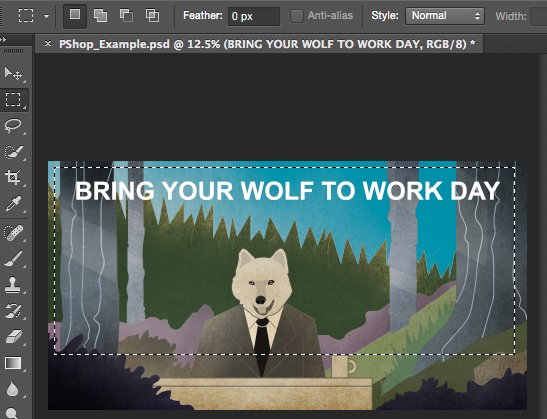
You should pay attention to the layer you are using, then using this tool will become easier.
First, select the area. Then, right-click and select the custom from the pop-up menu. For example, you can retrieve several objects from the current layer and create a separate layer.
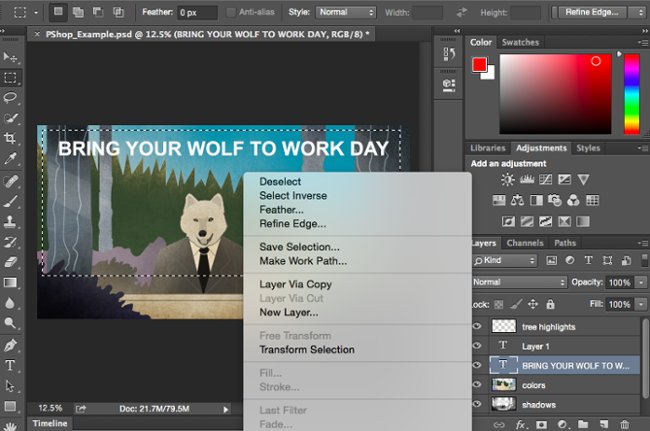
How to select photos to insert into graphics
Open the image you want to insert in Photoshop and use the Select tool to determine which area of the image you want to take. Then copy it.
Next, open the tab for the project to insert and paste as a new layer. Turn on the layer of the object you want to select. Moreover, it is possible to move multiple objects when multiple layers are turned on.
Next step, right-click and there are several options as follows:
- Select Layer via Copy to copy the object from that layer and create a layer for the object.
Pro tips more:
- To select the entire image including all layers, turn on all layers simultaneously and click Select Tool . When you locate the copy area, use the menu bar at the top and click Edit > Copy Merged . Finally, the entire image will be copied and pasted into its layer.
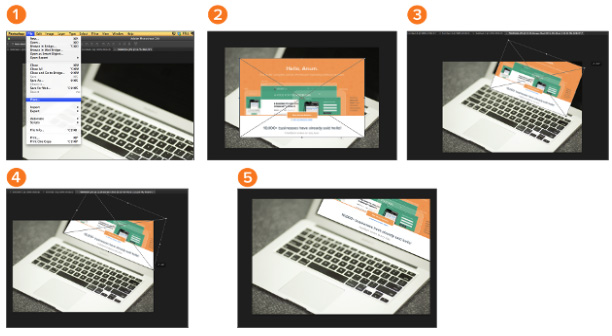
- Select Free Transform to align, rotate, move and flip objects of your choice.
- Another extremely useful tip that you can use with Free Transform is to create an overlay with a PDF file to help the image look like a 3D image, like the image below.
6. Move Tool
Define
This is the basic tool that allows you to move parts of an image.
The Move Tool works on each layer or on the entire image if you turn on all layers. This tool is useful when you try to reposition photos, text, and other designs.
Location
Top right of the toolbar.
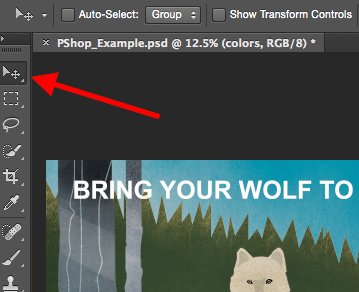
Use the migration tool
Click the Move icon from the left menu and drag the object you want. Move all objects on the same layer, turn on that layer and use the Move tool. You can right-click on the image to get additional customizations.
To align, rotate, move and flip
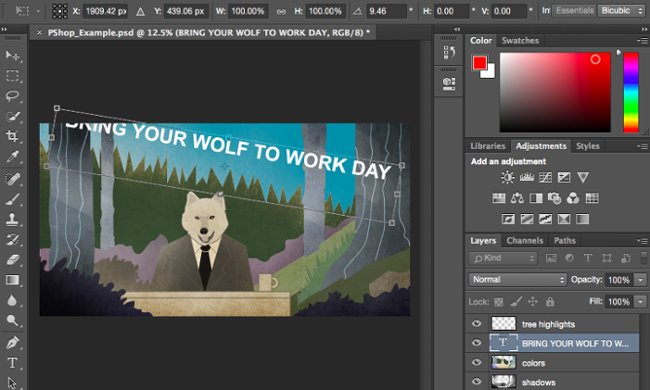
The Free Transform tool allows you to align, rotate, move, and flip any part of a selected layer. Use Ctrl / Command + T to launch Free Tranform, and try the pop-up options on the top of the screen. Hold Shift while switching to maintain the aspect ratio.
7. Zoom Tool
Define
The Zoom tool allows close zoom into specific areas of the image and zooms far away to see the entire picture.
Location
Top menu bar, select View > Zoom In or Zoom Out.
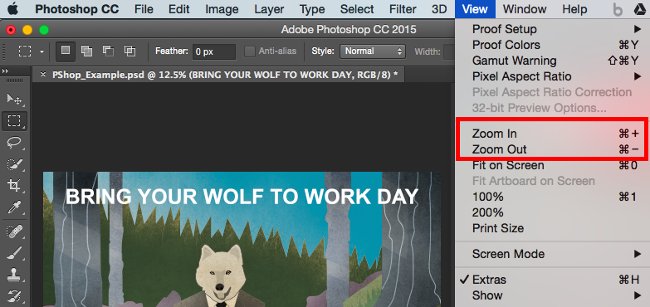
Use the Zoom tool
Select custom zoom from the View menu. Or use the shortcut, hold Alt or Command to press + to zoom close, Alt or Command with the button - to zoom away.
8. Eraser
Define
The Eraser tool is similar to the Brush tool, you can change the size and hardness of the eraser to have a variety of effects like blurring and blending. Remove background using different colors to help you delete unwanted background areas on photos.
Eraser is one of the useful tools in Photoshop. But you've never used an eraser like the one below.
Location
On the left toolbar.
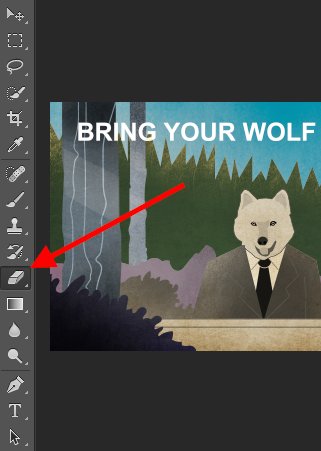
Use Basic Eraser
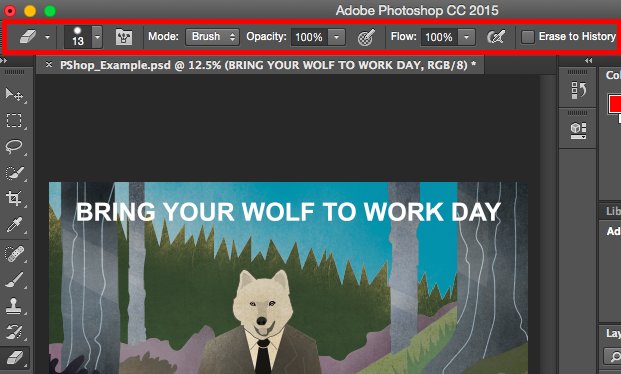
When clicking on the eraser icon, all options will appear at the top of the screen. There are customizations such as resizing bleaching, hardness, .
Like most tools in Photoshop, eraser only works on a defined layer. Before using this tool, make sure to select the layer you want.
Use Background Eraser
This tool is quite time-saving. You can see it easily removes the background color of the image. Pretty useful when hiding objects with transparent backgrounds.
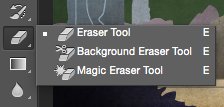
To use the background eraser tool, select and between the eraser icon until the next menu appears. Select Background Eraser .
Are you ready to delete something now? Resize the Background Eraser, and select the color you want to delete from the selected layer. Remember to choose the right layer.
Tips
Don't be afraid to use the huge size eraser of Background Eraser. Because it will delete specific colors from the image but not delete the color when not selected.
9. Crop Tool
Define
Crop tool allows cropping images. It basically works like the other cutting tools you have used: Locate and cut off.
I know this is the basic tool, but you'll have to use it as often as other tools in Photoshop, especially when you've just finished editing and need to remove the extra space around the corners.
Location
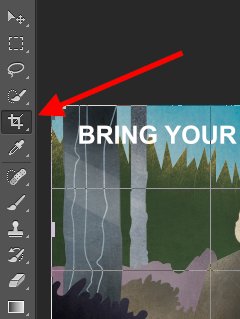
Like other tools, it is located on the toolbar on the left.
Use the Crop Tool
Select the Crop icon on the sidebar and move the frame to the position you want to remove. To adjust the frame, simply click and drag the corners and edges of the frame.
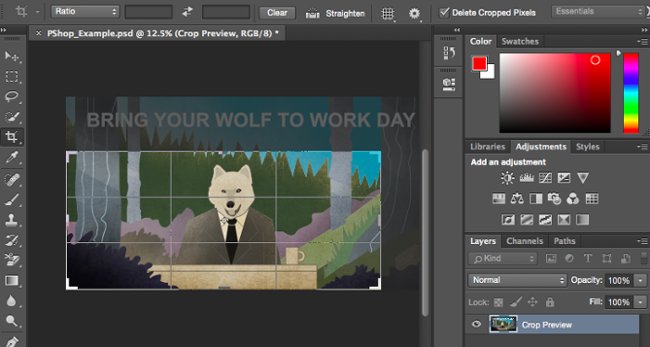
Tip: You can make the design frame wider so that you can move the necessary design elements, then use the Crop tool to bring them to the right size.
10. The Fill Tool
Define
The previous Fill tool is the Paint Bucket tool, coloring the entire area of your choice. Suitable for large backdrops or areas. In addition, textures can be used. The Gradient tool in the Fill tool creates a blur effect for the selected color.
Location
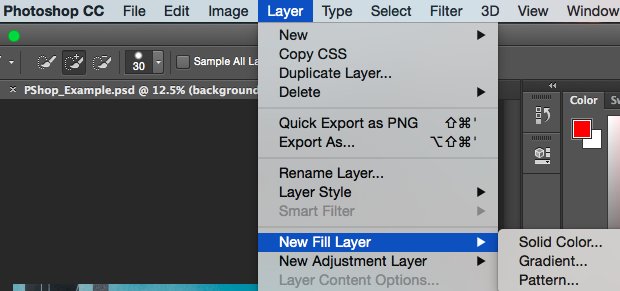
On the main menu, select Layer > New Fill Layer . From there, you have the options "Solid Color", "Gradient", or "Pattern" .
Color fill
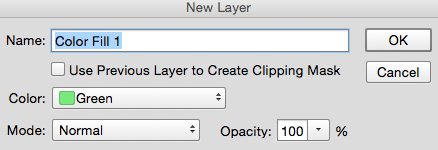
First, select the layer you want to fill. Then, from the main menu, select Layer > New Fill Layer > Solid Color . Next, the New Layer window will open, enter the layer name. Don't worry about choosing your color at that time, this step is simply to name the layer. After naming, select OK .
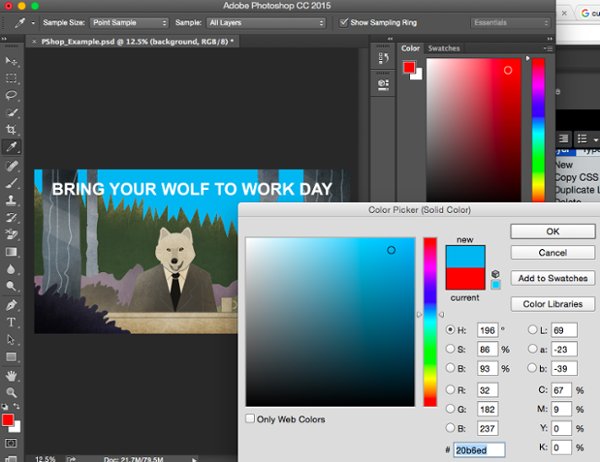
Next, the Color Picker window appears. Here, you can choose the color you want to fill. From there, select the background layer to color, the color selected in Color Picker is blue by default.
Textures for photos
You can also design your own textures if you have time and passion or download free textures available on Google search.
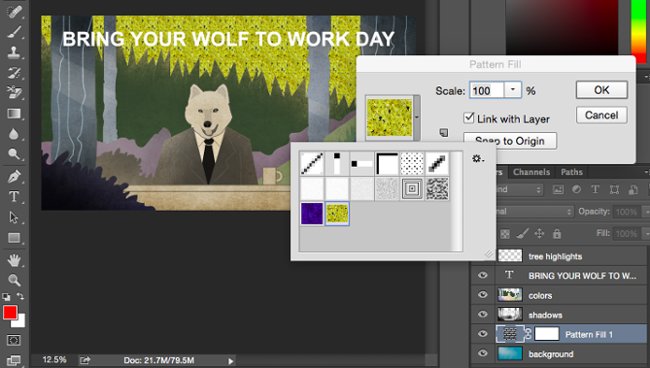
First, select the layer you want to fill. Then, from the main menu, choose Layer > New Fill Layer > Pattern . Next, the New Layer window will open, enter the layer name. Don't worry about choosing your color at that time, this step is simply to name the layer. After naming, select OK .
Next, the Pattern Fill window appears. Here, you can choose textures. From there, select the background layer to fill it, the selected color will replace the blue background.
Use Gradient Fill
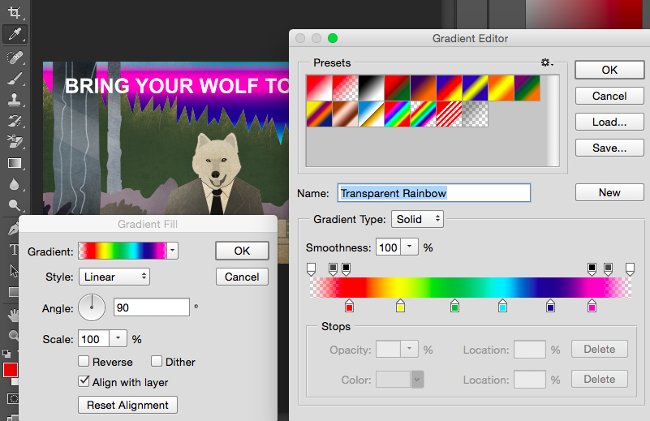
First, select the layer you want to fill. Then, from the main menu, select Layer > New Fill Layer > Gradient . Next, the New Layer window will open, enter the layer name. Don't worry about choosing your color at that time, this step is simply to name the layer. After naming, select OK .
Next, the "Gradient Fill" window appears. Try using the options in the window. To select another gradient, right-click the default gradient to open the Gradient Editor, as shown below:
11. The Eyedropper
Define
This small tool allows you to extract or use any color from photos in Photoshop.
Location
Located on the left toolbar.
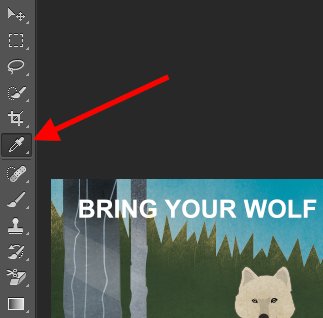
Use Eyedropper
Select the icon on the sidebar. Next, determine the color you want to extract, and click the copy area.
Once you've extracted the color, you will see it displayed both on the color module at the top right of the screen and the side menu bar. You can double-click on the color box to open the advanced color.
12. Blending Options
Define
Blending options include a number of interface and graphic editing features. For example, you can use the "Outer Glow" effect to make the text appear as if it is glowing. Or, you can use the "Drop Shadow" effect to add shadows to the text. Take some time to explore the layer effects and find your favorite features.
Location
From the main toolbar, choose Layer> Layer Style> Blending Options . You can double-click any layer to open the custom for the specific layer.
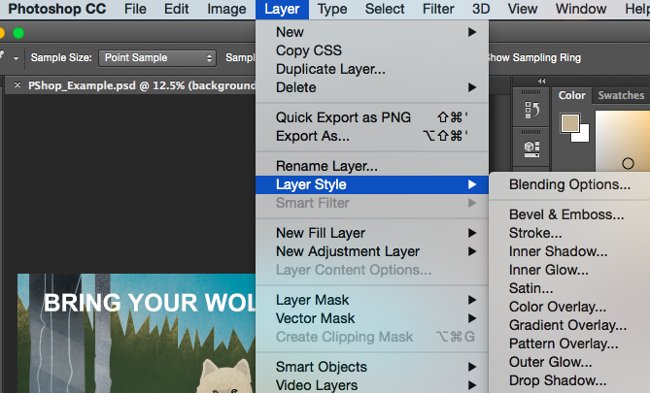
Use Blending Options
First, select the layer used for blending. Next, open custom blending and select the object you want to use. With the customizations available, you can have a large amount of effects to complete the picture. There are many interesting things in each layer, photo and text. Look at the picture below:
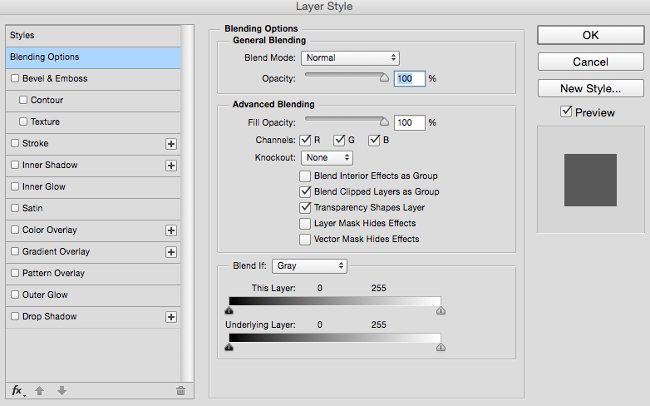
For example, edit the text layer and select "Bevel & Emboss". Look beautiful, isn't it?

I'm not sure you can become a Photoshop witch right now. And that's not my purpose in this tutorial. I just hope I have provided you with the necessary knowledge to use useful features in Photoshop effectively and save time.
Discover more
Adobe Photoshop adobe photoshop cc photoshop shortcutsShare by
Samuel DanielYou should read it
- How to reset tools in Photoshop to default settings
- Instructions for using Photoshop CS5 to edit photos in full set
- How to blur photos using Adobe Photoshop Fix Android
- How to use Photoshop CS5 - Part 3: Introducing Layers
- 15 common problems in Photoshop and basic remedies
- The Quiet Details That Make a Sports Betting Platform Feel Reliable
- Instructions on creating toy set images with ChatGPT AI
- How are AI agents changing the journalism industry?
- 10 things to know about Mask in Photoshop
- Use the blur feature in Photoshop
- Photoshop shortcuts help you work faster (part 2)