A full guide to editing photos in GIMP
GIMP's excellent photo editing capabilities make it the best free replacement software for Photoshop. This article will show you how to use GIMP to edit photos.
GIMP's excellent photo editing capabilities make it the best free replacement software for Photoshop. This article will show you how to use GIMP to edit photos.
If you are a new user of the app, you can easily download, use and get great editing images. If you've used Photoshop before, you'll find many familiar points at GIMP. Although it has a number of different features, and other naming tools, the basic principles are the same.
Edit photos in GIMP
- Install GIMP
- Adjust layout
- Before start
- Pull the horizon straight
- Cut photos
- Adjust the exposure
- Adjust the white balance
- Refine colors
- Increase contrast
- Remove dust
- Apply filter
- Increase memory for undo actions
- Apply conversions
- Export images and find more information
- How to change the image size in GIMP
Install GIMP
GIMP is a very powerful and outstanding photo editing program. By learning how to use it, you will have great photos. Making subtle or 'spectacular' changes will turn ordinary images into something truly special.
Choosing the right photo editor is always a difficult decision: Want a free program or a powerful software? With GIMP (GNU Image Manipulation Program), you can have both. It is as powerful as many other professional image editing programs, and because it is open source, it is completely free to download and use GIMP.
Getting started with any program is harder with Photoshop, and GIMP also has a slightly special interface. But once you're familiar with its most powerful tools, you'll find it easier to make your photos great.

GIMP for Windows || GIMP for Mac || GIMP for Linux.
First, download and install GIMP. It's a pretty heavy program, so be prepared that the download will take a long time, especially if your Internet connection is a bit slow.
GIMP's default configuration is a set of floating windows, but it has been upgraded recently with a view for each window.
Adjust layout
You can accept all the default options and go through the installation steps in seconds, continue to click Finish and then start the program for the first time. Starting for the first time may take longer than usual, as the program must take some time to analyze the computer and search for your hard drive.
When GIMP is set up and running, you'll find that it seems a bit different from most other software, because it was originally developed on Linux. The interface is made up of multiple windows and you can rearrange them the way you want - or you can click Windows > Single-window Mode to have a more familiar environment.
Instead of simple presets, GIMP gives you total control over the colors in the image.

Before start
Before learning how to use GIMP to edit photos, there are a few things you need to know:
- By default, all application tables and toolboxes have their own windows. To return to the traditional interface, select Windows> Single-Window Mode .
- Images are usually opened in zoom view. To set the image to a more suitable size, go to View> Zoom> Fit Image in Window .
- GIMP does not support non-destructive image editing, so any edits made to a file will be permanent. For this reason, always work on a copy of the file and keep the original safe.
- Also, consider applying all edits to duplicate the layers in the image (right click on the layer in the Layers panel on the right and select Duplicate Layer ). After that, you can delete this layer if you want to delete that modification.

Pull the horizon straight
Creating a deviant horizon is one of the most common mistakes in photography but is also easiest to fix unless you deliberately take pictures that way for artistic reasons. Select the Rotate tool from the toolbox in the left column, or press Shift + R. In Tool Options below, set the Clipping to Crop to result .
Now click anywhere in the image to open the Rotate box. On the side of Angle , click the up and down arrows to rotate the image. Each click will rotate the image by one tenth of the degree. You can enter the number in the box if you want to make smaller adjustments.

When you're happy with editing, click Rotate . The image will now be rotated and cut to shape. Finally, go to Image> Autocrop Image to remove the remaining transparent areas around the edges.
Cut photos
Cropping an image is an effective way to shrink the composition of an image or remove unwanted objects around the edges. Select the Crop tool (Shift + C) . Now click and drag inside the image to draw a new border. Hold Shift to maintain the original frame rate of the image.

To adjust the selection, hold the mouse at the corner or edge of the frame and then drag in or pull out to edit. Alternatively, click in the middle of the frame and drag to reposition the cropped area, then press Enter to confirm.
Adjust the exposure
When the image is too bright or dark, the brightest parts of the frame are displayed as pure white and without details, you need to change the exposure.

Go to Colors> Brightness-Contrast , then drag the Brightness slider left or right until you are satisfied. Turn on and off the Preview button to see the effect before and after, then click OK to apply the changes.

Adjust the white balance
White balance is used to remove an unrealistic color in an image. Although it is obvious that, if shooting a white area, the image will appear white, however, sometimes the camera can create a different color due to ambient light conditions. For example, under certain artificial lighting, the image may be orange or under a cloudy sky may be blue.

To fix this problem, go to Colors> Auto> White Balance . If you are not happy with the automatic result, you can do the editing manually by going to Colors> Levels and at the bottom of the window that opens, click the drop-down icon in the middle. This will allow you to set a gray point in the image, a neutral colored area where all other colors will be based on it.

With the dropper icon selected, find a gray area in the image and click on it. The color of the photo will change immediately. You can test different shades of gray in different parts of the image until you find a color you're happy with.
Refine colors
Editing the colors will make the photo more beautiful. Vibrant, vibrant colors often get a stronger response on social media, but you can also create more intense colors if you match the effect you are using with the image. mine.
Start editing by selecting Colors> Hue-Saturation . You can increase the color on the entire image with the Saturation slider. Note that it is easy to make your image too saturated, so make changes slowly. One rule that users can apply is to set saturation to a stable level, then just return to the previous saturation a bit.
For more control, you can adjust the red, magenta, blue, cyan, green and yellow parts of the image separately. Here, the Lightness slider will be used instead of the Saturation slider.
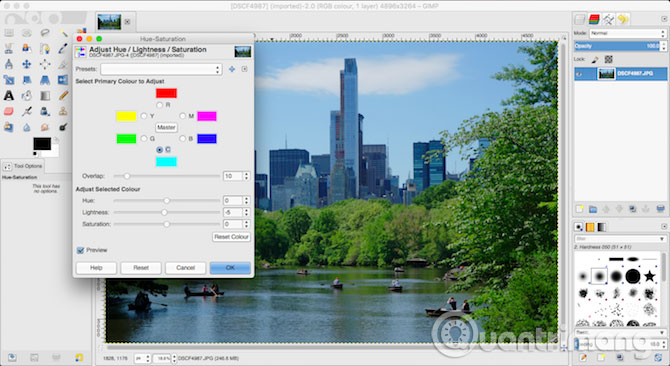
For example, to make the sky look clearer and greener in focus on green and blue colors, set the Lightness slider to a darker level. Or make the grass and leaves look greener and more vivid, increasing the level of Lightness to green. If you see rough edges around the color area you have adjusted, just drag the Overlay layer to the right to blend them better.
You can also use GIMP to create digital paintings from scratch, as it has a diverse and flexible set of tools to create original artwork. But most likely you will want to use it as an editor to optimize your photos.
Open an image, then explore the editing range using the tools in the Colors menu . GIMP has automated optimization tools that you can't find in other ineffective image editors. GIMP has a powerful set of options such as color adjustment, saturation balance and contrast, as well as a more advanced curve adjustment feature.
GIMP's excellent Healing tool allows you to eliminate drawbacks, scratches and distracting details of objects in the image.
Increase contrast
The easiest way to add an effect to a photo is to increase the contrast. This can turn a flat image into something that looks like a drama. The best way to do this is to use the Levels tool, which you can open by visiting Colors> Levels.
This will open the Levels dialog box, with a chart (labeled Input Levels ) in the upper half. This chart displays the color range of the image: black on the left, white on the right and all shades of gray in the middle.

All you need to do is drag the handles under the chart until they match the first pixel on the left and right sides of the chart. This puts the image's darkest point into 100 percent black and the brightest point up to 100 percent and maximizes contrast.
Remove dust
GIMP's amazing Healing tool is extremely useful for photographers. It looks like a plaster in the left toolbox, and can be used to remove all unwanted elements from the image, such as spots and facial stains, canopies leaves and anything you want to remove.
GIMP has a quick and easy tool to remove specifications from a dusty image on a camera lens or sensor.

First, enlarge the image by going to View> Zoom> 1: 1 or pressing 1 on the keyboard. You can move around the image by holding down the spacebar, then clicking and dragging with the mouse.
Next, select the Healing Tool (H) . Use square frame keys ( [ and ] ) to adjust the size of the brush to match the size of the stain.
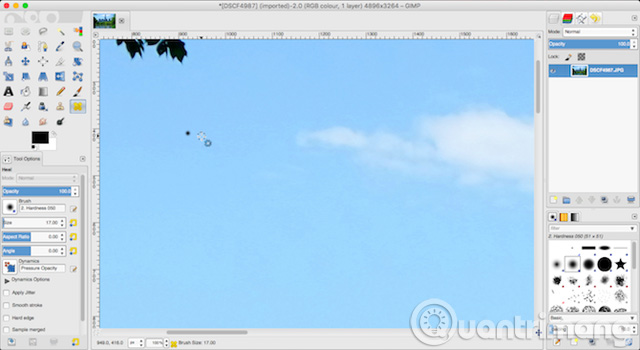
Hold down the Ctrl key on Windows, or Cmd on the Mac, then click on an area of the same color right next to the point you want to delete. Then release the Ctrl or Cmd key and click on the blank. Now the stain will disappear.
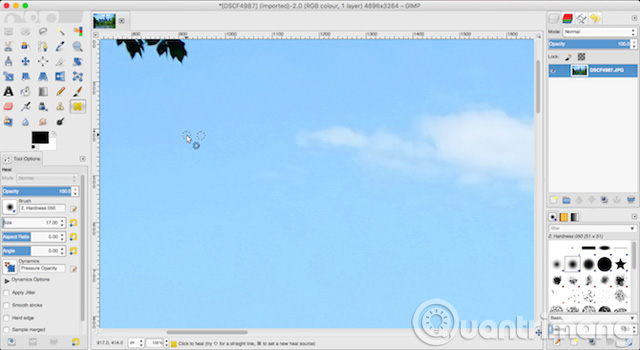
What you are doing is telling GIMP to copy the pixels from the first click and paste them into the second part (dust section). Then blend them seamlessly and naturally. Repeat this for all unwanted points on your image.
In addition, GIMP contains a great set of image enhancement filters, including many creative options.
Apply filter
One of the fastest and easiest ways to improve the look of any image is to use multiple filters integrated into GIMP. In the Filters menu , you'll find everything, from the option to add lens effects to your photos, to make the image look as if it was printed on canvas.
Don't be afraid to experiment here. You can use the Undo option if you don't like something.
Also note that you can apply effects to a part of the image, instead of the entire image, by creating a selection before applying the filter.
You can adjust the amount of RAM allocated to GIMP's Undo tool, allowing you to undo more functions.
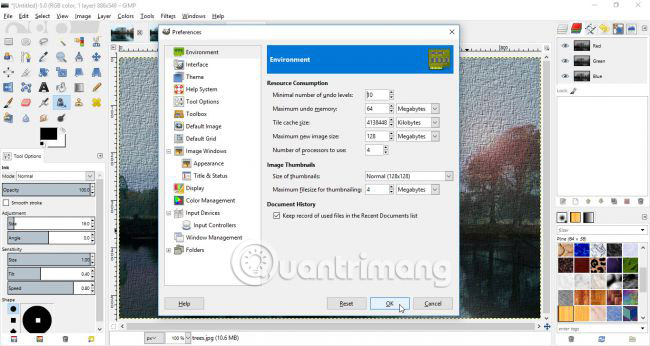
Increase memory for undo actions
If you start doing many experiments, you may find that you start to go beyond undoing. To help fix this problem, you can fine-tune the program settings so that more memory is set for more undone actions. Click the Edit menu and select Properties, and in the Environment section , you can choose the number of undo levels (the number of actions you can reverse) or the amount of undo memory.
While you are in Preferences, it is worth considering if there are any other customizations you want to make.
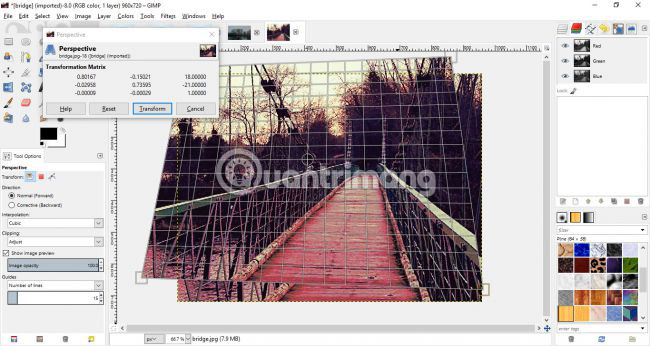
Apply conversions
Another powerful option found in GIMP is the conversion tool. You will find a full range of conversion options in the Tools menu and some options can be accessed from the left toolbar.
If you took a picture and you want to adjust it to straighten things up a bit, the Perspective tool will be very useful. After selecting this tool, you can drag and rotate your image from the corners, previewing how everything looks on the Perspective Grid. When you're happy with the result, click Transform.

Export images and find more information
When you're done, you should choose to export the result instead of saving it, unless you intend to return to GIMP and edit it later. GIMP stores files in its own proprietary format, leaving all layers of the image intact, but cannot be opened in other programs.
Instead, if you click File > Export, you can choose more popular formats like JPG and PNG.
How to change the image size in GIMP

The last job in the photo editing process is to resize them correctly. This is quite simple. Go to Image> Scale Image , then under Image Size, enter a new width for the image (in pixels). Set Interpolation to Cubic (this is the slowest but best quality option).
It is best to only reduce the image size. If you need to increase the image size, it is best to only increase the maximum by 10%.
If you plan to resize to print images, use Image > Print Size instead. Be sure to know DPI well and how it affects the image size printed before selecting this option.
It's easy to learn how to use GIMP to edit images. The above steps will help make the original image look great, suitable for online printing or sharing purposes.
Once you've mastered everything, you should install some of the best GIMP plugins. These plugins make GIMP a more powerful image editor and allow RAW image editing, apply filters, edit skins and more.
Like any image editor, you can do everything with GIMP.
Wish you have pictures like GIMP!
See more:
- Create ghosts in Photoshop or GIMP
- Let your photos 'shine' with GIMP's background change feature
- Instructions for drawing arrows with Gimp


 How to cut a circle image on Paint
  How to fix the error of saving JPEG images into JFIF on Chrome
  Instructions on how to crop a circle image online
  How to create a 3x4 photo in Paint
  How to batch format photos in Windows 10
  How to delete text in photos with Paint