Steps to bypass TPM 2.0 requirement when installing Windows 11
So how to bypass TPM 2.0 requirement when installing Windows 11? The answer is to follow the instructions below. With this guide, you can install Windows 11 regardless of TPM 2.0 requirements.
Bypass TPM 2.0 by editing Registry Editor during Windows 11 installation
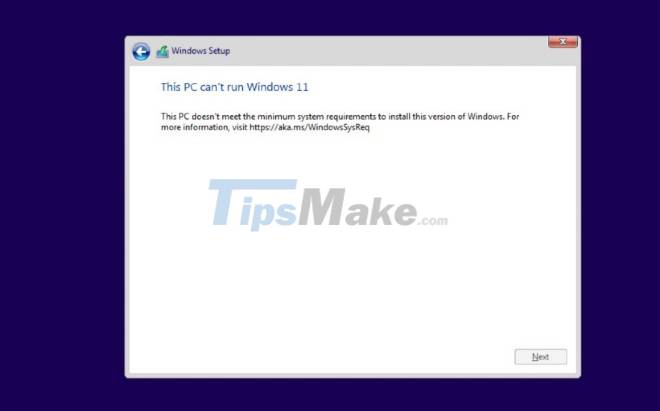
During the installation of Windows 11 on a computer without or without TPM 2.0 enabled, you will receive the message "This PC can't run Windows 11" as shown below.

Here you can start editing the Registry Editor to bypass TPM 2.0. Here's how to do it:
Step 1 : Press Shift + F10 to open a command line window (CMD)
Step 2 : On the CMD window, type regedit.exe and press Enter
Step 3 : On the Registry Editor window, go to:
HKEY_LOCAL_MACHINESYSTEMSetupStep 4 : Right-click Setup and select New > Key to create a new key named LabConfig
Step 5 : Create 2 new DWORD values in the newly created LabConfig key by right-clicking on LabConfig and then selecting New > DWORD (32-bit) Value . Name the 2 new values BypassTPMCheck and BypassSecureBootCheck
Step 6 : Double-click the two newly created values and then enter 1 in the Value data box then press Enter

After you save and exit, the error message above will disappear and you can install Windows 11 normally.
Bypass TPM 2.0 and Secure Boot by fixing the Windows 11 installation file
In addition to editing the Registry Editor, you can also edit the Windows 11 installation file to bypass the TPM 2.0 and Secure Boot requirements.
Before you start, you need to prepare the following:
- USB install Windows 10
- Windows 11 ISO file (currently no official file)
Step 1 : Mount the Windows 11 ISO file to the virtual drive by right-clicking the ISO file > Open with > Windows Explorer
Step 2 : Go to the sources folder, find and copy the install.wim file of the Windows 11 installer
Step 3 : Paste the install.wim file into the sources folder of the Windows 10 USB installation. Choose to overwrite the old file ( Replace the file in the destination ). In other words, you replace the install.wim file of the Windows 11 installer with the Windows 10 installer
Note : If there is install.esd file in the source folder of the Windows 10 installer , you must delete it. Then paste the install.wim file of Windows 11 in.
That's it, you can use that USB to install Windows 11 normally, bypassing the TPM 2.0 and Secure Boot requirements.
Above are the two simplest ways for you to bypass the TPM 2.0 requirement and install Windows 11 normally. Good luck!
You should read it
- How to bypass TPM 2.0 requirement when installing Windows 11?
- Free users of Spotify can skip ads
- Download Ghost win xp, win 7, 8, 10 32 and 64bit Link Google Drive
- 6 bad things will happen if you regularly skip meals
- Microsoft released Windows 10 Build 18865 (20H1) with Narrator bug fixes
- How to Make Windows 8 Move Deleted Favorites to the Recycle Bin Instead of Deleting Them
 Intel updates WiFi and GPU drivers for Windows 11
 How to turn off Snap Layout in Windows 11
 ThisIsWin11 tool customizes Windows 11 to run better
 Windows 11 transparency and rounded corners don't affect PC performance
 Microsoft explains Windows 11's default logo and wallpaper
 Microsoft claims Windows 11 does not copy macOS