Role of Section in text presentation
In some cases when building a document (usually projects, essays ...), we need to present rich and diverse in the same text file, such as multiple settings. margin system for text; paper orientation when printing; Many header and footer systems
In some cases when building a document (usually projects, essays .), we need to present rich and diverse in the same text file, such as multiple settings. margin system for text; paper orientation when printing; various header and footer systems; Many systems of page numbers and set different protection modes for each paragraph . in the same text.
Maybe in one way or another, you use the tools in the application to perform the above features, however we can use a paragraph break method and will perform functions on each piece thanks to Split section section tool.
1. Divide the text into multiple Sections (sections, sections).
Place the cursor where you want to split the paragraph, then select the Insert menu, select Break , we have the following options:
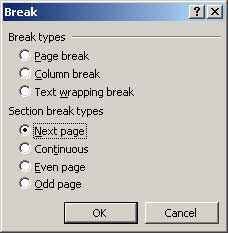
To add a section, select 4 options in the Section break types section , specifically as follows
- Next page : The new section starts at the beginning of the next page.
- Continuous : Section starts right at the cursor position.
- Even page : The new section starts from the next even page.
- Odd page : The new section starts from the next odd page.
After doing this, the text has been split into two parts, the latter part by the boundary is the Section break mark that we just inserted (this separator can be seen when you select the View menu). and select Nomal, the section number is also shown in the status bar). This way, we can split a text file into multiple sections as we like.
2. Set up multiple margin systems (Margin) and direction of Orientation in the same text.
We can set each section to have a different Margin system at will, as follows:
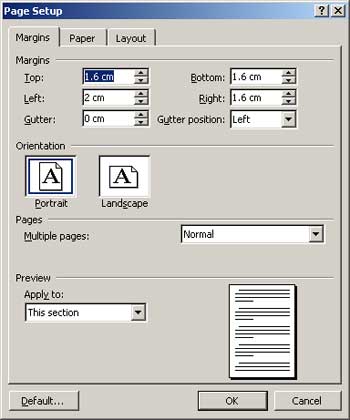
Place the cursor on the Section you want to set the margin for, select File , select Page setup , select the Margin tab. We set the margins for the normal print page at will, and finally, if we want to set the margin mode just set to apply only to the section containing the cursor, then in Apply to select this section (illustration), if you want to make Alignment applies to the entire document, select the Whole document . Similarly, we can set the print paper orientation for each section at the Paper size card.
3. Set up multiple headers and lower header (header and footer) systems for Sections.
In the following section, we want to have the above heading and the lower title different from the Section before we do the following:
Place the cursor in the following section, select the View menu, select Header and footer , before composing in the title content we click the Same as previous button for this button to be in subsidence mode to normal mode to remove The Header and footer options of all sections are the same (illustration).

Now the headers and footers we type will be different from the previous Headers and footers . This way, we can create Headers and footers for each section separately.
4. Set up multiple page number systems on the same text.
We can create each Section with a different page number system, how to do the following:
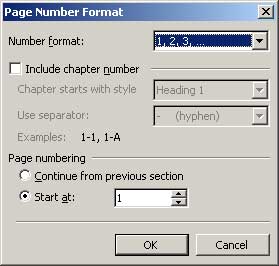
Place the cursor in the Section you want to create your own page number system, select Insert menu, select Page numbers , Page numbers window will appear, select Format button. At the Page numbering section of the Page Number Format window, check the Start at item and select the first order number of the first page of the Section (illustration). When completed, this section will have a separate page number system according to your wishes.
5. Set the content protection mode for each piece of text.
After creating the sections that need to protect the content, we do the following:
Select the Tools menu, select Protect Document , the Protect Document dialog box appears, check the Forms item, then the Sections button will be enabled (lights up), select the Sections button.
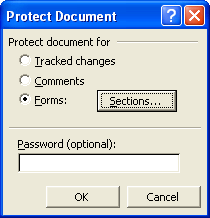
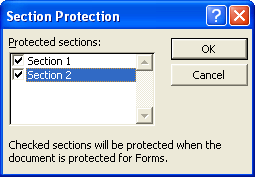
The Sections Protection dialog box appears, in which Sections Protection is numbered from 1 to 9. In order to protect a Section, please mark that Section, for example Section 2.
Back in the Protect Document dialog box, enter the password in the Password ( Options ) box. The Confirm Password dialog box appears, re-type the old password again in the Reenter Password to open box .
After completing these steps, the text is protected according to each Section according to your intentions, all the content in the protected section cannot be corrected (except for yourself, of course).
To fix the content of the text, select the Tools menu, select Unprotect Document . The Unprotect Document dialog box appears, type the correct password in the Password box so that we can fix the text we protect.
Chu Ngoc Anh ( Department of Posts and Telematics of Vinh Phuc Province )
Email: ngocanh1978@gmail.com
Was this article helpful?
Your feedback helps us improve.
Related Articles
 How to Add an Object to a Presentation2 minutes read
 How to delete the entire Section Break in Word3 minutes read
 How to Create a New Prezi Presentation3 minutes read
 Learn about Permission and Role Based Access Control - RBAC part 210 minutes read
 How to Present a PowerPoint10 minutes read
 Change the Section Break in Word 2007 and 20102 minutes read
Reader Comments 0
Sign in with email or Google to join the discussion.