Create a new heading in Office 2003

MS Word: Next section Create automatic table of contents, QuanTriMang.com continues to introduce more about how to create new Heading and how to delete text

Create a new heading in Office 2003

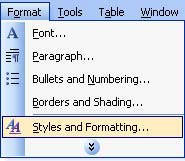
1. Go to FormatStyle and Formatting .

Create a new heading in Office 2003 Picture 1Create a new heading in Office 2003 Picture 1

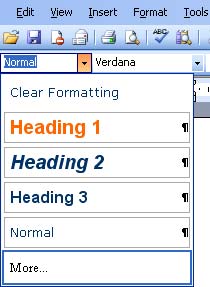
Or go to StyleMore box .

Create a new heading in Office 2003 Picture 2Create a new heading in Office 2003 Picture 2

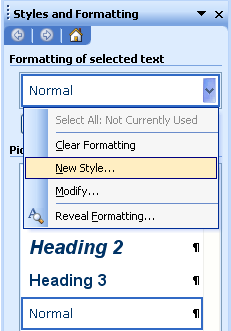
2. The Style and Formatting panel will appear on the screen, select the New Style button or the New Style line . on the Formatting of selected text drop down box:

Create a new heading in Office 2003 Picture 3Create a new heading in Office 2003 Picture 3

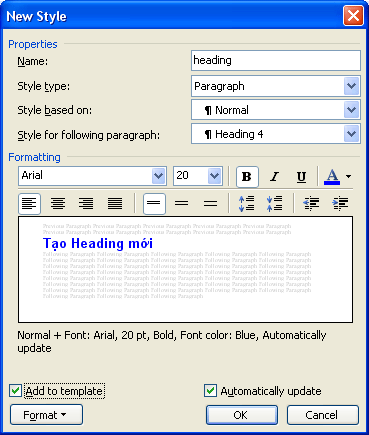
3. New New Style dialog box appears:

Create a new heading in Office 2003 Picture 4Create a new heading in Office 2003 Picture 4

  1. Name: Name Heading
  2. Style for following paragraph: Apply new format for heading type, note, caption, bullet character, .
  3. Formatting: Font format.
  4. þ Add to template: Apply this new format to the following files. If not marked, only apply to the current file.
  5. þ Automatically update: When changing other formats for Heading will automatically update without having to enter the Modify Style dialog box to modify.
    - Format button: Some formats for Heading (can be viewed at: https://quantrimang.com/view.asp?Cat_ID=20&Cat_Sub_ID=1&news_id=31698)

4. Select the OK button to complete, the name of the new heading will appear on the list in the Style box.

Delete the format as heading

1. Select the line that has set the heading.

2. In the Style box, type Normal: Create a new heading in Office 2003 Picture 5Create a new heading in Office 2003 Picture 5

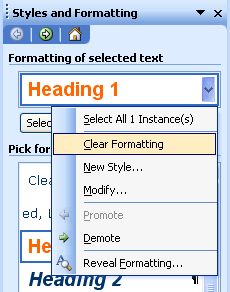
Or: On the Formatting of selected text box drop down menu select Clear Formatting.

Create a new heading in Office 2003 Picture 6Create a new heading in Office 2003 Picture 6

3. After executing step 2, the text content will return to the normal font format.

5 ★ | 2 Vote