Photoshop CS: Christmas cards for relatives
Christmas season is near, you have prepared the gifts to give to relatives? Each gift is a meaningful gift and do not forget to include a postcard and good wishes..
Christmas season is near, you have prepared the gifts to give to relatives? Each gift is a meaningful gift. But do not forget to include a postcard and your sincere, loving wishes.
In this practice exercise. I will guide you to make a greeting card in just a few simple steps. It is simple but it will be interesting. First, practice my exercises. Then you will create your own postcard.
Imagine your card result will be:

And now let's start practicing with me:
Part I: Create greeting card background .
Step 1 . Ctrl + N opens an invitation document, size (600px x 500px), Background # CE4102
Step 2 . Press F7 to open the Layers palette .
Step 3 . Create a layer whose background is black above the original layer
- Layer > New > Layer . or ( Shift + Ctrl + N )
- Rename the new layer to "Tuyet whip"
- Press D to switch the default background color on the toolbar to black - white
- Press the X key to reverse the background to white - black
- Press Ctrl + Backspace to turn the background layer "whip" into black
Step 4 . Create snowfall.
- Filter > Noise > Add noice ( Amount : 80% - 90%, Gaussian , Monochromatic )
- Filter > Blur > Gaussian blur with Radius of 1.5 Px
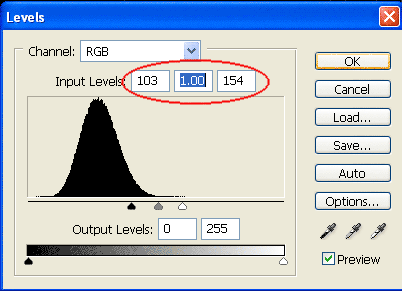
- Image > Adjustments > Levels or Ctrl + L with the following parameters:
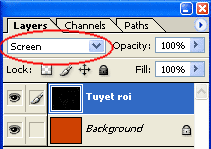
- On the Palette layer , select Blending option: Screen
Result step 4: you have the following picture:

Step 5 . Scoring a few snowflakes to make the cards more impressive.
- Shift + Ctrl + N to create a new layer> rename this layer to "hoatuyet"
- Select brush tool (or press B)> Select brush strokes "snow flower"
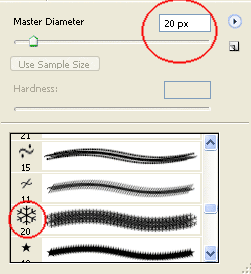
(You can find the snowflake brush on the Assorted brushes file of the pop-up menu on the Palette Brushes )
- Finally, score a few snowflakes on the "snowflakes" layer and set the layer 's Opacity to 60%.

Step 6 : Ctrl + Shift + E > combine all the layers into 1.
Part II. Greeting card content
Step 1 : Card frame
- Select Rectangular Marquee Tool > size: 250 x 400

- Click on the corresponding position on the Background layer (card background)
- Shift + Ctrl + N to create a new layer called "Frame"> Set the background color of this layer to white
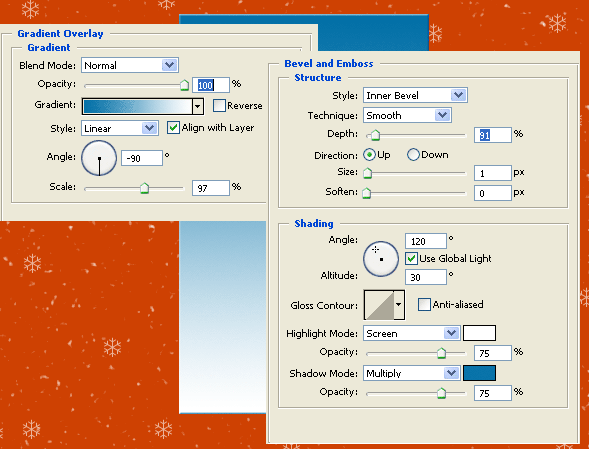
- Right-click the "Frame" layer> Blending option > Gradient Overlay with green color (# 0370A7) - white (#fffff)> Bevel and Emboss (Style: inner Bevel, Technique: smooth, Size: 1, Shadow mode : ## 0370A7)
Step 2 : Snowflakes
- Press Ctrl + click "frame frame" layer> create a selection frame around
- Shift + Ctrl + N create new layer> name "Bong tuyet"
- Select brush tool> pen stroke Soft Round 27> Set Opacity : 63%

- Mark a few "Bong tuyet" layer brushes. (At this point, the brush will only be filled in the selection)
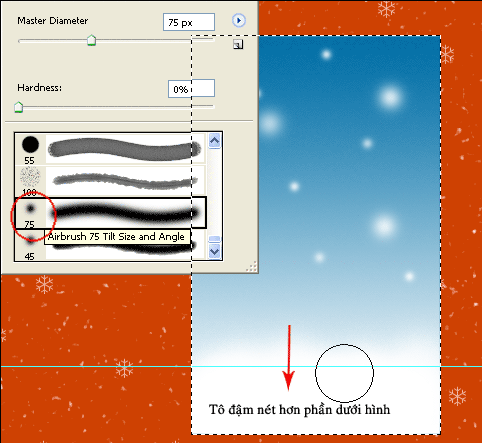
Note : When you paint the brush, change the size to a small and small stroke so that the brush strokes are shaped like the following
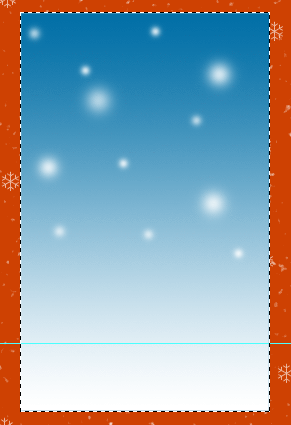
- Choose the Brush with stroke: Airbrush 75 tilt size and angle > set Opacity to 70%
- Bring the pen stroke from the top down to the "Bong tuyet" layer, highlight it at the end of the image
Step 3 : "Snowman"
- Create "circle 01" layrer with background "# F1EDED"
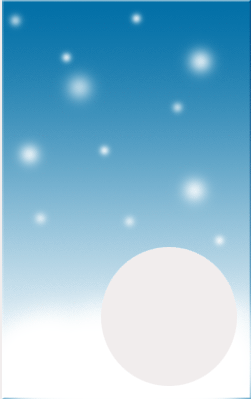
- Ctrl + Click the "Circle 01" layer> Shift + Ctrl + N to duplicate the Layer (with the same circle shape 01)> set the background "#ffffff"> name "circle 02"
- Select the layer "Rounded 01"> Ctrl + T> drag the circle into an ellipse
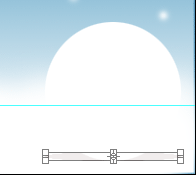
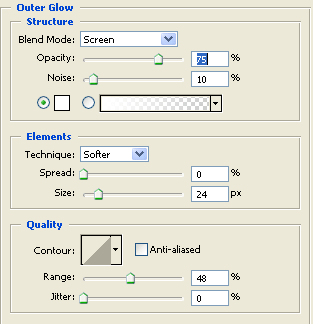
- Select layer "circle 02"> right mouse> Blending option > Outer Glow with the following parameters:
- The next step is to paint the eyes and mouth for the snowman (this drawing is simple, so look at my picture and follow it)
- Draw the eyes and mouth, you create a hat for this snowman.
+ Using Polygon Tool , set sides: 3: to convert into triangles
+ Draw a triangle in the following figure

+ Shift + Ctrl + N Create a new layer called "red hat"> Ctrl + Enter to create a triangle selection> set the background color for this red triangle
+ Use Furrball Brush to fill the hat cap and hat

Step 3 : Write a text of greetings.
This part will probably not guide you anymore. With a simple card, you should only write the text gently, so the card will not be tangled.
This is an example of my text.

So you have a card already. But don't stop here. Please take a few more minutes to decorate your card more impressively.
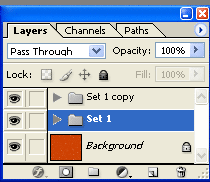
Step 4 . Create layer management file.
- Click on the top layer.
- Click the " Create a new set " icon below the Palette layer => a layer set named "set 1" appears.
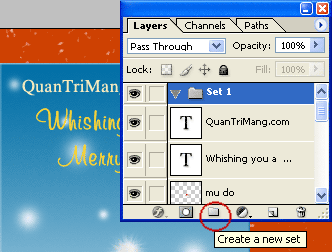
- Click a layer> hold the left mouse button and move the currently selected layer to "set 1" and release the mouse button
=> Repeat this step with the remaining layers, except for the background layer (background card)
=> The purpose of this action is to leave all the layers in the set 1. The next step is to imagine more specifically why I did so.
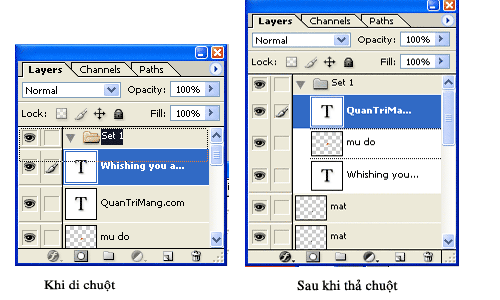
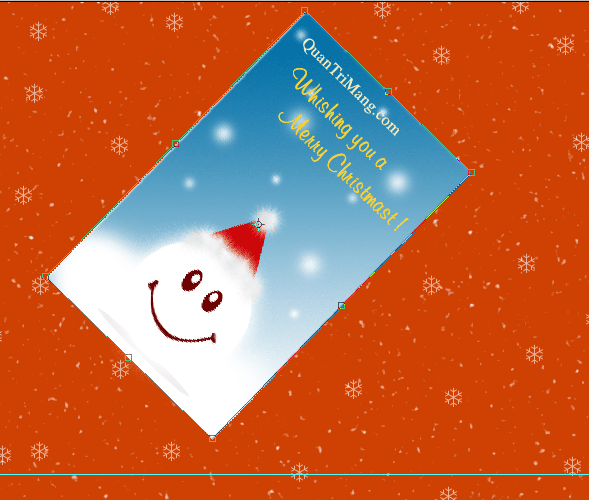
Step 5 : Rotate the layer set 1
- Select 1> Ctrl + T layer set> Mouse over the corner of the selection> rotate as shown below
Step 6 . Duplicate Layer 1
- Right click "set 1"> Duplicate layer set > we get "set 1 copy"
Result
Step 7 : Create shadow for layer 1 set.
- Click Select 1> Ctrl + T layer set> Move to an angle> Rotate 90 degrees as shown below.
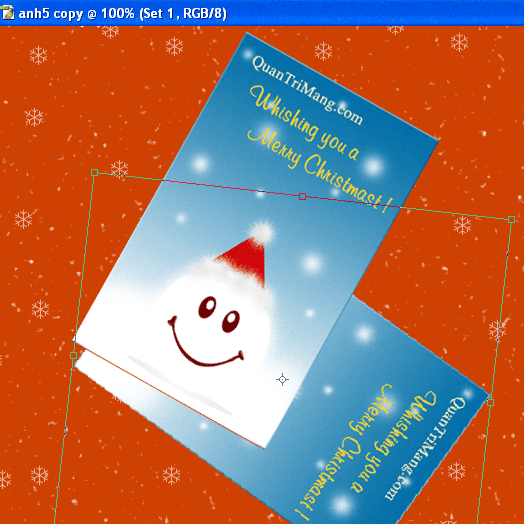
- Drag the 1 set layer so that the corner of the "set 1" layer and the "copy 1 copy" layer are created at a right angle

- Reduce the opacity of layer 1 set to 40%
Final result

It's also simple, isn't it ?! Wish you create your own thoughtful cards for your loved ones and welcome a happy Christmas.