Photoshop CS: Creativity with new year cards
If you are a marksman in photoshop, it is not difficult to design yourself a postcard to celebrate your new year and send it to your relatives. What about those who don't know or don't know much about photoshop? will be a problem here. New year, who
Photoshop CS: If you are a marksman in photoshop, it is not difficult to design yourself a postcard to celebrate your new year and give it to your loved ones. What about those who don't know or don't know much about photoshop? will be a problem here. New year, everyone has a dream, everyone wishes to send their blessings to relatives, family and friends. Let TipsMake.com with you do it.
This design lesson is a bit more special. TipsMake.com written for all of you have not practiced much design on photoshop can also design for yourself a new year card. Therefore, in each design step, I will introduce the smallest part details. It's a bit cumbersome for you to know about photoshop, but it won't take long, please sympathize and share your experience with other friends.
A little reminder to you: This real lesson consists of many parts. Working in each part is always related to each other. If the same operations are repeated in consecutive sections, I will just use the keyboard shortcut, or speak quickly through that section. Therefore, to practice the lessons well, you should practice right from the beginning.
- First, look for buying CS photoshop software and install it.
- After installing, start the program by: Go to Start > All Programs > Adobe photoshop
- Normally when you start Photoshop, it will also appear as a toolbar tool

In case you don't see this toolbar: Click Windown > Tools
There are many different New Year greeting cards. I will not be able to introduce all the way of making postcards, because your imagination and creativity are the most beautiful and unique postcards. Follow me with these exercises, then combine different shapes or add a few more fun details to create a unique character in your postcard.
Okay, now we start the exercise.
Part I. Card background
1. Open a new document : File > New (or press the key combination: Ctrl + N )> set the size: 500px x 300px, the background is white (#ffffff), Name: Thiep_01

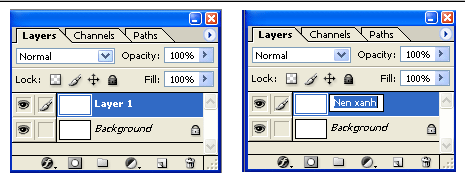
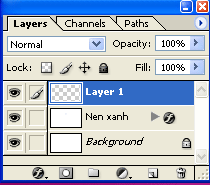
2. Copy the original layer
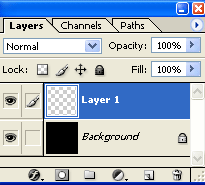
As with the Tools tool, the Layers palette usually appears when you start photoshop. If you do not see the palette, click Window> layers
- When opening a new document. The first layer will be the default "layer background".
- To create a new layer just like the original original layer: Click Layer > view > layer via copy or press the key combination ( ctrl + j )
- Now the new layer will have the default name "layer 1". Double click on "layer 1" and rename this layer "Greenen".
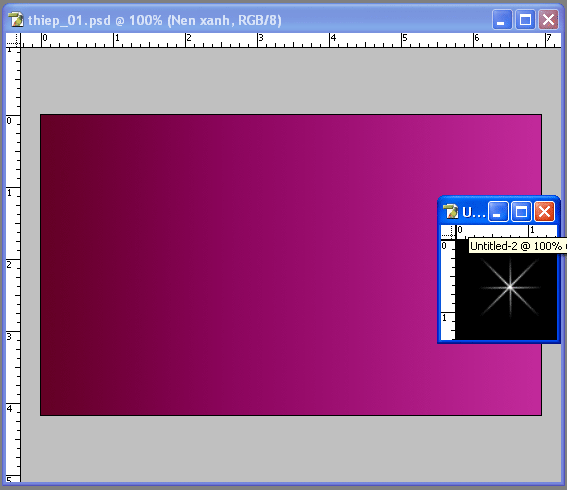
3. Pour the color .
With each one, you can choose your own unique background color. In this exercise, I will guide you to choose specific colors to make it easier to visualize the color scheme when designing.
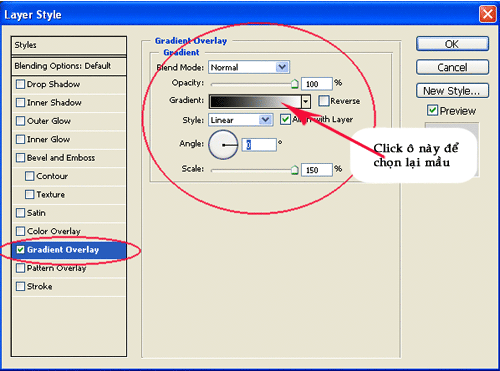
- On the Layer Palette > right click the "Greenen" layer and choose Blending options
- In the layer style table
-
Select Gradient overlay
-
Set properties according to the following figure
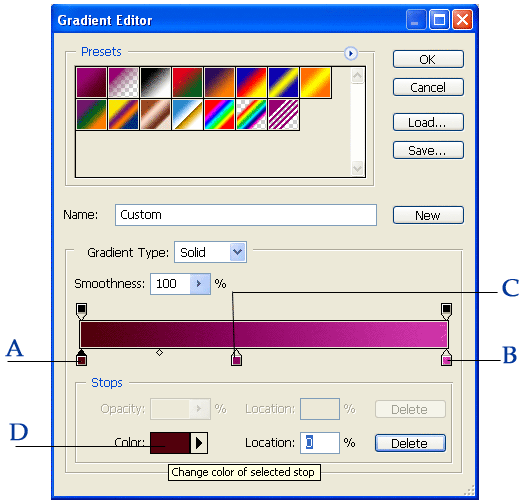
- When you click on the Gradient color box to select the color again, a Gradient Editor dialog box appears, select the color for the background as follows:
-
Points A and B are 2 initial default points.
- Point C is an additional point:
To add any point. Move the mouse to the color bar, and when the mouse pointer changes to the hand, click once to add a new point.
- Change colors for points.
- Click on point A> Mouse over the color box D, until the mouse turns into a hand, click once> a color picker dialog box appears> In this dialog, you set the color for point A to (# 500009)
- Similar: color for point B: (# 8C055D), point C: (# D136AC)
- The result will be the following background color:

4. Background decoration .
To prevent you from feeling distracted when using too many layers on a design document, I will separate the part that creates the light into a small part. Surely you will be easier to imagine.
I don't know if you still remember the brush and how to create the brush I gave you in the previous exercises. You can review this lesson section to learn more about the brush, (spiritual path) or practice again with me how to create a light ray brush.
4.1. First, pause the design of this postcard background. Open a new document, 100px by 100px, so the white Background (#ffffff), Name: Tia_sang
- Press D: Switch to default foreground mode - background (Black - white)
- Press X: Reverse the foreground color mode - the background (White - Black)
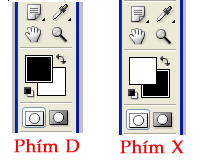
- Press Ctrl + Backspace -> Change the current background layer color to black.
- Select the Brush Tool
- On the Option Brush tool
- Click on the small triangle on the Brush > open Brush palette > Continue clicking the circle button with the triangle in the middle of the upper right corner of the Brush palette , open the popup menu> Choose Assorted Brush
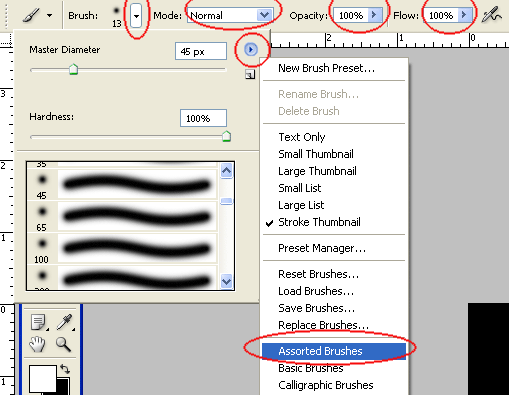
- An Adobe photoshop dialog box asks if you have a comment about brush conversion> click OK.
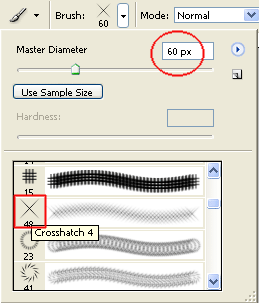
- Continue to select the brush stroke: Croshatch 4; Size: 60px
- Add a new layer: Click Layer > New > Layer . (or press the key combination: Ctrl + Shift + N ). Now this new layer is called "Layer 1".
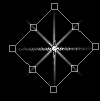
- Use the Croshatch brush , Click once to add new layer 1.

- Copy layer 1:
- First, you have to remember that you are still selecting Layer 1 on the layer palette
- On the menu bar Click Layer > view > layer via copy (or ctrl + j )
- New layer named "Layer 1 copy"
- Rotate "layer 1 copy" image
- On the layers palette > select layer 1 copy
- On the menu bar> Edit > Free Transform (or Ctrl + T )
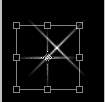
- Place your mouse in any corner of the selection frame, rotate 1 45 degree angle
- Press Enter to finish
- Continue Ctrl + T
- Put your mouse on any corner of the selection frame
- Just hold down the Shift key and move the mouse -> minimize the light on "layer 1 copy"
- Press Enter to finish
- Hover drag the light on "layer 1 copy" to concentric with the light on "layer 1"

- Combine 2 "layer 1 copy" and "layer 1" as one
- Select layer 1 copy
- Press the ctrl + E key combination -> On the layer palette at this time, still the background layer and layer 1
4.2. So the design of the light beam has been completed. Now the more important step is to learn how to drag "light ray" image on document "Tia_sang" to document "thiep_01"
- Drag the picture
- Arrange these 2 documents together.
This is an example
- Edit the tool: Move tool

- Click on the light ray image (layer 1) on document Tia_sang
Hold down the left mouse button and move the mouse to document Thiep_01

4.5. Now let's skip document beam_sang, we just need to focus on Documen thiep_01. And continue to improve the remaining tools
- After dragging layer 1: light rays to document Thiep_01.
The Layre palette will now be:
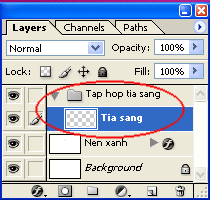
- Rename Layer 1: Tia comes
- Layer management: The purpose of this action is to help you group layers with the same nature, characteristics, and types, linking these layers in the same folde for easy management.
- Click icon: Create a new set under the layer palette.
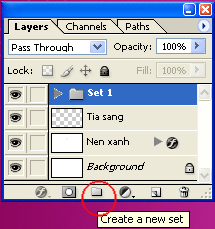
A layer: has a folder icon: set 1 appears above the "rays" layer, Change the name of this set to: "Tap hop to"
- Move the "ray" layer to the "Tap hop rays" folder
> On the layer palette> select the "Tia to" layer
> Press Ctrl +} key combination
- Multiply the "light ray" layer several times and move some "ray to copy" layers into the appropriate locations
- Use Ctrl + T : Minimize some layers "rays to copy", or adjust the opecity of some layers to make the card background more impressive.
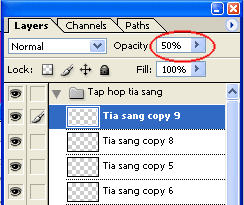
This is an example of my result.

So the design of a card is finished. Don't forget to save this document to design for the following lesson: File > Save
To name:
+ File name: Thiep_01
+ Format: Photoshop (*. Psd, * .pdd)

Was this article helpful?
Your feedback helps us improve.
Related Articles
 Photoshop CS: Creativity with New Year's cards (Last part)6 minutes read
 Instructions for using Photoshop CS6 (Part 7): Creating Christmas cards with Christmas balls on a Stylish background15 minutes read
 Instructions for using Photoshop CS6 (Part 5): Create christmas cards with snowflakes on a red background6 minutes read
 The mystery of the West: The special meaning of the J - Q - K cards9 minutes read
 Create Christmas cards in Photoshop6 minutes read
 The Tet Holiday cards are not to be missed2 minutes read
Reader Comments 0
Sign in with email or Google to join the discussion.