Photoshop CS: Creativity with New Year's greeting card (Part II)

Part I

Part II. Decorative soil background

1. Re- open the Thiep_01.psd document you designed in Lesson 1 - Part I.
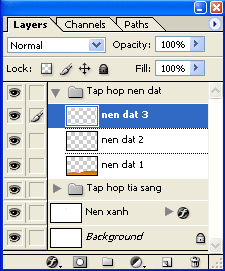
2. Layer management

  1. Click icon: Create a new set under the layer palette.
  2. Rename the current set 1: "Tap hop"
  3. Click the icon: Create a new layer below the layer palette.
  4. Rename the current layer 1: "Nen dat 1"
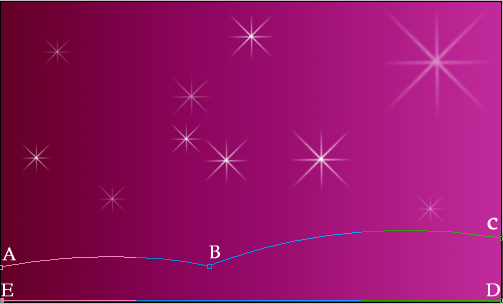
3. Use the Pen tool

Photoshop CS: Creativity with New Year's greeting card (Part II) Picture 1


Photoshop CS: Creativity with New Year's greeting card (Part II) Picture 2

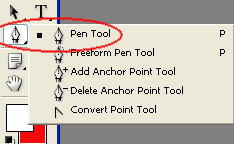
Draw some points for the layer "nen dat" as follows
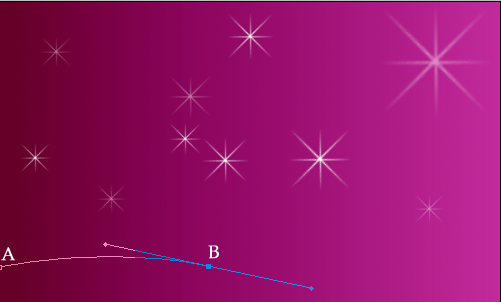
Photoshop CS: Creativity with New Year's greeting card (Part II) Picture 3

- Click on point A

- Press the left mouse button and click point B (In the process of clicking point B, you move up or down to create an arc).

- After creating an arc> Simultaneously press Ctrl + click the mouse again to point B -> mark the end point

Photoshop CS: Creativity with New Year's greeting card (Part II) Picture 4

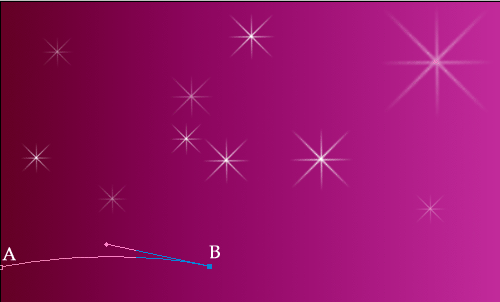
- Repeat the above steps with points C, D, and E and end at point A.

Photoshop CS: Creativity with New Year's greeting card (Part II) Picture 5

4. Create a selection

- Right mouse> Make selection

Photoshop CS: Creativity with New Year's greeting card (Part II) Picture 6

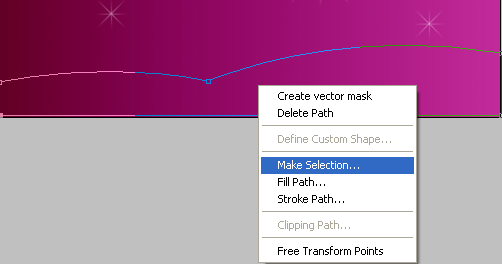
- Choose Feather radius = 0 in the Make selection dialog

- A line with broken lines will surround the selection frame.

There are 1 of 2 cases that happen with your selected frame.

Photoshop CS: Creativity with New Year's greeting card (Part II) Picture 7

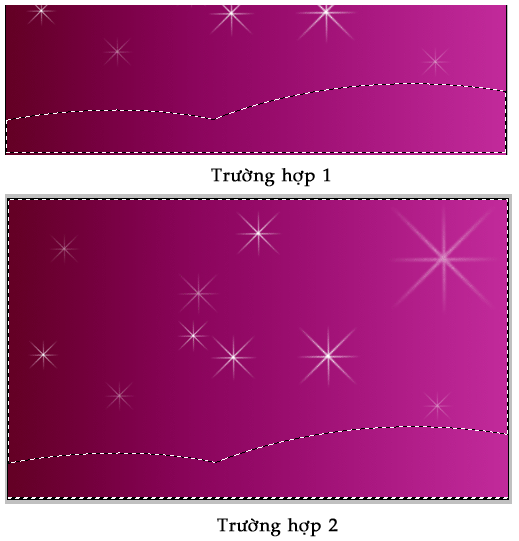
  1. If your design suffers a case 1. There will be no problem
  2. If you encounter case 2, you can reverse the selection by:
    Click Select on the menu bar> select Invert (or ctrl + shift + I )

5. Color the selection.

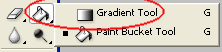
- On the Tool bar > select Gradient tool

Photoshop CS: Creativity with New Year's greeting card (Part II) Picture 8

- On the Option bar: click Set to edit the gradient to select the color again

Photoshop CS: Creativity with New Year's greeting card (Part II) Picture 9

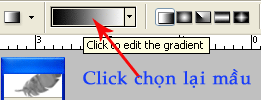
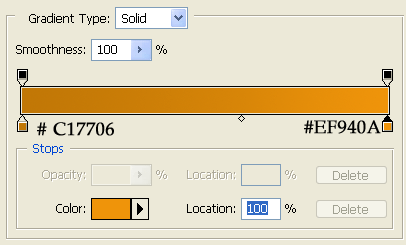
- Set color as follows:

  1. Bold color: # C17706
  2. Light colors: # EF940A

Photoshop CS: Creativity with New Year's greeting card (Part II) Picture 10

- After setting the color for the selection, you proceed to fill the color by cleverly clicking the mouse from above straight down.

Photoshop CS: Creativity with New Year's greeting card (Part II) Picture 11

- Press Ctrl + D : Remove the selection line

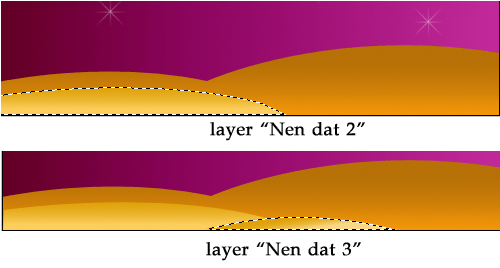
6. Add 2 new layers named

  1. layer 1: "nen dat 2"
  2. layer 2: "nen dat 3"

Photoshop CS: Creativity with New Year's greeting card (Part II) Picture 12

7. Repeat steps 4 and 5 to color the "layer 2" layers, "color 3" with the following colors:

  1. "Data 2": # DFA20B - # FCCE5C
  2. "nen dat 3" # DFA20B - # F9D885

Photoshop CS: Creativity with New Year's greeting card (Part II) Picture 13

So you have designed another part for this card_01 already. Don't forget to save the steps you've just taken.

Photoshop CS: Creativity with New Year's greeting card (Part II) Picture 14

Part III. Draw the ball

1. Open a new document

As well as the "light ray" design, pause the document "thiep_01" and open a separate document:

  1. Name: "Through the bubble"
  2. Size: 200px x 250px
  3. Background: black (# 000000)

2. Layer management

  1. Click icon: Create a new set to create a layer set 1
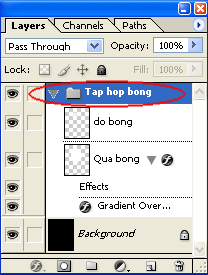
  2. Rename the current set 1: "Tap hop bong"

3. Add new layer

  1. Create a new layer
  2. Rename the current layer 1: Layer "Over the bubble"

4. Construct the ball

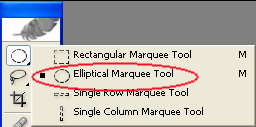
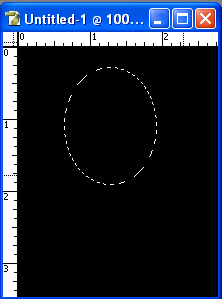
- Select the Eliptical Marquee tool

Photoshop CS: Creativity with New Year's greeting card (Part II) Picture 15

- Draw an ellipse

Photoshop CS: Creativity with New Year's greeting card (Part II) Picture 16

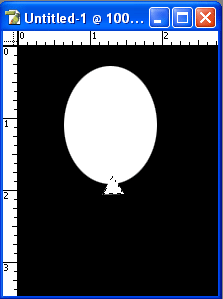
- Press D: to change the default foreground color to the background: (black - white)

- Combine Ctrl + Backspace => fill white (#fffffff) for layer "Via bubble"

Photoshop CS: Creativity with New Year's greeting card (Part II) Picture 17

- Ctrl + D removes the selection

- Select Polygon tool ; side: 3

Photoshop CS: Creativity with New Year's greeting card (Part II) Picture 18

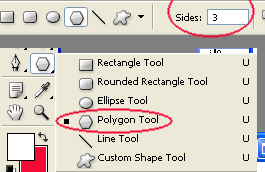
- Draw a small triangle below the ball, equalize both sides and fill this triangle white

Photoshop CS: Creativity with New Year's greeting card (Part II) Picture 19

5. Rotate the shape of the ball.

- Edit > Free Transform (or Ctrl + T )

- Move the mouse to any corner of the selection frame, rotate the angle to 10 degrees

Photoshop CS: Creativity with New Year's greeting card (Part II) Picture 20

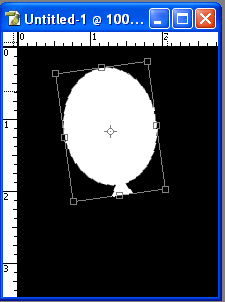
- Press Enter key to finish

6. Fill the ball with color

- In the Palette layer > right-click on the "Via bubble" layer> select Blending option

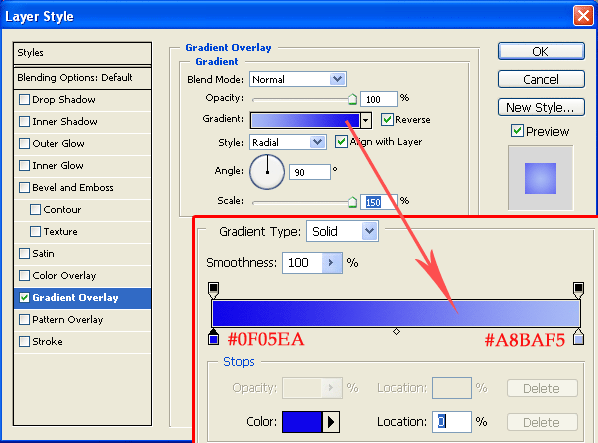
- In the Layer style dialog box

Select Gradient overlay , and set the color as follows:

Photoshop CS: Creativity with New Year's greeting card (Part II) Picture 21

7. Add new layer: name: "Do bong"

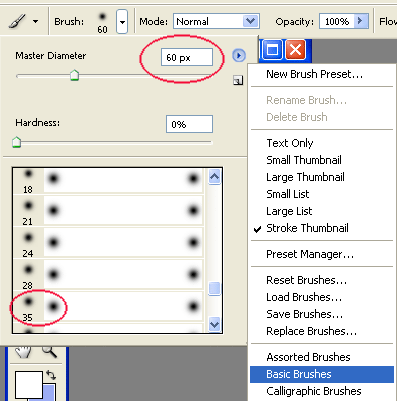
8. Select the Brush tool

- On the Options bar, click the pop up menu from Option brush > choose Basic brushes

- Choose Soft mechenical brush 35 pixels , size: 60px

Photoshop CS: Creativity with New Year's greeting card (Part II) Picture 22

9. Click once to paint the brush on the ball

Photoshop CS: Creativity with New Year's greeting card (Part II) Picture 23

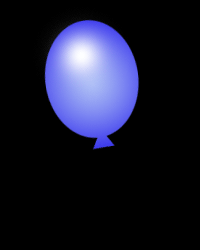
10. Use a brush to add a curve to shape the tie

Photoshop CS: Creativity with New Year's greeting card (Part II) Picture 24

So the design of the ball is done

11. Now we will gather the balls that have been made on top of the document "Thiep_01".

- On the document layer's "Layer through" layer> Click on "tap hop bubble" set

Photoshop CS: Creativity with New Year's greeting card (Part II) Picture 25

- Similar to drag "beam to" layer to document thiep_01 as I guided in part 1.

You will also drag the entire set of "tap hop bubbles" to the document you are looking at.

Photoshop CS: Creativity with New Year's greeting card (Part II) Picture 26

12. Your next job will be your creativity. Create a few different colored balls, shrink them and position them into the appropriate spots on the postcard.

This is an example of me

Photoshop CS: Creativity with New Year's greeting card (Part II) Picture 27

5 ★ | 1 Vote

May be interested

  • Making Spring cards with Photoshop (Part 2)Making Spring cards with Photoshop (Part 2)
    in part 1, we have taken simple steps to create a petal of spring red with yellow apricot branches using photoshop. in this section, we will implement the card on the blue background of the banh chung.
  • How to use Photoshop CS5 - Part 4: Basic menusHow to use Photoshop CS5 - Part 4: Basic menus
    photoshop has a huge menu system with options that no user can ignore. in the article below, tipsmake.com will continue to introduce you to this diverse menu system.
  • Instructions for creating Business Card in PhotoshopInstructions for creating Business Card in Photoshop
    in today's work, business card - business card is used very widely and popularly, whenever you need to talk with partners, customers or friends, this is exactly what you need. this business card contains many information about name, address, title, phone number, website, email ... of individuals or organizations, businesses.
  • How to use Photoshop CS5 - Part 6: Digital artHow to use Photoshop CS5 - Part 6: Digital art
    for art-reading readers, photoshop offers quite a number of options for digital drawing. whether your drawing is a craft or simply wants to draw for fun, or to study, photoshop's drawing tools are also very useful.
  • PhotoShop: Create your own Christmas cardsPhotoShop: Create your own Christmas cards
    christmas is coming! have you prepared gifts for your loved ones? a card for relatives and friends is indispensable for christmas. more specifically, this card is because you 'design' yourself. this tutorial will help you easily create a unique card using a photoshop program.
  • How to create card photos in PhotoshopHow to create card photos in Photoshop
    photoshop software is famous for its professional features and maximum support for professional card photography. in this article, the software tips will guide you how to create card images in photoshop.
  • Instructions for making an online 20/11 cardInstructions for making an online 20/11 card
    to make an online 20/11 card for teachers, follow the steps below. step 1: go to this address to select a wallpaper and write a greeting and click create image
  • 49 smart Photoshop tips you need to know (Part 3)49 smart Photoshop tips you need to know (Part 3)
    save time, effort and optimize photoshop with these 45 clever tricks to create the best products.
  • 49 smart Photoshop tips you need to know (Part 1)49 smart Photoshop tips you need to know (Part 1)
    simple photoshop tips to save you time and increase efficiency when working with this world's most popular photo editing software.
  • How to use Photoshop CS5 - Part 5: Photo editingHow to use Photoshop CS5 - Part 5: Photo editing
    this article tipsmake.com will introduce briefly some basic photo editing techniques and learn how to improve a family photo.