Photoshop CS: Creativity with New Year's greeting card (Part III)

Have you practiced good ground and ball design for this Tet card? Do you encounter any difficulties? Don't be discouraged when you encounter any difficult steps. The result of labor when you create a postcard yourself is the greatest joy

Part I
Part II

Have you practiced good ground and ball design for this Tet card? Do you encounter any difficulties? Don't be discouraged when you encounter any difficult steps. The result of labor when you create a postcard yourself is the greatest joy you give to your loved one.

Now we continue to practice the next part. Start photoshop, document "Thiep_01" and start the work.

Part IV: Bottle of champagne (champagne)

1. Open a new document

- Name: sam banh

- Size: 300px x 400px

- White background (#ffffff)

2. Managing layers:

- Create a new set, name the set: "Sam ball"

3. Add new layer: Name: Vo bottle

4. Activate the ruler. View > Rulers (or Ctrl + R )

Photoshop CS: Creativity with New Year's greeting card (Part III) Picture 1Photoshop CS: Creativity with New Year's greeting card (Part III) Picture 1

5. Move the mouse pointer to the ruler line> Left mouse button> Move the cursor to the document> at this point a blue line (ruler) will appear on the documment.
You place the correct lines according to the dimensions as shown below

Photoshop CS: Creativity with New Year's greeting card (Part III) Picture 2Photoshop CS: Creativity with New Year's greeting card (Part III) Picture 2

6. Using the Rectangle tool (shown below) draw a rectangle on the document background

Photoshop CS: Creativity with New Year's greeting card (Part III) Picture 3Photoshop CS: Creativity with New Year's greeting card (Part III) Picture 3

Notice how to set the top and bottom of the image when hovering the right way.

Photoshop CS: Creativity with New Year's greeting card (Part III) Picture 4Photoshop CS: Creativity with New Year's greeting card (Part III) Picture 4

7 In the Tools menu, select the Add Anchor Point Tool by clicking on the small triangle in the Pen tool

Photoshop CS: Creativity with New Year's greeting card (Part III) Picture 5Photoshop CS: Creativity with New Year's greeting card (Part III) Picture 5

8. Add points to some positions on the rectangle as follows (note the extra points for equal weight on both sides)

Photoshop CS: Creativity with New Year's greeting card (Part III) Picture 6Photoshop CS: Creativity with New Year's greeting card (Part III) Picture 6

9. Move the add points to shape the bottle: Click on each point, hold and hover the points to match the following positions:

Photoshop CS: Creativity with New Year's greeting card (Part III) Picture 7Photoshop CS: Creativity with New Year's greeting card (Part III) Picture 7

10. Press Ctrl + Enter -> select image

Photoshop CS: Creativity with New Year's greeting card (Part III) Picture 8Photoshop CS: Creativity with New Year's greeting card (Part III) Picture 8

11. If you see a slightly messy ruler: click View > Etras (or Ctrl + H ) to remove the lines.

12. Set the color to cover the bottle

- Click on the bottom background square ( Set background color ) on the tools bar, and select any color. Here I choose green

Photoshop CS: Creativity with New Year's greeting card (Part III) Picture 9Photoshop CS: Creativity with New Year's greeting card (Part III) Picture 9

- Press Ctrl + Backspace to fill the color for the bottle shape, with the color you selected

Photoshop CS: Creativity with New Year's greeting card (Part III) Picture 10Photoshop CS: Creativity with New Year's greeting card (Part III) Picture 10

- On the Layer palette > right click> choose Blending option .

In the Layer style dialog box, set the properties as follows:

  1. Gradient overlay

Photoshop CS: Creativity with New Year's greeting card (Part III) Picture 11Photoshop CS: Creativity with New Year's greeting card (Part III) Picture 11

  1. Inner Glow

Photoshop CS: Creativity with New Year's greeting card (Part III) Picture 12Photoshop CS: Creativity with New Year's greeting card (Part III) Picture 12

You will get the champagne bottle cover as follows.

Photoshop CS: Creativity with New Year's greeting card (Part III) Picture 13Photoshop CS: Creativity with New Year's greeting card (Part III) Picture 13

13. Add new layer: name: "Nhan ruou"

14. Using the Rectengle tool draw a rectangle in the middle of the bottle

15. Using the Add Anchor Point Tool, add 2 symmetrical points on the 2 sides of the rectangle, drag the 2 points to add the following image.

Photoshop CS: Creativity with New Year's greeting card (Part III) Picture 14Photoshop CS: Creativity with New Year's greeting card (Part III) Picture 14

16. Ctrl + Enter > Ctrl + Backpasce to fill any color for the "layer" layer, for example

Photoshop CS: Creativity with New Year's greeting card (Part III) Picture 15Photoshop CS: Creativity with New Year's greeting card (Part III) Picture 15

17. Simultaneously press Ctrl + Click the layer "crumple". A broken line will surround the bottle

Photoshop CS: Creativity with New Year's greeting card (Part III) Picture 16Photoshop CS: Creativity with New Year's greeting card (Part III) Picture 16

18. Reverse selection: Select > inverse (or Ctrl + shift + I )

Photoshop CS: Creativity with New Year's greeting card (Part III) Picture 17Photoshop CS: Creativity with New Year's greeting card (Part III) Picture 17

19. Press the Delete key to delete the currently selected zone

Photoshop CS: Creativity with New Year's greeting card (Part III) Picture 18Photoshop CS: Creativity with New Year's greeting card (Part III) Picture 18

20. Adjust the Gradient overlay and Inner Glow for the "texture" layer as follows.

  1. Gradient overlay

Photoshop CS: Creativity with New Year's greeting card (Part III) Picture 19Photoshop CS: Creativity with New Year's greeting card (Part III) Picture 19

  1. Inner Glow

Photoshop CS: Creativity with New Year's greeting card (Part III) Picture 20Photoshop CS: Creativity with New Year's greeting card (Part III) Picture 20

21. Add a new layer, name the layer: "Cut"

- Do the 11-18 operation again to get the "Giay" layer as shown below.

Photoshop CS: Creativity with New Year's greeting card (Part III) Picture 21Photoshop CS: Creativity with New Year's greeting card (Part III) Picture 21

22. Decorate wine labels.

- Add a new layer, name "decoration page"

- Press Ctrl + click the "ruou" layer on the layer palette at the same time.

Photoshop CS: Creativity with New Year's greeting card (Part III) Picture 22Photoshop CS: Creativity with New Year's greeting card (Part III) Picture 22

- Use the Brush tool with any brush strokes you like and paint on the "makeup" layer, of course your strokes will only cover the selected path.

This is an example of me.

Photoshop CS: Creativity with New Year's greeting card (Part III) Picture 23Photoshop CS: Creativity with New Year's greeting card (Part III) Picture 23

23. Draw the bottle mouth

- Add a new layer, name the layer "Mieng bottle"

- Using the Elliptical marquee tool , draw an ellipse to create a mold for the bottle mouth

Photoshop CS: Creativity with New Year's greeting card (Part III) Picture 24Photoshop CS: Creativity with New Year's greeting card (Part III) Picture 24

- Fill the "mouth bottle" layer with green color # 0CB808

Photoshop CS: Creativity with New Year's greeting card (Part III) Picture 25Photoshop CS: Creativity with New Year's greeting card (Part III) Picture 25

- On the layers palette: Right-click the "bottle" layer> Blending options

In the Layer style dialog box> set Inner Glow with the following properties:

Photoshop CS: Creativity with New Year's greeting card (Part III) Picture 26Photoshop CS: Creativity with New Year's greeting card (Part III) Picture 26

Finally finished the sam ball bottle

Photoshop CS: Creativity with New Year's greeting card (Part III) Picture 27Photoshop CS: Creativity with New Year's greeting card (Part III) Picture 27

24. Ok, now you continue to "drag" the entire "Sam ball" set to the "Thiep_01" documnet.

- Certainly the height of the bottle sam banh is now beyond the "Thiep_01" frame. Reduce it by:

  1. Edit > Free transform (or Ctrl + T )
  2. Press the Shift key and drag any corner of the selection to minimize the image to match the card background

Photoshop CS: Creativity with New Year's greeting card (Part III) Picture 28Photoshop CS: Creativity with New Year's greeting card (Part III) Picture 28

- Rotate the bottle tilt 1 corner about 30-45 degrees

Photoshop CS: Creativity with New Year's greeting card (Part III) Picture 29Photoshop CS: Creativity with New Year's greeting card (Part III) Picture 29

- Press Enter to finish the last operation.

25. Now, let's do a few operations you know, to get the position for the bottle of wine on the card is reasonable. Here is an example

Photoshop CS: Creativity with New Year's greeting card (Part III) Picture 30Photoshop CS: Creativity with New Year's greeting card (Part III) Picture 30

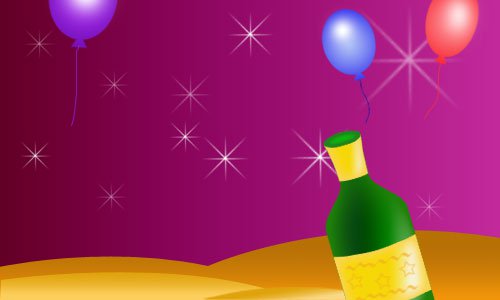
My lesson today will end here. Don't forget to save the document "Thiep_01" and practice the operations I've introduced to prepare the "glass" design, complete the new year postcard in the next lesson.

4.5 ★ | 2 Vote