MS Access 2003 - Lesson 19: Filtering data
A filter allows you to limit the records to view. Filtering data does not lose records, it only allows to determine which records you want Access to display.
In the previous section, you learned how to use the Filter window to make complex arrangements. You can use the Filter window to filter data. A filter allows you to limit the records to view. Filtering data does not lose records, it only allows to determine which records you want Access to display.
When defining a filter, you specify the criteria that the data should have before Access displays it. For example, a filter lists records of workers living in New York.
Access only displays records that match the filter criteria specified. In fact, when creating a subset of data, you can work with that data set as if it were a table: you can add, delete records and make the desired changes. Accees will update the original table to show each change you have made.
Use filters to manage data more easily. For example, suppose you are working with a list of customers, and need to replace one of the sales representatives. Now you have to update the customer table to have a new representative.
You can use the Replace function (described in Chapter 2, 'Access Learning for 1 hour'), but instead you want to create a filter so you can review your customers before you really want to replace them. . In this case, the filter limits the records that Access only displays include the old sales representative. In most cases, it is an easy way to work with a small table rather than an entire customer table.
Create a Filter
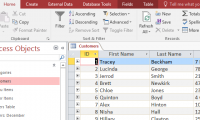
To create a filter, you need to work with the Filter window. Click your mouse on the Filter option from the Records menu, then select Advanced Filter / Sort from the submenu. Access displays the Filter window as shown in Figure 1.
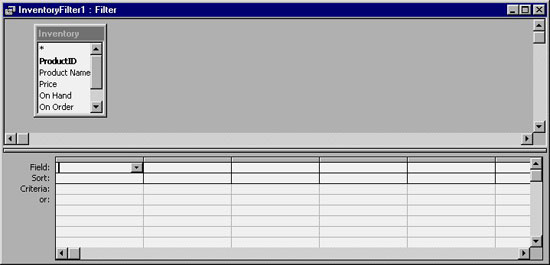
Figure 1: Filter window
To create a filter, all you need to do is set a field and specify the criteria you want to apply to the field. If you wish, you can also determine how your school will be organized. (That way, you've just sorted and filtered the data at once.)
For example, suppose you have a table containing inventory records (Table Inventory) shown in Figure 1. In this table, one of the fields is named Supplier . You use this field to track who provides a special item. Suppose you need to see which item is provided by Allied Industries . Using filters, you can limit the records that Access displays to the records that the provider is Allied industries . To create a filter, follow these steps:
1. Choose Filter from the Records menu, then select Advanced Filter / Sort from the submenu.
2. In the first column of the bottom pane, select the Supplier field.
3. In the Criteria cell of the column, type the = sign, followed by the phrase Allied Industries . When pressing ENTER, the Filter window appears as shown in Figure 2. (Note that Access automatically adds quotation marks around the provider name)
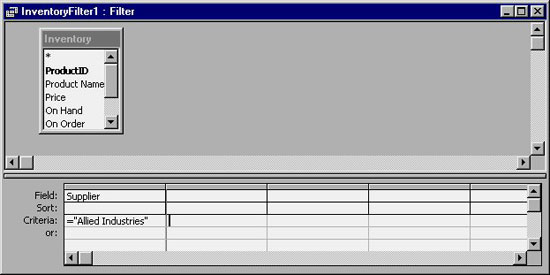
Figure 2: Create a simple filter
4. Click your mouse on the Apply Tilter on the toolbar.
Access applies the selection rules (specified by the filter) and displays the records of Allied Industries. The results of a subset of the statistics table will be easier to work with than the entire table. In this case, your filter instructs Access to look at each record in the table and only displays the records of the Supplier field containing the name Allied Industries.
Remove a Filter
It is not uncommon to use a filter to quickly view data in a particular way, and then want to remove the filter to see all the records. Access does this very easily and you can complete this operation using one of two different methods.
The first (perhaps easiest) way is to drag the toolbar. When a filter is active, there is an icon like a funnel in the toolbar. In fact, there are 3 tools containing funnel-shaped images, but there is only one tool that contains a funnel-shaped image without any additional icons and it is currently selected. If you put your mouse pointer over the tool, you will see its name is Remove Filter. Click Remove Filter , then all records will reappear, the filter is completely removed.
Another method of removing a filter is to use menus. On the Record menu is the Remove Filter / Sort option . If you select this option, all records are displayed again.
Save a filter
Access only keeps the filter until you close the table. Therefore, if you close the table and then decide to use the filter again, you will need to recreate a filter from scratch. That way can be boring and time consuming.
To solve this problem, you can save the filter as a query (query). You will learn all the queries in Chapter 6 ' Using queries to review data '. Filters are related to queries, although they do not have many features or flexibility. When filters and queries are involved, Access allows you to store filters under a query name. To do this, make sure the Filter window is displayed. Then, choose Save As Query from the File menu or click your mouse on the Save As Query button on the toolbar. Access displays the Save As Query dialog box as shown in Figure 3.
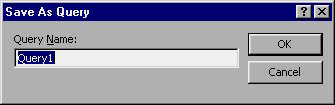
Figure 3: Save As Query dialog box
Enter the name you want to save the filter. The name can be any name you want. For example, if you want to save the filter showing the inventory tables provided by Allied Industries, you can use the name Supplied by Allied Industries . Type in the name and press ENTER or click your mouse on the OK button.
To use the filter again, display the Filter window and select the Load From Query option from the File menu. Access displays the Applicable Filter dialog box shown in Figure 4.
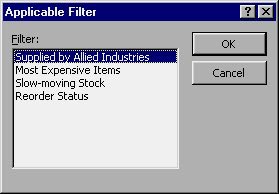
Figure 4: The Applicable Filter dialog box
Highlight the name of the query you want to enter into the Filter and select OK . Access downloads Filter. You can use Filter or make any changes to filter as you like.
Was this article helpful?
Your feedback helps us improve.
Related Articles
 Work with data in Access 20169 minutes read
 MS Access 2003 - Lesson 21: Chapter 6: Using Query to check data6 minutes read
 MS Access 2003 - Lesson 22: Using Query Wizards15 minutes read
 MS Access 2003 - Lesson 18: Chapter 5: Sorting and filtering information11 minutes read
 MS Excel 2007 - Lesson 8: Sort and Filter2 minutes read
 MS Access - Lesson 9: Data management3 minutes read
Reader Comments 0
Sign in with email or Google to join the discussion.