MS Access 2003 - Lesson 11: Chapter 3: Customizing components
In the previous chapter, you learned how to create a database and create a table, as well as how to enter and edit information in the table. In this chapter, you will set up on the basis of chapter 2.
In the previous chapter, you learned how to create a database and create a table, as well as how to enter and edit information in the table. In this chapter, you will set up on the basis of chapter 2.
At the end of this chapter, you will understand the following concepts:
- How to change the existing table structure.
- Data types that Access supports
- Why should you add comments to the table design
- What are the school's characteristics and how to change them
- How to do editing in the whole table
Lesson 11: Change table design
In chapter 2, you know about Design view mode, it allows you to look at table structure without looking at the information it contains. Now, open the My Friends database created in chapter 2.
To see the table structure (or design), select the table name from the Database window and click your mouse on the Design button. In turn, Access will display the Design view window as shown in Figure 1.

Figure 1: The Design view window of the My Friends table
Using Design view mode, you can change the table layout. Add or edit fields, change the type of information stored in the field, add comments and modify the properties of a field. The following sections look at those activities.
Add and edit fields
For the most part, the Design view mode window is similar to the Datasheet window. Access allows you to add, move fields, or change field names without affecting the information contained in the current field. To add a field, select the first blank row in the layout (this is the last line) or insert a line. To insert a line, select the field before you want to insert a new field. Then, select Insert Row from the Edit menu or click your mouse on the Insert Row tool. When inserting a new field, Access will move all fields behind it and insert a blank field into it.
For example, suppose you want to add a field that contains the middle name of the people in the list. Usually, you place this field between the first name and last name fields. To add, perform the following steps:
- Select the 3rd line and set it as the current line. (This is the line that defines the LastName field)
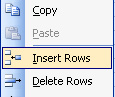
- Click your mouse on the Insert Row tool. This will add a blank line between the FirstName and LastName fields, Figure 2.

Figure 2: Insert a blank line in the table.
Now you can enter the new field name. In this case, when entering the Initial Middle (may include spaces). That's all to add a school. In the next section, you will learn how to determine the type of information (text, numbers, .) that the new field will contain.
When working with fields in a table, there will be times when you want to move a field. To move a field, select the row containing the field (make sure the entire line is blacked), Hold the left mouse button, and you can drag the field to many new locations you want. When releasing the mouse, Access moves the field to a new location. Moving a field does not change its data, nor does it change data in the surrounding fields.
Field names should specify the data that the field contains. During the process, the information you store in the table can be changed. To change the name of an existing field, simply select the name and change it. For example, if you want to change the name of the PostalCode field to Zip code, select the current field name and type Zip code . Thus, it is possible to rename the StateOrProvince field to State. The result changes to the table structure (after adding the Middle Initial field and changing the name of the StateOrProvince field, Postalcode) as shown in Figure 3.

Figure 3: Changing the table structure
During the entire time, data may not need to be checked. As such, Access also allows you to delete fields. Deleting a field is the same as deleting a record in a table:
1. Using the mouse, select the entire line containing the field you want to delete.
2. Press the DEL key or select Delete from the Edit menu. If you are deleting a data field, Access will ask you to confirm the deletion, Figure 4

Figure 4: Access asks you to confirm the deletion.
To delete the field, along with all previous information contained within it, click your mouse on the Yes button
Note: If you delete a field by mistake, immediately use the Undo option from the Edit, menu. If you make many different changes to the table structure, deleting the field (and its contents) cannot be restored.Change data type
To store part of the information effectively, Access needs to know its data type. The data type specifies the type of information the school will contain. Access allows you to specify 9 different data types, detailed in Table 1.
DatatypesMeaning
AutoNumber
Self-condensing numbers - Access automatically fills in sequential numbers every time you add a record.
Currency
Currency value - The number is accurate to 15 decimal places to the left of the dot and 4 decimal places to the right.
Date / Time
Time and date type - A number representing the date or time between 100 and 9999
Hyperlink
A hyperlink address to another document, URL, or location in a document
Memo
Memo style - Maximum length of up to 64000 characters
Number
Number type - A numeric value
OLE Object
Objects such as sound clips or graphic images (OLE is an embedded technique and object connection, you will know better in Chapter 17, 'Using OLE')
Text
Text style - Contains many characters with a maximum length of 255 characters
Yes / No
Logical type - Give true or false values.
Table 1: Data types supported by Access.
If you work with computers for a long time, you will find it very familiar with some of the data types shown in Table 1. These are the basic data types that are almost in every information that can be stored.
In the Data Type column of the Design view window, Access displays the current data type for each field. If you want to change data types, select the data type for the field you want to change.
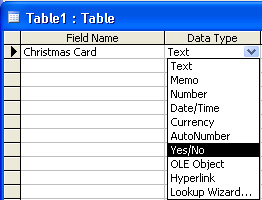
For example, suppose there was a Christmas Card field in the table. The purpose of the school is to tell you whether this person has a Christmas card in the list. This field matches the Yes / No data type, but Access automatically sets the data to Text type (text). As such, you must change it to another data type.
To do this, select the Christmas Card line from the Data Type column. You'll notice a small arrow appears to the right of the data type. If you click your mouse on the arrow, a list is available. All you need to do is choose a data type. In this case, select Yes / No. When you return to Design view mode, Access changes the values in the field.
Add captions
When designing a table, you select the fields that the table stores, each field has a data type. To help you explain issues to others who can update the table, Access allows you to put comments about each field in the table. By reading those comments, you or other users quickly know why those specific choices were created.
In Design view mode, you can put comments about fields in the third column of each line. The content of the description field does not affect Access's working process, the description of the field is simply a place to document or give a comment for the purpose of the school. Later, you may forget why you included a field in the table. If you make a comment now, then you won't have to worry.
To add a comment, simply select the cell in the third column of the line that contains the comment content. You can type in a comment of up to 283 characters. In chapter 9, 'Creating arbitrary forms', you will learn how to describe fields
Learn the properties
You have already noticed the area at the bottom of the Design window, which is the Field Properties area (the properties of the field).Properties are simply characteristics associated with a field or an object. The Design window allows you to change the properties associated with the fields.

Figure 5: Field Properties
Each attribute type associated with a field depends on the data type of that field. For example, a Text field has a property of length (also known as Field Size property) that controls the maximum level that characters achieve in a field. On the other hand, an OLE Object (like sound or image) does not have such properties because a length does not make sense.
To change a field property, select the row containing the field and then select the attribute or enter the new attribute. The following sections explain some of those properties.
Note: Changing some properties may result in data loss. For example, if you shorten the length of a text field, then many fields containing long values will be truncated. In that case, you may lose data, Access will issue the first warning before it is changed.Subtitle
Caption is a label that Access uses to refer to a field. In Datasheet view mode, subtitles appear above the column of the field. Access also uses Caption properties in other locations, such as labels for instructions. (You will be better understood in Chapter 9)
Caption properties have up to 255 characters. If you do not give a Caption, Access uses the field name instead.
Format
The Format property describes how the format Access uses to display a value in the field. This property only affects how Access displays data, not changing the value stored in the table. You can set different formats for different data types. For example, Access provides different formats to adjust how a date is displayed. Thus, for the currency field, you can display currency values based on different formats.
To see the available formats for a particular field, select the Format property and click your mouse on the arrow that appears to the right of the property dialog box. For example, if you select the Birthdate field (the field has a Date / Time data type), and then click your mouse on the Format property, the arrow appears to the right of the property box. If you click your mouse on the arrow, you will see a list of available school properties. The name attribute is displayed on the left side of the list, while examples of using this attribute are on the right side.

Figure 6: Format Properties
If the available format does not fit the need, you can create a custom format by arranging a sequence of characters together to specify how the values in the field appear. The format of the characters you use will depend on the type of data in the field: Numeric or Currency, Date / time, Yes / No, or Text, Memo.
The code format for Numeric or Currency data types is shown in Table 2
CharactersMeaning
0
Give an alternative position for a number. Access displays a number or a 0
#
Give an alternative position for a number. Access displays a number or a white character
.
Decimal dots
,
Comma separates thousands of numbers
E-, E +, e-, e +
How to signify
%
Percentage
Display the next character as a word
-, +, $, (,)
Displayed as a letter character
*
Use the following character as enough characters (filling white characters in the format)
Table 2: Optional code formats for Numeric, Currency data types.
For example, if you want to display a custom format for the Currency field, the numbers 1234.5678 and -1234.5678 are displayed as follows:
******* $ 1,234.57
(******* $ 1,234.57)
You can use the following Format attribute:
** $ #, ## 0.00; (** $ #, ## 0.00)
Notice that there are actually two theoretical formats separated by semicolons. Access uses the semicolon format on the left if the value in the field is positive and the format is right if the value is negative
Table 3 gives details of custom format codes that you can use for fields with Date / Time data types
CharactersMeaning
:
Separating hours
/
Date separation
d
Displays the date as a number without leading zeros
dd
Displays the date as a number with the leading zero
ddd
Displays the date in a format of only 3 characters (Sun, Mon, Tue, .)
dddd
Give the full name of the day (Sunday, Monday, Tuesday, .)
ddddd
Use the short date format set from the Control Panel window to display the full date (default is m / d / y).
dddddd
Use the full date format set from the Control Panel window to display the full date (default is mm, dd, yyyy)
w
Displays the day of the week as a number.
ww
Show the week of the year as a number
m
Display months as some without leading zeros.
mm
Displays the month as a number with the leading zero.
mmm
Show month with 3 characters (Jan, Feb, Mar, .)
mmmm
Give the full name of the month (January, February, March, .)
q
Displays the quarter number of the year
y
Show year with a number.
yy
Show year with 2 numbers
yyyy
Show year with 4 numbers.
hour
Displays hours with a number excluding leading zeros.
hh
Displays the time with a number with the leading zero.
n
Displays minutes with a number excluding leading zeros.
nn
Displays minutes with a number with a leading 0
S
Displays seconds with a number excluding leading zeros.
ss
Display seconds with a number with leading 0.
tttt
Full time display, use special time format in Control Panel window
AM / PM
Use the 12-hour clock mode to display the time with the appropriate suffix of AM or PM
am / pm
Use the 12-hour clock mode to display the time with the appropriate suffix am or pm
A / P
Use a 12-hour clock to display the time with an appropriate suffix of A or P
a / p
Use a 12-hour clock to display the time with the appropriate suffix of a or p
Table 3: Format custom code for Dat / Time data type.
In most cases, Access's format provides a Date / Time data type that will meet the requirements you need. However, you can use a special format to complete a single request, such as the quarterly display of the year. For example, your goal is to want the 6/11/1999 and 1/15/2000 days to be displayed, as follows:
Quarter 2,1999
Quarter 1, 2000
In this case, you should use the Format attribute as follows:
'Quarter' q ',' yyyy
Table 4 shows the format of custom codes that you can use when working with Text or Memo data fields
CharactersMeaning
@
Character specified (a text string or space)
&
Character not specified
<
Convert all characters to lowercase
>
Convert all characters to uppercase
Table 4: Format custom codes for Text or Memo data types.
When you compare them to formatting other characters, the custom character format is easy to use. For example, suppose you want to format a value so that it is capitalized, so there are 3 question marks that appear if the field is empty. In this case, you should use the following format attribute:
>; ???
The code to the left of the semicolon indicates the format in Access will apply to a text value. The code on the right shows question marks if there is no text value there. The results of the format attribute display as follows:
???
WIDGET
???
COG
???
You can also create a custom Format property for the data type Yes / No. Access stores this data type in one of two values: -1 for Yes, and 0 for No. A custom Format attribute for this data type has 3 parts, each separated by a semicolon. Access does not use the first section to the left of the blank (applies to later versions of Access). Access uses the second part if the value is -1 and the third part if the value is 0. For example, keep track of the following format attribute:
; 'Left'; 'Right'
As a result of this Format attribute, the letters Left and Right are used instead of Yes and No. This text can be used completely in custom format. You should note that when entering data for the field in Datasheet mode, you still have to work with it as a check box, if the check box is selected, Access will understand it as Left. If not selected, it means Right.
Note: The Format attribute only affects how Access displays information; it does not change the value in the table.Input mask
Some data types allow you to specify the Input Mask attribute. An Input Mask instructs the user to enter data. Perhaps one of the most common examples is when entering a phone number. If you use an Input mask, you'll see the following example:
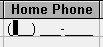
Note that parentheses are often used to place the area code in it and a tile appears in the appropriate place of the phone number. All the users can do is enter the numbers. You specify the Input Mask attribute type as follows:
! (999 ')' 000-0000
You can from this example build Input masks in the same way as specifying the format (mentioned in the previous section). In other words, you specify a series of characters given to Access how the input mask appears. Table 5 shows the different characters you can use in the Input Mask attribute.
CharactersMeaning
0
Numeric characters (Items required to be entered, punctuation and minus signs are not allowed
9
Number characters (Items that are not required to be entered, empty positions are converted into characters; plus and minus signs are not allowed)
#
Numeric characters (Entries that are not required to enter, empty positions are converted into characters; plus and minus signs are allowed)
L
Alphabetic character (Item required to enter)
?
Alphabetical character (Optional entry)
A
Alphabetic and numeric characters (Item required to enter)
a
Alphanumeric characters (Optional entry)
&
Place to enter for any character or space (Entry required to enter)
C
Where to enter for any character or space (Optional entry)
.
Decimal dots
,
Comma separates thousands of numbers
/ or -
Dividing the date
:
Time separation
<
Convert all characters to lowercase
>
Convert all characters to uppercase
!
Enter data from right to left instead of left to right
Display the next character as a word
Table 5: The characters you can use in the Input Mask attribute
Note: If you just need to put a simple Input mask together, or you want to use it in a common way (like a phone number, social welfare fund, or postal code), you can use Input. mask Wizard. You login to this Wizard by clicking on the Builder button, which appears to the right of the Input Mask properties dialog when this box is selected.

Validation Rule and Validation Text
As you know, Input mask controls the format for users to enter data. In the add process, to allow you to specify how users enter data, Access also allows you to specify acceptable values for a field. You can do this by building Validation rules.
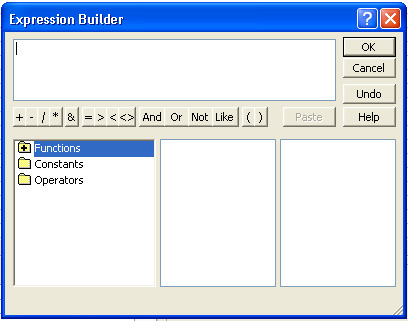
Figure 7: Expression Builder dialog box to build Validation rules.
If you properly apply Validation rules, it can become a very powerful tool. It allows you to check user information when you are admitted to the school. For example, you can use a Validation rule to make sure that a value is greater than 0 or greater than 100. You also use another rule to make sure a value is outside a range. You build Validation rules as an equation. Use operations such as those shown in Table 6 to compare field values with other values.
Note: Setting the Validation rules together may be like programming. If you don't have a programming experience, you feel that building a valid validation rule is not quite the same, don't pay attention to all the issues that can be written expressions together. You can use Access successfully without having to set validation rules together. After getting used to Access, and maybe after working with the following chapters (programming part), you want to go back to this section and perform other Validation rules.
Operator
Meaning
+
Add up
-
Subtraction
/
Division
*
Multiplication
Mod
Residual division
Integer division (all numbers)
^
Hat
=
Equal sign
<
Less
>
Bigger
<=
Less than or equal
> =
Bigger or equal
<>
Different
Between
Between 2 values
And
And operator
Eqv
Equivalent operator
Imp
Related operators
Not
Negative operator
Or
Test Math Or
Xor
Negative operator Or
Table 6: Operators can be used in implementing Validation rule.
For example, suppose you want to check if a value is entered by the user between 10 and 20. You can do so by entering the following operation in the Validation Rule attribute:
Between 10 and 20
Attribute Validation Text is the message displayed by Access if a value is not Validation Rule. In other words, if the validation rule checks a value outside the range. Access displays validation text in a dialog box. The following example allows you to set the Validation Rule property and Validation Text:

In this case, if you tried to enter a value less than 20 in the field, Access displays the error message dialog box as shown in Figure 8:
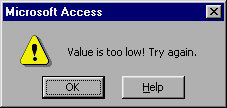
Figure 8: Error message dialog box.
Was this article helpful?
Your feedback helps us improve.
Related Articles
 MS Access 2003 - Lesson 1: Chapter 1: Terminology Access8 minutes read
 MS Access 2003 - Lesson 5: Chapter 2: Access Learning in 1 hour6 minutes read
 MS Access - Lesson 29: Summary of chapter 72 minutes read
 MS Access 2003 - Lesson 25: Chapter 7: Printing tables7 minutes read
 Ms Access 2003 - Lesson 14: Chapter 4: Creating another database2 minutes read
 MS Access 2003 - Lesson 21: Chapter 6: Using Query to check data6 minutes read
Reader Comments 0
Sign in with email or Google to join the discussion.