MS Access 2003 - Lesson 32: Using other Report Wizards
The Report Wizard you used earlier in this chapter is not the only part provided by Access, but other parts you can use as well..
The Report Wizard you used earlier in this chapter is not the only part provided by Access, but other parts you can use as well . From the Insert menu, you access the Wizard by selecting Report . Then, Access displays the New Report dialog box as shown in Figure 1.
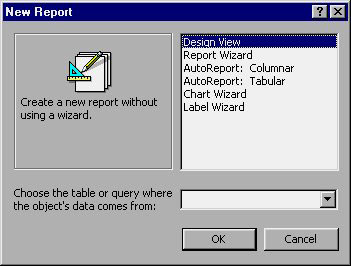
Figure 1: New Report dialog box
Note that at the bottom of the New Report dialog box where the data source is defined (the table or query) will be used as the basis for the report. Above the dialog box are 6 choices that represent different actions you can use:
• Design View : Allows you to create a report using the report design window. This section will be presented in detail in chapter 14.
• Report Wizard . Create a report using the basic Report Wizard. This is the same Wizard you use if you double click on the Create Report By Using Wizard in the Reports section of the Database window
• AutoReport: Colummar : Create a report that lists each field in a record on a separate line. (This type of report may consume a large amount of paper).
• AutoReport: Tabular : Create a report similar to a spreadsheet - a record on a line, with fields starting from left to right of the page.
• Chart Wizard : Create a report that includes a chart that is converted from data in a table or query.
• Label Wizard : Create different types of lables
Most of the above reports use a different Report Wizard. Your choice of answer report here will decide the question later. Even if the final result is different, the question asked in the given section is similar. All you need to do is apply the skills acquired in this chapter and everything will be convenient
An exception is when you want to create labels. In the next section, you learn how to use the Label Wizard to create labels based on information in the database.