Instructions to create WinPE file IOS, USB boot WinPE
Windows Preinstallation Environment (WinPE) boot device depends on each toolbox of the geeks.
Table of Contents
Windows Preinstallation Environment (WinPE) boot device depends on each toolbox of the geeks. According to a quote from Wikipedia, 'WinPE was originally intended to be used only as a pre-installed platform, to deploy Microsoft Windows operating systems, especially to replace DOS in this respect. WinPE has the following uses:
- Deployment of workstations and servers in large corporations, as well as preinstalled by builders of workstation and server systems for sale to users.
- Platform recovery to run 32-bit or 64-bit recovery tools, such as Winternals ERD Commander or Windows Recovery Environment (Windows RE).
- Play the role of running third-party or 64-bit disk mirroring utilities. "
Create a WinPE file IOS, USB boot WinPE
Create a WinPE file IOS, USB boot WinPE very fast and easy. This article will guide you in detail how to create a WinPE file IOS, USB boot WinPE.
1) Download the latest Windows 10 ADK (Assessment and Deployment Kit) or Windows Insider Preview ADK.
2) You can fully install 7 GB ADK version, but in this article, you only need components Deployment Tools and Windows Preinstallation Environment .

3) After installing, open the Deployment and Imaging Tools interface by right-clicking on Start> W> Windows Kits and selecting More> Run as administrator .

4) Reminder is quite long. Shorten it by going to the root of the C: drive with the cd command (# 1 in the next screenshot).
5) Create WinPE files with the following command (# 2):
amd64 copype D: WinPEx64
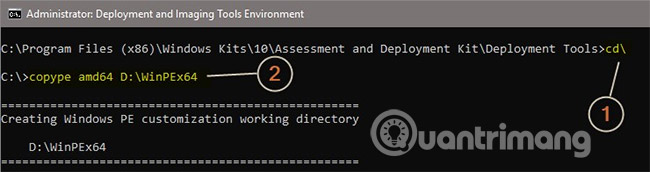
Replace the D: WinPEx64 path with the drive letter and your preferred directory name. The above command creates PE files used to boot a 64-bit machine. If you create PE for a 32-bit machine, replace amd64 with x86 :
x86 copype D: WinPEx86
6) Plug in the USB flash drive, note the drive letter. Enter the following command, replace the path D: WinPEx64 with the actual path to the directory where you created the PE file and drive letter I: by the actual drive letter of the USB drive:
MakeWinPEMedia / UFD D: WinPEx64 I:
If you want to create a WinPE file ISO, change / UFD to / ISO , then add the path and file name where you want to create the ISO file:
MakeWinPEMedia / ISO D: WinPEx64 F: WPE64.iso
You will be warned that the USB flash drive will be reformatted. Accept with Y:

See more:
- Deploy Windows 7 - Part 19: Create a custom WinPE Tools CD
- Deploying Vista - Part 11: Working with Windows PE
- Deploy Vista - Part 10: Introduction to Windows PE
Was this article helpful?
Your feedback helps us improve.
Related Articles
 How to install Windows on WinPE6 minutes read
 Instructions to edit or replace Boot.ini file on Windows XP3 minutes read
 Instructions for creating USB boot with Hiren's BootCD quickly6 minutes read
 20 best USB boot software8 minutes read
 Instructions to install Win 7/8/10 in WinPE (Mini Win) environment7 minutes read
 How to create USB Boot, USB install Windows by Rufus4 minutes read
Reader Comments 0
Sign in with email or Google to join the discussion.