Instructions to create Ghost files with Boot disk
You can use Ghost to recover your computer quickly without spending time on installing Windows and previously installed software.
Have you ever installed a completely new Windows? If so, you will surely realize that this installation is very time-consuming even though today's versions of Windows are much faster than before. To improve the situation on Ghost was developed to support maximum reinstallation of Windows.
Ghost is a software used to backup and restore data, it can backup from a hard drive or a certain hard drive partition into an image file. If the operating system shows signs of error or malfunction, you can use Ghost to quickly recover the machine without spending time on installing Windows and previously installed software.
Here I will guide you the steps to successfully create Ghost files with Boot disk :
Step 1: To create Ghost file you need to have Ghost.exe program, this application can be found in normal Boot disks. Please prepare a Boot disk, proceed to the CD or DVD drive.
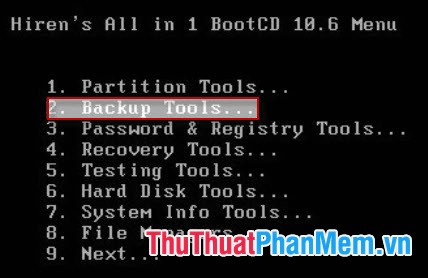
Step 2: From the Dos Programs main screen select 2. Backup Tools.
Step 3: Select 6. Norton Ghost .

Step 4: Select 8. Ghost (Normal) .

Step 5: The main screen of Norton Ghost appears, click OK .

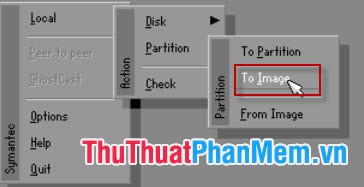
Step 6: Select Local -> Disk -> To Image .
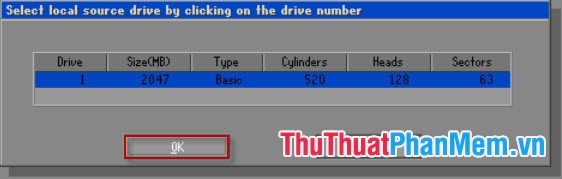
Step 7: Select the hard drive containing the partition or partition that needs Ghost and click OK .
Step 8: Name and choose where to store the generated Ghost file and click Save . To save the Ghost file you create, please note the volume of the partition containing the Ghost file must still have enough space.

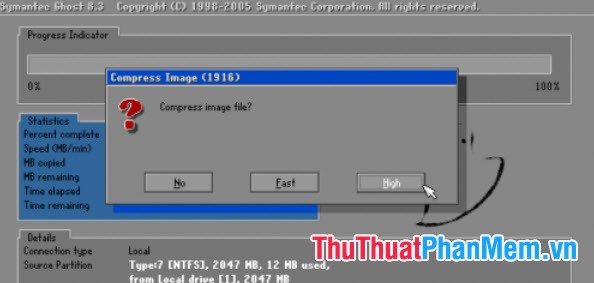
Step 9: A dialog box appears asking you how to choose to compress this Ghost file? Click on High (Ghost file compression at a high level).
Click Yes to start creating the Ghost file.

The process is fast or slow depending on the size of the generated Ghost file. Wait for the program to finish, Restart the computer and check the newly created Ghost file.
Thus, the Ghost file has been completely created and you can use it to recover necessary.
Was this article helpful?
Your feedback helps us improve.
Related Articles
 Instructions on how to ghost Windows 7 using USB5 minutes read
 Instructions to use Onekey Ghost to create and extract Ghost files quickly3 minutes read
 How to ghost Windows 7, ghost Windows 7 using Hiren Boot's CD3 minutes read
 Instructions for creating USB boot with Hiren's BootCD quickly6 minutes read
 How to Create a Boot Disk8 minutes read
 Norton Ghost integration on Hiren's Boot disk 13.x4 minutes read
Reader Comments 0
Sign in with email or Google to join the discussion.