How to create USB boot versatile, USB rescue by DLC Boot
USB boot or versatile USB will help users in many cases such as fixing computer errors, corrupted data, dividing the drive, creating Win install partition, partitioning the hard drive without losing data, creating a ghost file. With extremely compact device, this powerful USB boot will help you rescue your computer anywhere, without the need for a CD / DVD as before. Currently, there are many software to support users to create bootable USB such as Hiren's BootCD, Rufus tool, or DLC Boot.
DLC Boot is integrated with many features such as support on UEFI boot and LEGACY with FAT32 USB format, support Mini Win, tools for partitioning non-data loss, driver update tool, . There are many tools Tools on DLC Boot support rich user needs of users. The following article will guide you how to create USB boot using DLC Boot software.
- How to create USB Boot, USB install Windows by Rufus
- Instructions for creating USB boot with Hiren's BootCD quickly
- Instructions to create USB install Win, USB boot with Windows 7 USB Download Tool
How to use DLC Boot to create multi-purpose USB boot
Step 1:
You download DLC Boot software according to the link below. Then extract the rar file with WinRAR, or Zip included in the computer. In the DLC Boot folder, locate the DLC file. Boot right-click and select Run as administrator .
- https://docs.google.com/uc?id=0BxTOYa030FZmSmFpT2JxTDFTcGc&export=download

Step 2:
Plug the USB into the computer. If there is data in the USB, please transfer all the data. USB here must be at least 2GB. Next, in the DLC Boot main interface, click on the USB icon at the top of the interface.

A small dialog box appears to select Yes to proceed to create a USB boot.

Step 3:
The software will now detect the USB device connected to the computer. Select the USB drive on the bad computer press Create to proceed to create USB boot multipurpose by DLC Boot.

Next, confirm the creation of the multi-purpose USB and delete all data in the USB, click Yes to agree.

Step 4:
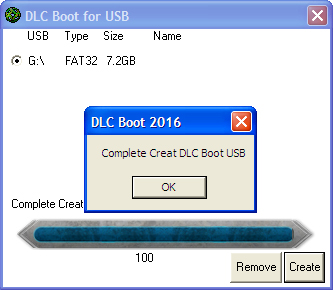
Immediately after that, the process of creating USB boot with DLC Boot appeared. This process can take more than 10 minutes so please wait patiently.

When you see the process running to 100% and a message appears as shown below, it means the multi-function USB creation process is complete.

Step 5:
To check the performance of the newly created USB boot, go back to the main interface of the tool and select Other Tools .

Step 6:
Select the USB name then click on Start Qemu Test to conduct the test.

If the picture appears below, it means that USB boot can be used and operated effectively.

So we have completed the creation of multi-function USB boot with DLC Boot tool. Users need to pay attention to boot on UEFI system, USB must be FAT32 format. In the process of use, if the antivirus program sends a notice, because it detects that there are programs that interfere with the system, you can still use it safely.
See more:
- How to backup and restore Windows in just 10 minutes with Acronis True Image
- Instructions on how to install Windows 7 from the HDD
- 20 ways to create the best USB boot
I wish you all success!