Instructions to install Win 7/8/10 in WinPE (Mini Win) environment
Instructions on how to install windows 7/8 / 8.1 / 10..on WinPE (Mini Windows) environment extremely fast and effective. How to use WinNTsetup to install win quickly.
There have been many articles that TipsMake introduced and instructed you how to reinstall Windows for your computer, but it seems that is not enough. To respond to those requests of everyone, in this article I will guide you how to install Windows 7/8 / 8.1 / 10 from the Mini Windows environment with the WinNTsetup tool.
#first. What needs to be prepared?
- First, create a multi-function bootable usb .
- Windows * .iso file (Win whatever you want). You can go online to download the original Windows Setup , if you intend to install Windows 10, you can download the installer as in this guide .
Just that simple, the necessary tools are already available in the usb boot that you created earlier.
#2. How to install Win on the WinPE environment
Update one more good way: In the WinPE environment (Mini Windows), in addition to the below way, you can install Win extremely quickly:
+ Step 1: Access to Mini Windows .
+ Step 2: Mount the Windows installation file to the virtual drive by right-clicking the iso file => selecting Mount as ImDisk Virtual Disk.
+ Step 3: Open the virtual drive that you just mounted => run setup.exe => file and start installing Win.
Or do the following:
Now, plug the USB into your computer and boot into the Mini Windows 7 or 8 environment. If not know how to boot into your computer, you can refer to the guide this .
+ Step 1: Go to Computer => and Format the hard drive partition you want to install Windows (in the File Type => you should remember to choose NTFS).
Tips: In addition to the above, you can use Partition Winzard software to delete the partition you want to install Win on.

Wait a while for the computer to Format, it also takes a while because we have dropped the Quick Format mode. Once done, move on to the next step.
+ Step 2: Click on DLC BOOT => select Disk Tools => select BootICE tool.
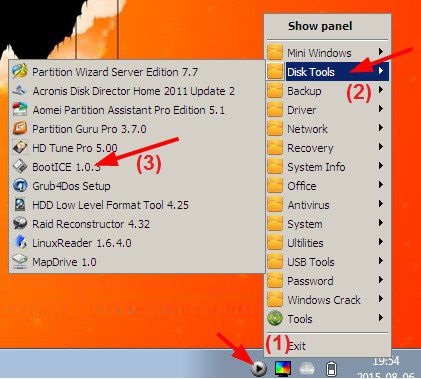
Next we will set up to load MBR, PBR for the hard drive partition that we just Format:
Select Physical => select the correct partition you just Format earlier => click Process MBR => select Windows NT 5.x / 6.xMBR => select Install / Config. You do it in turn as shown below:

Choose the latest version and use it.

+ Continue to click Process MBR => select the correct hard drive partition that you just Format => select Install / Config and click OK to install. You set up as shown below.

+ Step 3: This step we will have 2 ways to install it: " Mount" to the virtual drive to install directly with the setup.exe file in the installer, and the second way we will use the tool WinNTsetup is included with USB BOOT.
+ Method 1: Mount Windows setup file to virtual drive by right-clicking on that * .iso file => and selecting Mount as ImDisk Virtual Disk. This time it will automatically create for us a virtual drive containing Windows installation in it.

Then proceed to install as usual, you can refer to the article on how to install Windows if you do not know.
# 3. How to use WinNTsetup to install Windows
+ Method 2: Use WinNTsetup to install. To do this, you first click Mount the iso file to the virtual drive as instructed in method 1.
Then click on the DLC BOOT icon => select System => open the WinNTSetup software as shown below:

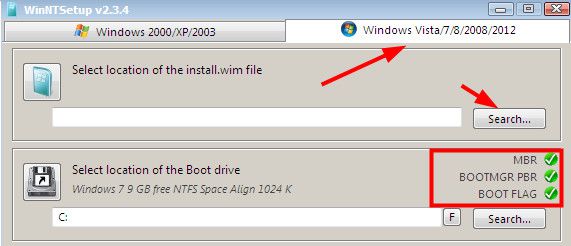
At the main interface of WinNTsetup you set up as follows. Select Windows Vista / 7/8/2008/2012 if you are installing Windows 7 or higher.
Next, in the Select location of the install.wim file => click Search to find the install.win file or install.esd in the virtual drive you burned earlier.
Important Note: There must be 3 green check marks in the red frame, as in the red frame, to make it possible, but if there is a yellow exclamation mark or a red x, the installation cannot be performed.
If I do the steps as instructed above, I make sure there is no error here.
You do as shown below to open the file install.win (file install.win or install.esd located in Folder sources offline)

You set up as follows:
At the box Select localtion of the installation driver => click Search . => and select the correct partition that you want to install win.
- Check the checkbox Patch UxTheme.dll to allow unsigned Themes
- Tweaks: Set advanced options if you want (in this there are quite a lot of great features you can go to see, if not understand, you can use google translate offline: D)
- Setup: Starts the windows installation process.
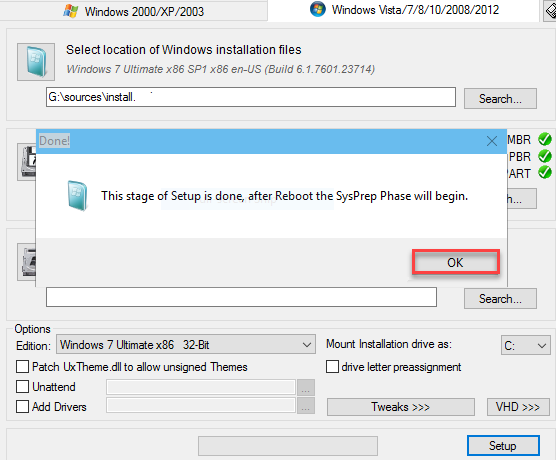
- In addition, in the Option Edition section you can choose the Windows operating system you are installing.

Note: When you press Setup, there will be a message asking if you want to choose the boot mode with BootICE or another mode in the Boot Menu.
In the old version I am using, the only option is BootICE, but in newer WinNTsetup versions, there is an option of BootSect (ie the default Windows Setup). We encourage you to choose the BootICE mode.
OK, now let's make a cup of coffee while waiting for the software to start installing Win. Once done it will show up a notice as shown below. Click OK and restart your computer to finish installing Win.
# 3. Conclude
So you have finished the guide to install windows in a WinPE environment, the instructions are lengthy, but the operation is extremely fast. Hope this new installation method of win will help you in the computer rescue.
Good luck !