How to optimize Delivery Optimization cache in Windows 10
Delivery Optimization (Delivery Optimization) feature in Windows 10 allows you to upload and download Windows 10 and Microsoft Store updates to and from other computers on the local network as well as on the Internet..
Delivery Optimization (Delivery Optimization) feature in Windows 10 allows you to upload and download Windows 10 and Microsoft Store updates as well as from other computers on the local network or on the Internet.Windows does this by using self-organizing distributed localized caches.By default, Delivery Optimization cache will use up to 10GB of your C drive space and be retained for three days.
Of course, if your drive has low capacity or Windows feels necessary, it will automatically clear the cache and free up space.Moreover, when a new update is sent, Windows will also adjust the cache to best suit it.
If you think that Delivery Optimization is using a lot of space or not keeping the cache long enough, you can change specific settings using the Group Policy Editor group editor or Windows Registry Editor.Here's how to proceed.
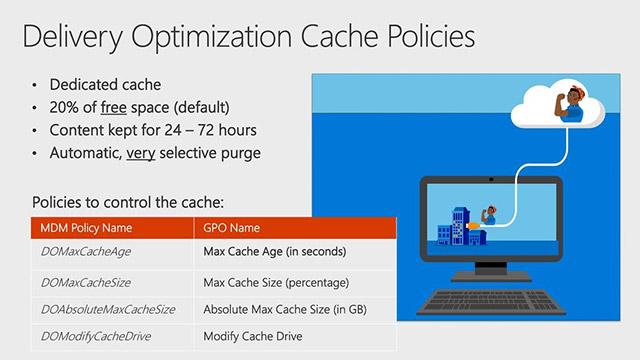
- Learn how cache works
Change the size and time of Delivery Optimization cache storage via Group Policy Editor
1. First, access the Group Policy Editor by searching for gpedit.msc in the Start menu. Then, navigate to Computer Configuration -> Administrative Templates -> Windows Components -> Delivery Optimization.
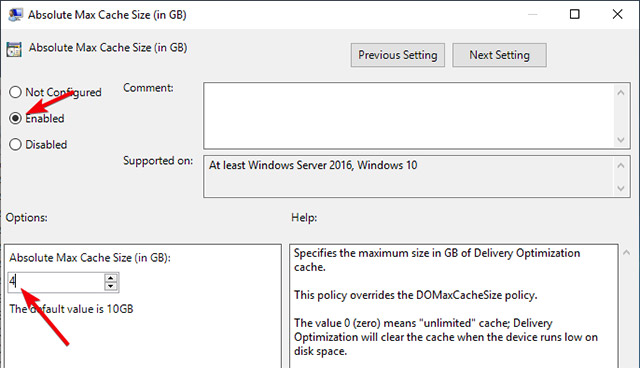
2. In the Delivery Optimization window, look to the right panel, find and double-click Absolute Max Cache Size policy (in GB) . This policy allows you to set the cache size in gigabytes. If you want to set the cache size according to relative amounts, such as the percentage of C drive, find and double-click the policy called Max Cache Size (percentage).

3. In the properties window of Absolute Max Cache Size policy (in GB) , select the Enables option. In the Options section, enter the amount of storage space you want to allocate and click the Apply button.If you have chosen to set the cache size as a percentage, calculate the percentage you want to set and enter the same value as above.
4. Next, find and open the Max Cache Age policy (in seconds).

5. Similarly, select Enabled . Then, in the options section, enter the amount of time you want to keep the files cached in seconds and click Apply and OK .For example, if you want to keep cached files for a week, enter the value 604800 in the value field.

6. Finally, restart your system to apply the changes.From now on, Windows will only use the amount of storage space you allocate to store Windows update files.In addition, Windows will automatically delete cached files older than the number of days set in the second policy.
If you want to revert the settings, select Disabled or Not Configured for both policies and then restart your system.
Change the size and time to store Delivery Optimization cache through the Windows Registry Editor
If you are using Windows 10 Home, you can use the Registry to make similar changes.However, because we will need to create some new values, please backup your Registry before continuing.
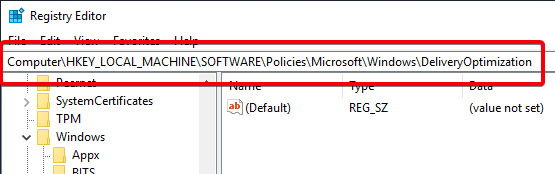
1. Open Start menu, enter the keyword regedit in the search box and open the Registry . In Registry Editor , navigate to the following location:
HKEY_LOCAL_MACHINESOFTWAREPoliciesMicrosoftWindows
2. Right-click the Windows item, then select New -> Key . Name the key as DeliveryOptimization.If you already have this key, go to the next step.
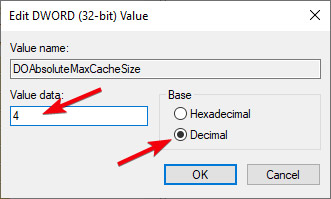
3. On the right panel, right-click and select New -> DWORD (32-bit) Value . Name the value DOAbsoluteMaxCacheSize . This value allows you to set the maximum storage space that Delivery Optimization can use.Next, double-click the newly created value.
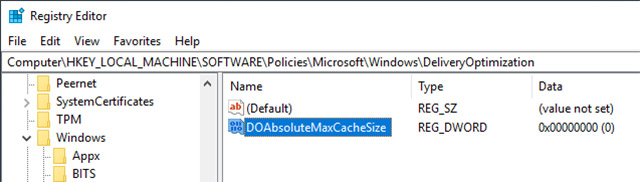
4. The first important thing you should do is choose the Decimal option. Next, enter the amount of storage space that you want to allocate in GB units in the data value field, and then click the OK button.
5. Again, right-click and select New -> DWORD (32-bit) Value . Name the new value DOMaxCacheAge and press Enter .
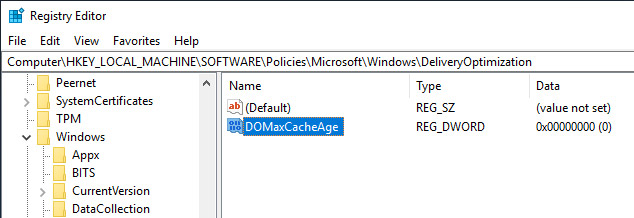
6. Double-click the newly created value and select the Decimal option. Enter the number of days in seconds in the value data field and click the OK button.For example, if you want the cache to be valid for seven days, enter a value of 604800.

Accomplished!Now close the Windows Registry and restart your system to apply the changes.If you want to revert the changes you just made, just delete both the values DOAbsoluteMaxCacheSize and DOMaxCacheAge .
summary
The above is how to change the size and time to store Delivery Optimization cache through the Group Policy Editor and Windows Registry Editor.Please tell us about your thoughts and experiences after using the above methods in the comment section below.Good luck!
See more:
- Clear the Windows 10 Update Cache to free up memory space
- How to turn off Windows Update on Windows 10
- 11 ways to start the Performance Monitor performance monitor in Windows
- Compare the differences between Windows 10 versions