Instructions for using anti-malware feature on Windows 10
Defender Security Center is a new feature on Windows 10 Creator Update, upgrading many customizations compared to the previous Windows Defender. This tool helps protect your computer more effectively with built-in anti-malware features.
Defender Security Center is one of the important improvements that helps strengthen security for Windows 10. If you haven't upgraded yet, you should do it now to enjoy the new features.
Instructions for using anti-malware features on Windows 10 with Defender Security Center
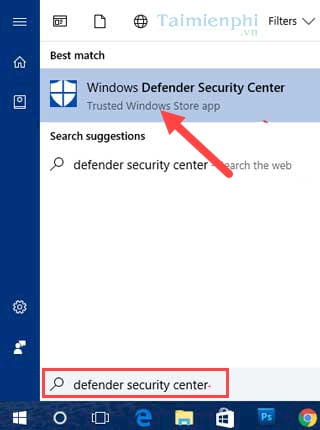
Step 1: Open the Start Menu, type Defender Security Center, then select the displayed result.
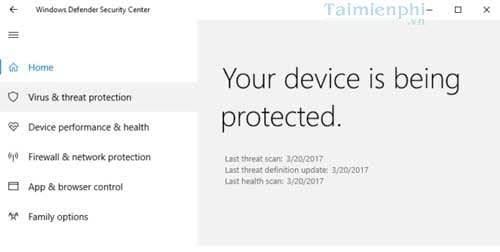
Step 2: In Defender Security Center, click Home. If the message Your Device is being protected appears, your device is protected.
Step 3: Next, click on Virus & threat Protection and select Quick Scan to scan for viruses.

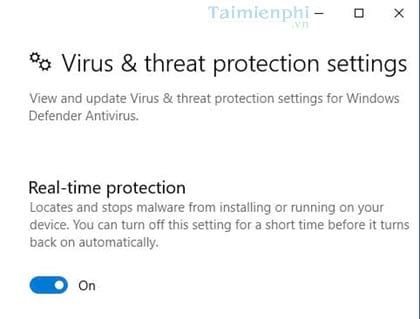
Step 4: To turn off Defender Security Center, select Virus & threat protection settings.

Step 5: In Virus & threat protection settings, switch Real-time Protection to OFF to turn it off.

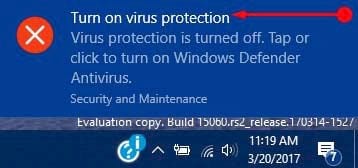
Step 6: After turning off, there will be a notification on the Desktop screen to warn you.
Step 7: To turn it back on, just do the opposite from step 4, but make sure Real-time Protection is set to On.
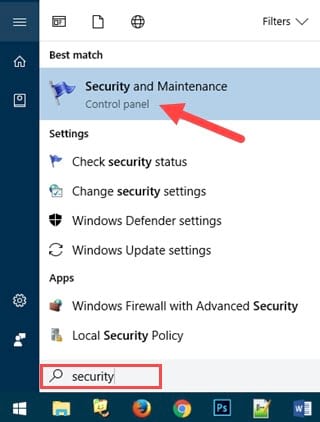
Step 8: To complete activation, open the Start Menu, type security, and then go to Security and Maintenance.
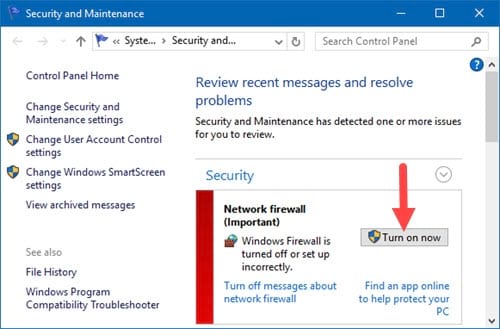
Step 9: In the Security and Maintenance section, go to Security and select Turn on now .
At this step, we have completed turning on Defender Security Center as well as using the anti-malware feature on the new Windows 10.
Using the anti-malware feature on Windows 10 through Defender Security Center helps protect your computer effectively. If you do not want to upgrade to Windows 10 Creator Update, Windows Defender is still a safe choice. In particular, when scanning compressed files, Defender works very well. You can also customize Defender, integrate it into the right-click menu to easily scan for viruses at any time. To do this, you can refer to the article on how to add Windows Defender to the right-click menu.
In addition, if you have any questions or concerns about Windows Defender, you can send us your questions or leave a comment here. We will respond to your questions as soon as possible to help you solve the problem.
- Instructions on how to use the Timeline feature on Windows 10
- Instructions to remove Malware on the computer
- How to see which Windows Defender has found malware on a PC
- Microsoft is about to add a useful security feature to Windows 10 to help detect software attacks early
- How to find and remove WMI Persistence malware from Windows PCs
- Windows Startup Tips That Will Save You From Dangerous Malware
- How many types of malware do you know and how to prevent them?
- 10 typical malware types
- What is Safe Malware? Why is it so dangerous?
- Can a VPN Fight Malware?
- Install CentOS on Windows 10 WSL
- What is the USO Core Worker Process or usocoreworker.exe? Are they viruses?
- How to exclude files and folders with Robocopy in Windows 10
- Fixed a bug with C drive with yellow exclamation on Windows 10
- How to disable SMB3 in Windows 10
- 3 ways to remove a Windows 10 computer from a domain that no longer exists
- How to create a yellow circle around the mouse cursor on Windows
- How to open the camera on laptop Windows 7/8/10
- How to change the Start button on Windows 10
- How to install Owncloud server on Windows 10 (WSL)
-
 Instructions on scanning compressed files with Windows Defender on Windows 10
-
Instructions for scheduling Microsoft Defender scans on Windows
-
How to Backup and Restore Microsoft Defender Windows 11
-
Microsoft Defender VPN will stop rolling out to Microsoft 365 subscribers
-
Is windows defender good? Is it as good as paid software?
-
How to set up Windows Defender to increase defense capabilities
 Instructions on scanning compressed files with Windows Defender on Windows 10
 Instructions for scheduling Microsoft Defender scans on Windows
 How to Backup and Restore Microsoft Defender Windows 11
 Microsoft Defender VPN will stop rolling out to Microsoft 365 subscribers
 Is windows defender good? Is it as good as paid software?
 How to set up Windows Defender to increase defense capabilities
-
 Free Tools
- CSS Minifier and Compressor
- HTML Minifier
- JavaScript Minifier
- Json Minifier
- SQL Queries Minifier
- XML Minifier
- Password Generator
- uuid Generator
- Hash Generator
- Lorem Ipsum Generator
- QR Code Generator
- QR Code Scanner
- Barcode Generator
- Meta Tag Generator
- Slug Generator
- Placeholder Image Generator
- HTML Table Generator
- Markdown Table Generator
-
System
-
Mac OS X
-
Hardware
-
Game
-
Tech info
-
Technology
-
Science
-
Life
-
Application
-
Electric
-
Program
-
Mobile