Table of Contents
This practical guide walks through how to set Up Windows Defender to Increase Defense. It organizes the required steps, settings, and checks so you can complete the task with fewer mistakes.
Compared to third-party antivirus software, Windows Defender Antivirus Only provides basic computer protection options, but the overall level of protection of Windows Defender Antivirus has improved. compared to other anti-virus software.
On the Windows 10 Creators Update, Microsoft introduced a new feature called Windows Defender Security Center . It can be said that Windows Defender Security Center is the 'hub' of the center of security-related settings.
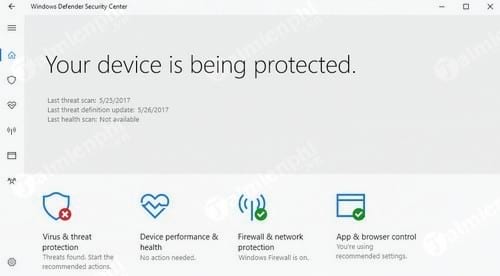
Along with Windows Defender Security Center , the blocking level of Windows Defender Antivirus is also 'raised' to a new level to enhance protection against threats.
Note: The steps below to set up Windows Defender in Windows 10 and 8 to increase defense capabilities activate the cloud protection level of Windows Defender Antivirus. This feature is only available on Windows 10 version 1703 (and higher versions) and managed through various interfaces including Group Policy , Registry Editor , System Center Configuration Manager Or Microsoft Intune .
The main benefit of enabling cloud protection is to detect and block new malware, even without a signature.
The key difference with Microsoft Advanced Protection Service , the previous version of the cloud protection service available for Windows 10 version 1607 and Windows 8.1, is that you can configure the cloud blocking timeout and on the first version This feature was also initially supported (in 1607 but not on Windows 8.1).
Set up Windows Defender to increase defense capabilities
Use Group Policy to Enable Cloud Protection for Windows Defender
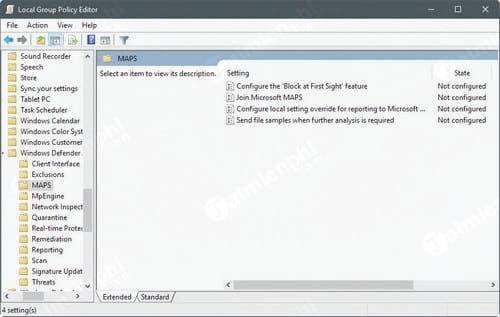
If you are using Windows 10 (or Creators Update or higher versions) Pro or Enterprise, follow the steps below to enable protection:
Step 1: Enter Gpedit. msc into the Search box on the Start Menu and select Enter to open theLocal Group Policy Editor Window.
Step 2: On the Local Group Policy Editor window, in the left pane, navigate to the key:
Computer Configuration => Administrative Templates => Windows Components => Windows Defender Antivirus => MAPS
Step 3: Find and double-select Join Microsoft MAPS .
Step 4: Set the value from Not Configured To Enabled .
Step 5: In the Join Microsoft MAPS section, select Advanced MAPS .
Basic membership Is no longer an option, as Microsoft 'deprecates' this option on Windows 10. If you choose basic membership, you will be automatically signed up for Advanced membership instead.
Basic membership sends basic information to Microsoft about the detected software, including the software's location, the actions you applied or were applied automatically, and whether the action was successful.
Advanced membership , in addition to basic information, will send additional information to Microsoft about malware, spyware and unwanted software, including the location of the software, file names, how to how the software works and how it affects your computer.
Note that both will send data to Microsoft.
The MAPS folder includes 3 additional policies you may want to configure:
- Configure the "Block at First Sight" feature : can enable or disable the Block at First Sight policy. If this policy is enabled, checks are performed in real time with Microsoft Active Protection Service before content is allowed to run or be accessed on the device.
- Configure local setting override for reporting to Microsoft : lets you configure local overrides. If this policy is enabled, Local preference settings take priority over Group Policy.
- Send file samples when further analysis is required : determines whether and when sample files are transferred to Microsoft. You can set it to always prompt, send safe samples automatically, never send or send all samples automatically.
Note that, if you enable the policy Configure the "Block at First Sight" feature, you must select one of the two automatic sending options.
Change Windows Defender Cloud Protection Level
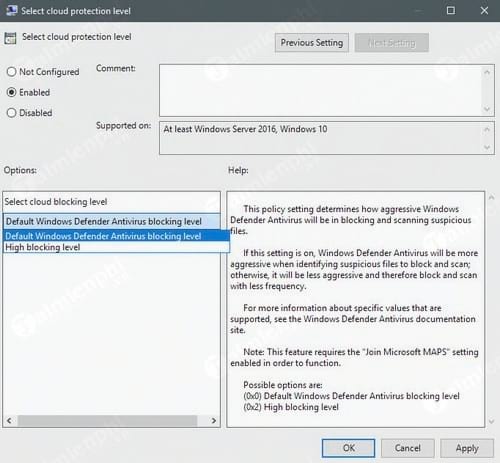
Now that you have engaged MAPS on your device, you can set up a higher level of protection.
Step 1: On the Local Group Policy Editor window, navigate to the key:
Computer Configuration => Administrative Templates => Windows Components => Windows Defender Antivirus => MpEngine
Step 2: Find and double-select cloud protection level.
Step 3: Set the value to Enabled and in the Select cloud blocking level section, select the High blocking level option.
Microsoft talks about the difference between two levels of blocking:
- Default Windows Defender Antivirus blocking level setting provides strong detection without increasing the risk of detecting legitimate files.
- Setting High blocking level will apply a strong level of detection. Although it is unlikely, some legitimate files may be detected (although you will have the option to unblock or dispute such detection).
Use Registry Editor to Enable Cloud Protection for Windows Defender
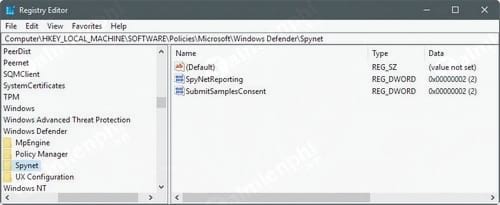
On Windows 10 Home devices, Group Policy Editor is not supported. However, you can use Windows Registry Editor to make the necessary changes.
Step 1: On the Search Start Menu frame, enter Regedit. exe There and select Enter .
Step 2: If the UAC Window appears in the window, select Yes to open theWindows Registry Editor Window.
Step 3: On the Windows Registry Editor window, in the left pane, navigate to the key:
Hkey_local_machinesoftwarepoliciesmicrosoftwindows Defender
Step 4: Find and right-select Windows Defender , select New => Key .
Step 5: Name this new key Spynet .
Step 6: Right-select Spynet, select New => DWORD (32-bit) Value .
Step 7: Name this value SpynetReporting .
Step 8: Double select SpynetReporting , and set the value in the Value Data Box to 2 .
Step 9: Return to the HKEY_LOCAL_MACHINESoftwarePoliciesMicrosoftWindows Defender Path.
Step 10: Right-select Windows Defender , select New => Key .
Step 11: Name this key MpEngine .
Step 12: Right-select the newly created MpEngine key, select New > DWORD (32-bit) Value .
Step 13: Name this value MpCloudBlockLevel .
Step 14: Double select MpCloudBlockLevel and set the value in the Value data Frame to 2 .
Doing this will help you set up Windows Defender to make your computer's defense more secure with detailed reports and higher security.
In addition, many times users turn off Windows Defender using the Registry on Windows 10. This method takes a bit of time but ensures that Windows Defender is completely turned off. you can use how to Turn off Windows Defender using the Registry Here on Windows 10..
Opt Out of MAPS
You can opt out of MAPS by deleting Registry Keys or setting policies in The Group Policy Editor To Disabled Or Not configured .
Conclude
Setting up Windows Defender to increase your defenses is a good idea. However, some users may not want to use this option, possibly because: first, it allows sending more data to Microsoft (including sample files if configured this way)., and second, because it can increase the number of false positives (error positive rate).
To use Windows Defender faster, you can add Windows Defender to the right-select Menu like many other applications. For details, please review the article Adding Windows Defender to the right-select Menu Here.
FAQ
What do I need before I set Up Windows Defender to Increase Defense?
Prepare the required device, software, account access, and any files mentioned in the steps. Back up important data before changing system settings.
Why does the process look different on my device?
Menus and options can vary by operating system, app version, device model, or region. Use the closest matching setting and check the official documentation when needed.
What should I do if a step does not work?
Restart the app or device, confirm permissions and connectivity, update the software, and repeat the step carefully. Avoid unofficial downloads or tools.
Related Articles
 Increase the Protection of Windows Defender with the Following5 minutes read
 Instructions for Using Windows Defender14 minutes read
 How to Turn Off the Windows Defender Summary Notification on4 minutes read
 How to Add Exceptions in Windows Defender on Windows 105 minutes read
 How to Fix Errors Cannot Open Windows Defender on Windows 7/8/1013 minutes read
 Use Windows Defender with Command Prompt on Windows 105 minutes read
Reader Comments 0
Sign in with email or Google to join the discussion.