Table of Contents
Use this guide to understand instructions for sending handwriting messages on iOS 10 and the factors that affect it. The information is organized to make the topic easier to apply in practice.
IOS 10 version will be officially released in the near future, but users can experience many new features of this operating system through upgrading to iOS 10 Beta. The higher the version, Apple offers more and more new features, bringing new look to users.
The app interface is designed to be more prominent and eye-catching. In addition to the feature of identifying and sending handwritten messages of iMessage. This is a completely new feature Handwritten Messages in iOS 10. Users instead of typing text as before, can manually edit the content, the type of writing according to their own or based on the form available to send messages others. This guide explains how to send messages in handwriting on iOS 10.
1. Send a handwritten message on iPhone
Note , the handwritten message templates created or sent are saved. Each message allows only one handwritten form.
Step 1
Open the iPhone Message app. First of all, we need to turn off the screen lock function when turning the device horizontally.


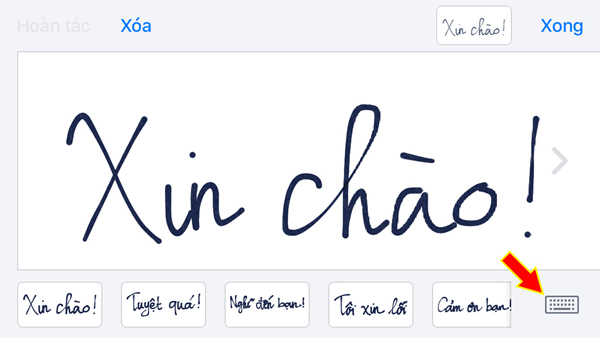
Immediately after that, there will be a white area used to write your own content. To add a white area, press the arrow button to the right of the screen.

Next, let's write whatever content we want to send. When you have finished writing the handwritten content to send the message, press Done (Done) to send. when needed to return to the previous operation, click Undo.

Step 2
To use more characters on the keyboard, click The semi-keyboard icon In the right corner of the screen.
Step 3
In addition, the company also provides some handwriting samples for user reference. First enter the phone number to receive the message to use this feature.
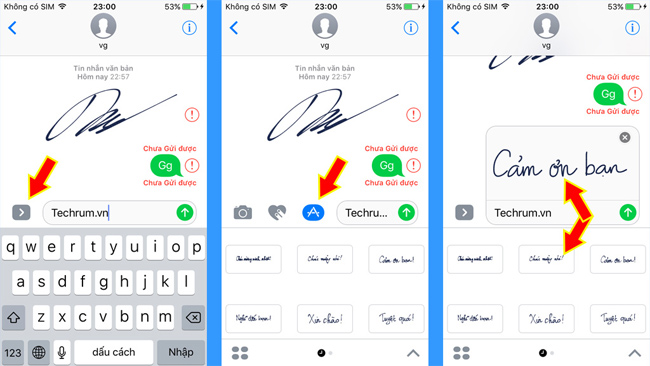
Click The arrow icon , then select The letter A symbol . Appears a list of handwriting templates with different content for us to choose to use.
2. Send handwritten messages on iPad
Handwritten messaging feature on iPad allows use on both horizontal and vertical screens.
Step 1
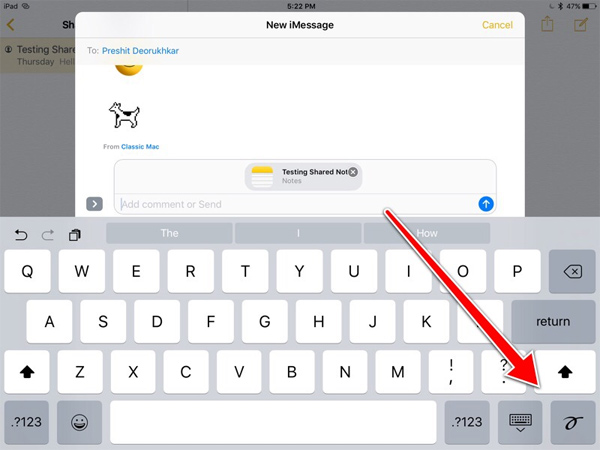
Click the item to write the message content and the keyboard appears. At the right side of the keyboard, press The handwritten icon To compose the content. click it and a white frame appears so that we can edit the content. Scroll left or right to the white frame to compose the message content.
Step 2
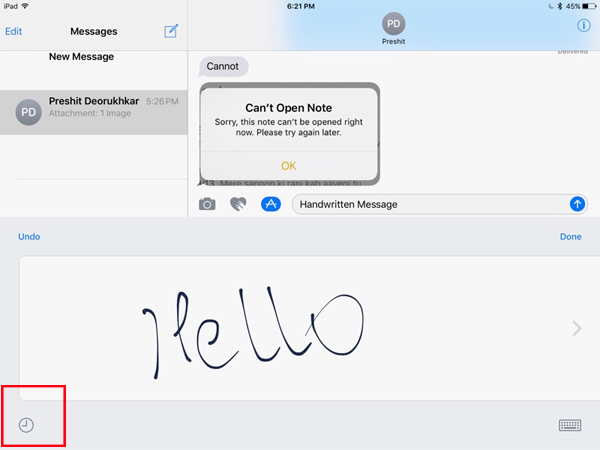
To review previous handwritten messages, click The clock icon Under the left corner of the screen.
You have now completed the operation of writing handwritten messages on iPhone, iPad iOS 10 already. Users can delight in composing the message content themselves or based on the handwritten templates available in the device.
Refer to the following articles
- How to upgrade to iOS 10 Beta does not need a Developer account
- How many tricks have you missed using this iPhone?
- Phone does not charge or charge slowly, this is how to handle it
I wish you all success!
FAQ
What is the main benefit of instructions for sending handwriting messages on iOS 10?
The main benefit is a clearer understanding of the topic and a practical way to apply the information covered in this guide.
What should I check before using instructions for sending handwriting messages on iOS 10?
Confirm compatibility, review the required settings, protect important data, and use the latest supported version whenever possible.
What should I do if the result is different?
Repeat the steps carefully, verify permissions and version differences, and consult the product's official support documentation for changes not shown in the article.
Related Articles
 How to Turn Off the Feature of Manually Writing Messages on iPhone5 minutes read
 How to Turn Off Sending SMS Messages on iPhone3 minutes read
 How to Speed up Sending Photos in iPhone Messages2 minutes read
 Instructions for Sending Audio Messages on Viber4 minutes read
 Instructions for Sending Video Messages on Viber4 minutes read
 How to Style Messages for Imessage iOS 106 minutes read
Reader Comments 0
Sign in with email or Google to join the discussion.