Instructions for installing and using XP Mode on Windows 7
Are you using Windows 7 but still 'glamorous' familiar operating system Windows XP? The following article will show you how to create a virtual machine using Windows XP right in the current Windows 7 operating system.
Are you using Windows 7 but still ' glamorous ' familiar operating system Windows XP?The following article will show you how to create a virtual machine using Windows XP right in the current Windows 7 operating system.
Windows XP Mode is a feature on Windows 7, which allows simulating the environment of Windows XP as a stand-alone virtual computer. This is a useful feature that allows users to use old compatible software and applications on Windows XP, as well as create a separate environment for testing when needed.
This is similar to using 2 computers with 2 different operating systems.
Currently there are many applications that allow users to build virtual computers inside the operating system they are using, however, these applications require the use of a separate installation (CD / DVD, file ISO settings .) with the license code of the installation (Windows license .). This causes inconvenience to users.
The following article will show you how to install Windows XP mode right in Windows 7 with the free application available from Microsoft.
Components to prepare:
- Windows XP Mode feature can only be used on Windows 7 Professional, Enterprise and Ultimate versions. To find out which version of Windows 7 you are using, right-click the My Computer icon, select Properties.
In the System Properties dialog box appears, you will see specifically the version of Windows 7 you are using. (includes information on 32-bit or 64-bit versions of Windows).

- Download Windows Virtual PC (Microsoft virtual computer software for Windows 32-bit and 64-bit) for free here.
- Download Windows XP Mode (offline installation) for free here.
Installation:
- After downloading Windows XP Mode, proceed to activate to install.
- Next, install Windows Virtual PC (essentially an offline update of Windows). After completing the update process, restart the system.
- Start the system and go back to Windows, click the Start button, type Windows XP Mode into the search box and press Enter.
In case of error message as shown below:
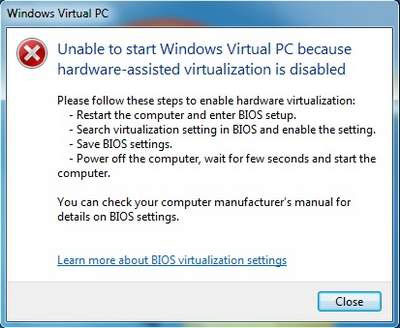
This means that the computer's BIOS does not support virtualization to create a virtual computer. To fix this, you need to change the settings in the BIOS, which is quite complicated.
For simplicity, you can download more Windows updates here (for 32-bit versions) and here (for Windows 64-bit)
Proceed to update and restart the system.
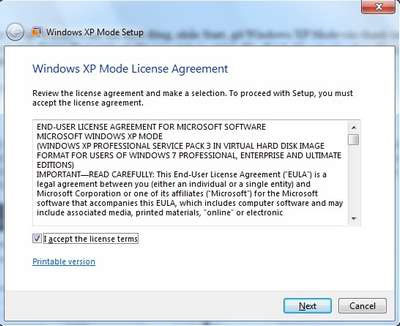
- Go back to Windows after booting, click Start , remove Windows XP Mode in the search bar and press Enter . The virtual computer installation process will begin. Check the option to accept the terms of use and click Next to begin.
- Next step, select the installation directory on the hard drive and set the password for XP user account. The amount of free space used for the virtual computer is about 2GB, if the C drive still has plenty of free space, you should leave it as default and click Next to continue.
- The next step requires you to enable automatic updates for virtual computers. You should choose Not Right Now to skip this step. Finally click Start Setup to start the installation.

- After the installation process is finished, you will be automatically taken to the interface of Windows XP (appears as a small window right in the Windows 7 interface).
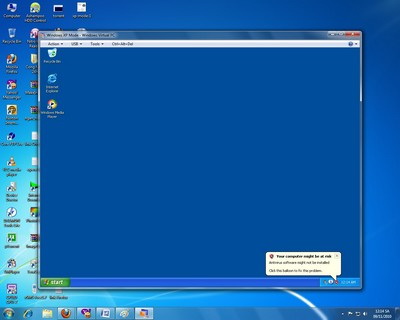
Now this virtual computer works separately from the system in use. You can install the application on it for use as a normal computer.
Access data from Windows 7 and vice versa:
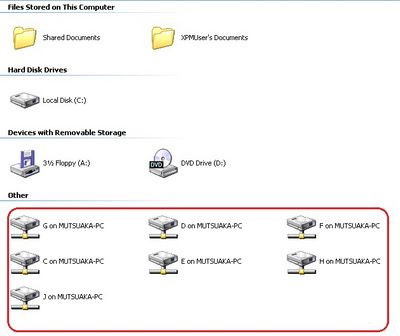
Data on Windows 7 hard drive is shared on Windows Mode virtual computer. Just go to My Computer in Windows Mode , the list of Windows 7 hard drive partitions will be listed as shared drives on the local network. You can access and use the data on it as usual.
In particular, if you want to use from USB or external devices on Widows XP Mode , you plug the device into the computer, from the XP Mode interface window, select USB -> and then select the device from the current list. out.

Click Yes in the dialog box that appears after that.
Now, the USB partition is only accessible from Windows XP Mode and disappears on Windows 7.
Run applications installed on XP Mode from Windows 7:
Applications installed on Windows XP Mode as well as data on it can be accessed and used directly from Windows 7.
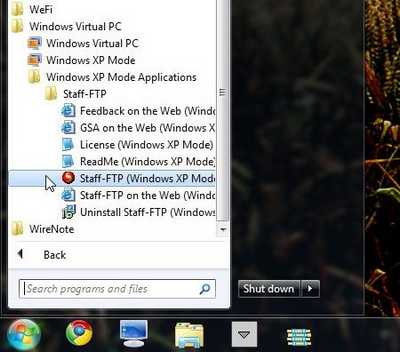
Just click Start on Windows 7 , navigate to the Windows Virtual PC folder, applications installed on XP Mode will be in the Windows XP Mode Application folder.
In case you need to reinstall Windows XP for XP Mode, just delete or rename the installation folder (saved at the location set above), then proceed to reinstall XP Mode as guided.
Was this article helpful?
Your feedback helps us improve.
Related Articles
 Instructions to turn off the automatic update mode on Windows 71 minutes read
 Enable Safe Mode in Windows 73 minutes read
 Instructions for installing screensavers on Windows6 minutes read
 How to enable AHCI mode in Windows 104 minutes read
 All problems with starting Windows in Safe Mode7 minutes read
 10 hidden modes in Windows and how to use them6 minutes read
Reader Comments 0
Sign in with email or Google to join the discussion.