Install & Uninstall Service Pack 1 on Windows 7
How to install / remove, reclaim the occupied space when installing Service Pack 1 (SP1) update package on Windows 7 / Windows Server 2008 R2. The answer lies in the following article.
How to install / remove, reclaim the occupied space when installing Service Pack 1 (SP1) update package on Windows 7 / Windows Server 2008 R2.The answer lies in the following article.
>>>Just released Windows 7 SP1 RTM has been stuck
>>> Windows 7 SP1 for end users released on February 22
1. Download and install Service Pack 1 for Windows 7:
Microsoft offers a variety of ways for users to choose SP1 patch updates for Windows 7 and Windows Server 2008 R2. (Posts made on Windows 7)
Disk space required when installing SP1 on Windows 7:
- Method of Windows Update: 750 MB with 32-bit & 1050 MB with 64-bit
- Installation method directly from the downloaded file or from DVD: 4100 MB with 32-bit & 7400 MB with 64-bit
Method 1: Download directly from Microsoft Download Center
Visit http://go.microsoft.com/fwlink/?LinkId=199583, select the appropriate version (32-bit and 64-bit) with the device you are using> Continue . Or download directly from the following links:
- SP1 update for 32-bit Windows 7: http://goo.gl/UH2g (537.8 MB capacity)
- SP1 update for Windows 7 64-bit: http://goo.gl/AXOj (903.2 MB capacity)
- SP1 update for Windows 7 32-bit & 64-bit (.iso): http://goo.gl/20D4j (1.9 GB capacity)
Once the file is downloaded, double-click it (* .exe) to install. Follow the steps on the screen until you finish installing the SP1 update on your Windows 7 computer. You may have to restart the computer to complete the installation.

With the downloaded file is ISO (general update for both 32-bit and 64-bit), you use burning programs such as Ashampoo Bruning Studio, Nero, Ultra ISO, . to burn DVD and install.
Method 2: Through Windows Update
Service Pack 1 version for Windows 7 RTM and Windows Server 2008 R2 is now available for download from the Microsoft Download Center. If you don't want to download large SP1 files yourself and install it, you can update SP1 through the Windows Update service.
Updating for Windows 7 SP1 via Windows Update is quite simple. Just follow the steps below:

- Type Windows Update in the Start menu search box and press Enter . In the Windows Update window, click the Check for updates button or link in the left panel to check for the latest updates for Windows 7 from Microsoft. When the checkout process is complete, the list of updates will show up inside the Install updates for your computer , which in the Important updates section is available are important updates to install, click on the link this.
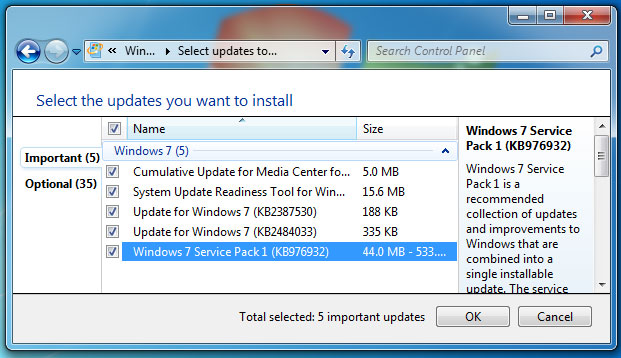
- In the interface that appears, select the item named Service Pack for Microsoft Windows (KB976932) in the list and click the OK button. And, finally click the Install Updates button to start installing Service Pack 1.
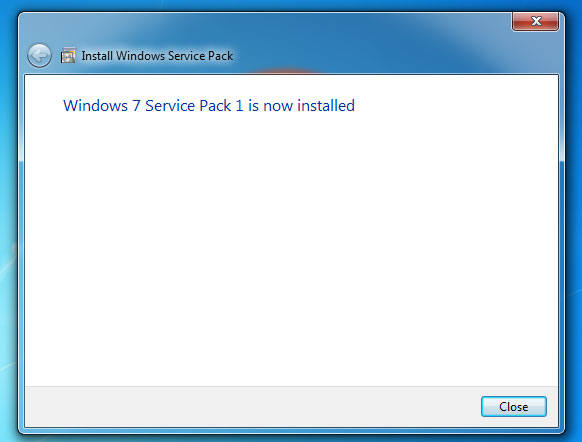
- Finish, give the computer a reboot to complete the SP1 installation procedure.Note that you need to uninstall the Windows 7 SP1 Release Candidate version before installing SP1 RTM.
2. Recover the occupied space for the drive when installing SP1:
During the installation of SP1 for Windows 7 installation, the system will make a backup of the necessary components to recover when the installation error occurs. If the installation is successful, you can reclaim the amount of the occupied components on the system by the following way:
- Enter Disk Cleanup in the search box on the Start menu> press Enter . In the interface that appears, click the Clean up system files > Yes button .

- You will find the Service Pack Backup Files section in the list, tick it and then click the OK button.
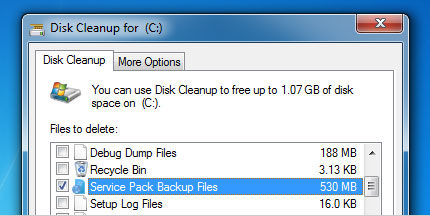
- You just wait when the cleanup process is complete and check the disk space for results.
3. Remove Service Pack 1 from Windows 7:
If you notice that a hardware device or an installation program has problems after installing the SP1 patch, or simply want to remove SP1 from Windows 7, just follow the instructions below. here.
Method 1: Use Programs and Features
- Open Control Panel and click Programs > Uninstall a program . Now click on the View installed updates link shown in the left bar.

- The SP1 update is called Service Pack for Microsoft Windows (KB976932) and you can find it in the drop-down list and click the Uninstall button on the toolbar to remove it. You can also right-click the update package and select the Uninstall option.
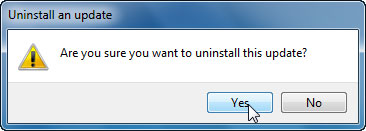
- A dialog box appears, click the Yes button to confirm the removal. After the removal is complete, you should restart the computer.
Method 2: Use Command Prompt
- Click on the Start button> All Programs > Accessories . Right-click on Command Prompt and select Run As Administrator . You can also open the Command Prompt in Administrator mode by typing cmd in the Search box and pressing Ctrl + Shift + Enter .
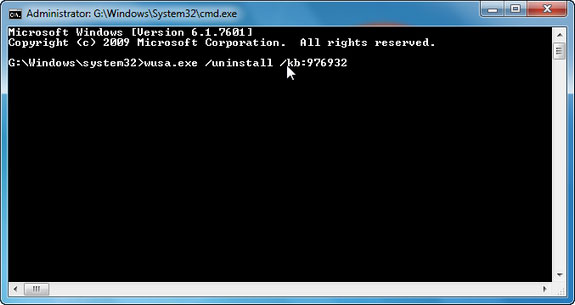
- At the command prompt you type the command wusa.exe / uninstall / kb: 976932 and press Enter . It will ask for confirmation, click the Yes button.
Method 3: Use System Restore
- Click the Start button. In the search box, type System Restore , in the results list, click the System Restore icon> press Enter . (Before you use System Restore , you need to make sure the program is still active).

- When the System Restore interface appears on the screen, select the Choose a different restore point box below to display all restore points> Next . The restore points will be labeled Install : Windows Update or Install: Windows 7 Service Pack 1 .

- Select the time when you make sure your computer works effectively> Next , and finally click the Finish button. The computer will restart and perform the recovery process.
- Install Windows XP Service Pack 3 (SP3)
- Overview of Windows XP Service Pack 3
- Windows 7 will automatically install Service Pack 1 on March 20
- Error handling cannot install updates and program settings
- How to Repair Wi Fi Connection After Windows Service Pack 2 Upgrade
- How to download and use the Program Install and Uninstall Troubleshooter in Windows
- Create a Windows 7 installation DVD with built-in SP1
- How to install Windows XP Service Pack 3 (SP3) easily and quickly.
- How to completely uninstall WSL on Windows 10/11
- Instructions on how to upgrade from Windows XP to Windows 8
- Windows 7, Windows Server 2008 R2 will continue to be unofficially supported for another two years
- Microsoft warns of Windows BlueKeep attacks
- Create private cloud with Hyper-V (Part 2)
- Create private cloud with Hyper-V (Part 4)
- Create private cloud with Hyper-V (Part 5)
- Learn about the Security Configuration Wizard in Exchange Server 2007 - Part 1
- Install Hyper-V Virtualization on Windows Server 2008 R2
- Introduction to UAG DirectAccess - Part 3: NAT64 / DNS64
- Install Windows Server Backup on Windows Server 2008 R2
- Introduction to UAG DirectAccess - Part 1
-
 Table of common BSOD error codes on Windows 11 and Windows 10
-
5 ways to fix Wi-Fi disconnection issues on Windows 11 laptops.
-
Windows 11 Error Code Table and Most Common Issues When Updating Windows
-
Useful AI features in Windows 11
-
Laptop displaying a blue screen: Causes and effective solutions.
-
How to quickly split the screen on a Windows 10, 11, and macOS laptop.
 Table of common BSOD error codes on Windows 11 and Windows 10
 5 ways to fix Wi-Fi disconnection issues on Windows 11 laptops.
 Windows 11 Error Code Table and Most Common Issues When Updating Windows
 Useful AI features in Windows 11
 Laptop displaying a blue screen: Causes and effective solutions.
 How to quickly split the screen on a Windows 10, 11, and macOS laptop.