To enable or disable Sleep mode in Windows 10
Sleep mode on Windows will put the computer into the lowest power consumption mode, extending the battery to the computer when not using the device.
Table of Contents
Sleep mode on a Windows computer will put the computer into an active state that consumes the battery at the lowest level. And on Windows 10, this mode is set to default. When a user does not use the computer for a period of time, Sleep mode prevents battery depletion.
Compared to Hibernation when the computer is completely idle, Sleep saves battery life but can continue to work on the computer, by pressing any key or hovering.
However, the problem here is the Sleep mode to the default setting, so it will automatically put the machine into Sleep state after a period of not using the device. Therefore, there are many cases where you are downloading data, the machine will automatically enter the Sleep state and must resume resume to download. The following article will help you to customize the time for Sleep mode, or you can disable Sleep Windows 10 mode if necessary.
Method 1: Turn on / off Sleep mode in Windows Settings
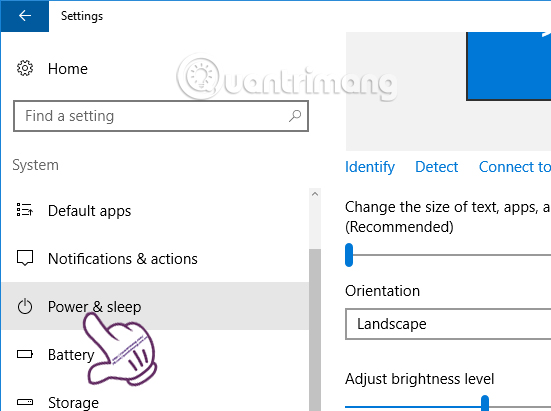
Step 1:
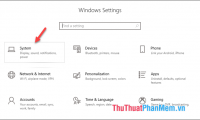
First of all, we will open the Windows Settings window interface by clicking Start menu and then clicking on the jagged icon . Or you can use Windows + I.

Step 2:
In the Windows Settings interface, continue to click System to set up the settings on the system.

Step 3:
Switch to the new interface, in the list on the left, click on Power & Sleep settings .
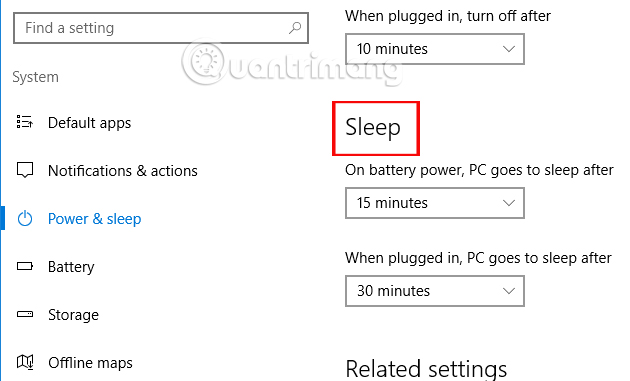
Step 4:
Switching to the interface to the right of the Sleep section will have options to set up for this mode, including:
- On battery power, PC goes to sleep after : when using the battery, the computer will automatically switch to Sleep mode after a period of 15 minutes.
- When plugged in, PC goes to sleep after : when plugged in, the computer will automatically switch to Sleep mode after about 30 minutes.
In case you want to turn off Sleep mode, just switch to Never mode .
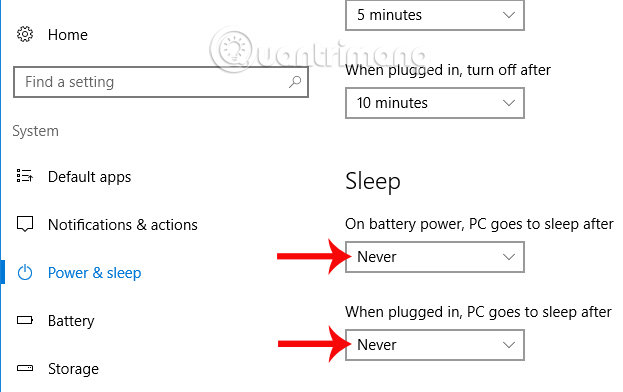
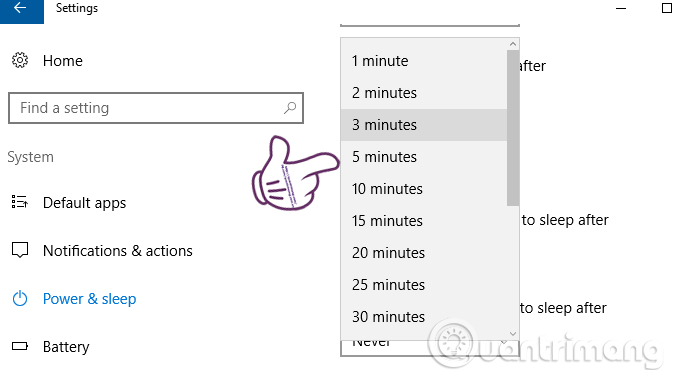
Or if you want to change the time to put in the Sleep state , we just need to select the time period that the list provides.
In addition, users can customize battery saving mode, screen brightness by clicking on the battery icon in the system tray.

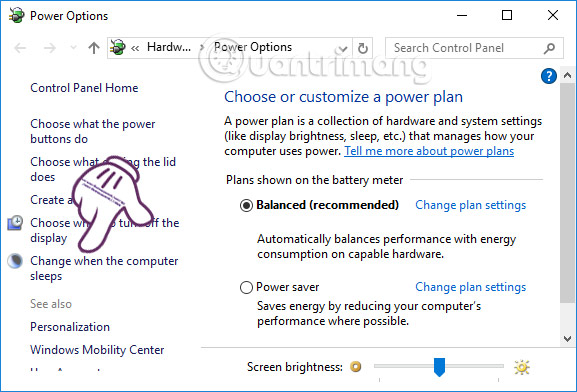
Method 2: Customize Sleep mode in Power Options
Step 1:
At the search bar on your computer or Cortana, users enter the Power Options keyword . Then click on the results found as shown below.

Step 2:
In the Power Options interface, click on Change when the computer sleeps setting in the list on the left of the interface.
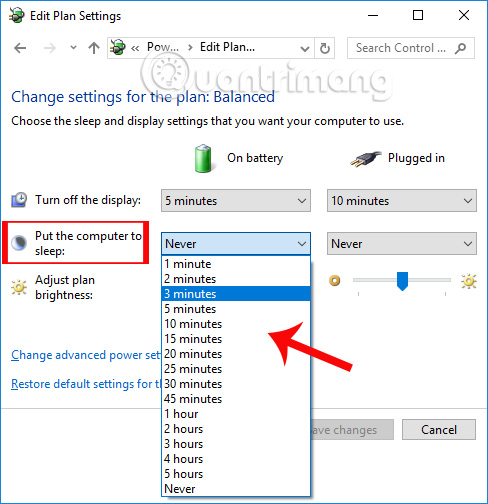
Step 3:
At the Edit plan settings interface, in the Put the computer to sleep section, it is set to Never in the default mode on 2 columns On battery and Plugged in.
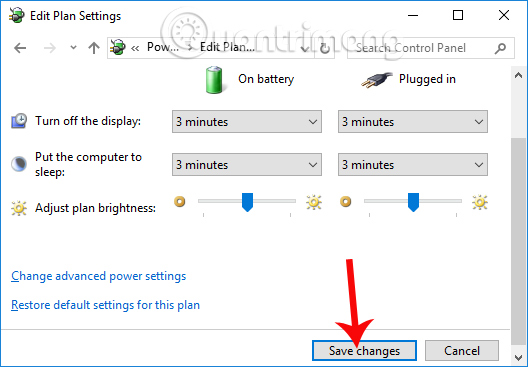
To adjust the amount of time for a Windows computer to enter Sleep mode, click the arrow icon, and then select the time in the provided list.
The last step is to click the Save changes button to save any new changes to Sleep Windows 10 mode.
Adjusting Sleep Windows 10 mode helps your computer save battery power, while the computer is still working but we don't sit in front of the screen. Besides, users can also disable Sleep Windows 10 mode if desired.
I wish you all success!
Was this article helpful?
Your feedback helps us improve.
Related Articles
 How to enable and disable the Sleep mode in Windows 102 minutes read
 How to disable automatic Sleep mode on Windows 10?3 minutes read
 How to disable Sleep mode on Windows 113 minutes read
 Ways to enable sleep mode on Windows 11 PCs3 minutes read
 How to troubleshoot problems with Sleep mode in Windows 107 minutes read
 What to do when Windows 11 won't lock in Sleep mode?3 minutes read
Reader Comments 0
Sign in with email or Google to join the discussion.