
Instructions for configuring Reverse Proxy with the latest NGINX
In today's article, TipsMake will help you learn and configure Reverse Proxy with NGINX fully and in detail.
While most popular applications can run as web servers on their own, the Nginx web server provides some advanced features such as load balancing, TLS/SSL, and acceleration that most specialized applications do not have. Using an Nginx reverse proxy allows you to take advantage of all of these benefits.
Benefits of using Nginx Reverse Proxy on an instance
Some notable benefits of setting up an Nginx HTTPS reverse proxy:
Load Balancer: An Nginx reverse proxy can perform load balancing to evenly distribute client requests across backend servers. It also improves redundancy in case one server fails, the reverse proxy will simply reroute requests to another server according to the established policy.
Enhanced security: An Nginx reverse proxy can also act as a line of defense for backend servers. Configuring a reverse proxy ensures that the identity of the backend servers cannot be discovered.
Improved performance: Nginx is highly regarded for its ability to stream, deliver static content files, and parse URLs.
Easy logging and auditing: Since there is only a single point of entry when deploying an Nginx reverse proxy, logging and auditing becomes much simpler.
Encrypt the connection between the client and the Nginx reverse proxy using TLS, the encrypted and secure HTTPS connection helps users protect their data.
Now we will go into the main part of the article:
Model:
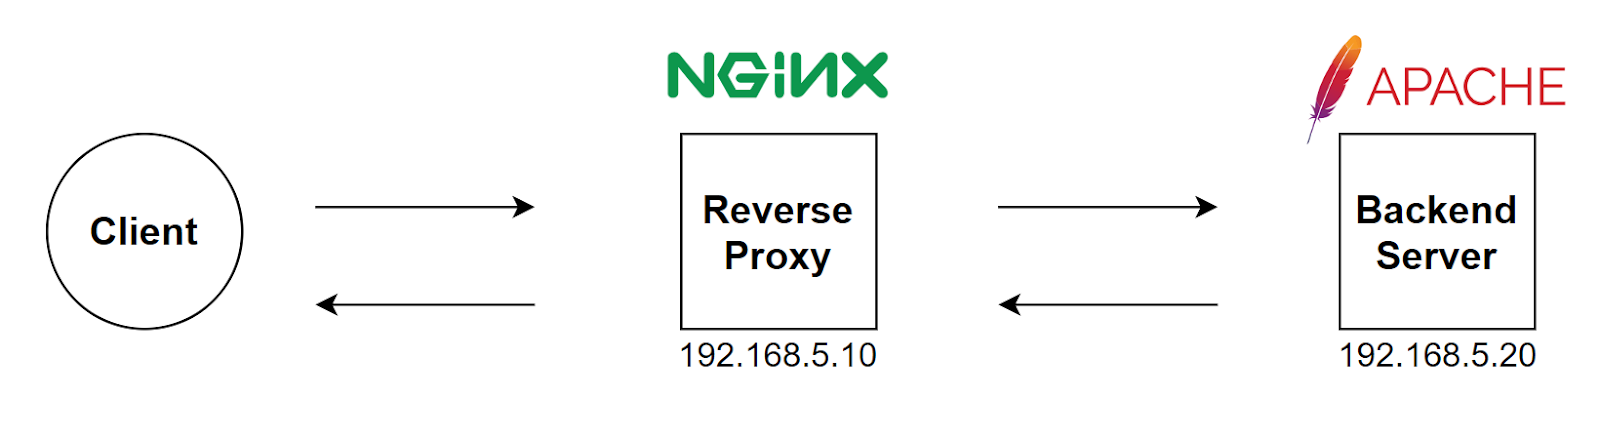
NGINX Reverse Proxy Configuration
Initialize NGINX repo:
Add the following content:
Import authentication signature:
Update repo information:
Install NGINX via the previous repo:
Configure firewalld to allow port 80:
Start and configure startup for the service:
Edit the configuration file /etc/nginx/nginx.conf
Add the following paragraph:
# where 192.168.5.20 is the address of the Backend Web Server
Restart NGINX service:
Apache Web Server Configuration (Backend)
Install httpd :
Configure firewalld to allow ports 80 and 443:
Start and configure startup for httpd service:
Edit the log format in the configuration file /etc/httpd/conf/httpd.conf
Edit at line 196:
Restart the httpd service:
Check the results
Go to the NGINX Reverse Proxy address on the client browser and you will be redirected to the Apache Web Server:
According to TipsMake share
You should read it
- Samsung developed an unbreakable phone screen
- USO, unidentified submerged dive on the seabed - The mystery of aliens?
- How to see who uses the most messaging on Facebook
- The way photo creation dissolves like Avengers: Infinity War does not need software, applications
- Instructions for setting the PIN code for SIM phones
- The best ultra-thin laptops
- Adobe launched an online application that competes with Microsoft Office
- ILife Trojan is available in pirated Photoshop CS4
- What is septic? Structure of 3-compartment septic tank, 2 common compartments
- How to Fix Problems with Windows 8/8.1
- How to Apply to College
- How to insert page numbers and page numbers in Word
Maybe you are interested
Instructions to turn off web search Start menu Windows 11 How to set up a website with Project Shield: DDOS prevention service from Google How to quickly lock Microsoft Edge Chromium MobiFone provides eSIM to customers in Vietnam How to register for 25 days for free using Funring, MCA, mFilm, My music, ... MobiFone How to receive up to 5GB data for all MobiFone subscribers with M090 application