How to set up a website with Project Shield: DDOS prevention service from Google
Despite having the same name as NVIDIA's handheld game console, Google's Project Shield is a completely standalone project that will be of great help to small websites.
Table of Contents
If visitors access your site without www (such as http://mydomain.com), you have a bare domain. If visitors access your website with https (such as https://www.my-website.com), you own a website with Secure Sockets Layer (SSL). Follow these steps to set up a new website with HTTPS (SSL).
First time user: Login
If this is your first time setting up Project Shield, open your Project Shield invitation email and click Set up Project Shield to begin setup. If you already clicked on your invitation, go to Project Shield or go to g.co/shield and click the Add A Site button to add the first site.
Step 1: Provide website domain
First, enter the domain of your website, such as my-website.com. When you enter a domain, do not put anything before it, such as "www" or "http://". Use only domains, such as mydomain.com.

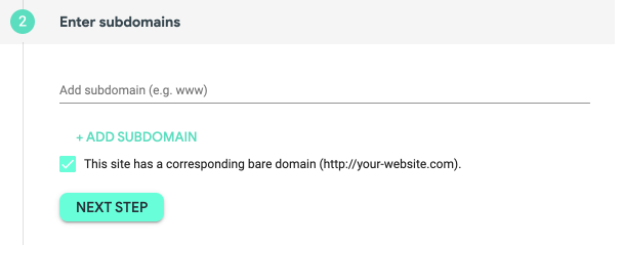
Step 2: Provide subdomain
Your website may have subdomains in the domain, such as blog.my-website.com or news.my-website.com, that you also want to protect. Let's add subdomains one by one. In this example, the subdomains are "blog" and "news". "www" is automatically added for you as your first subdomain, but you can remove it if you don't use www.
Please also note that subdomains must be added individually. Unfortunately, wildcard characters, like *.website.com, are not supported.
If visitors go to your site without www (such as http://my-website.com ), you have a bare domain. Use the following steps to set up a bare domain website, excluding "www" and adding subdomains.
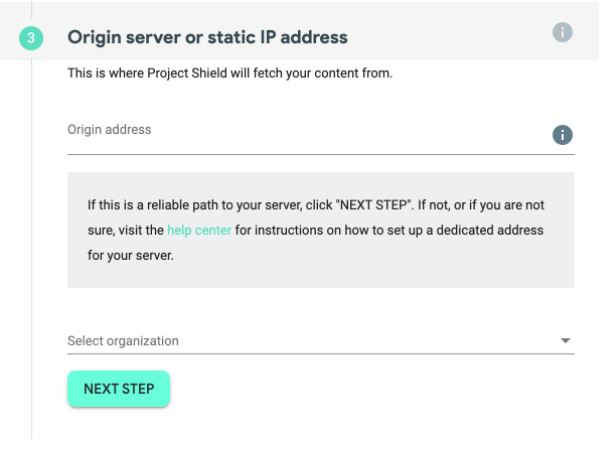
Step 3: Provide the website server address
The web server address indicates where to find your website content. You can share either a static IP address (in the format 000000,000,000) or a hidden hostname (in the format subdomain.my-website.com ).
Learn more about using static IP addresses or hidden hostnames.
If the origin is a hidden hostname and the Shield site will use SSL, your origin must provide a valid SSL certificate that protects the hidden hostname.
If you're only a member of one organization on Shield, you won't see the "Select organization" drop-down menu - that only organization will be automatically selected.
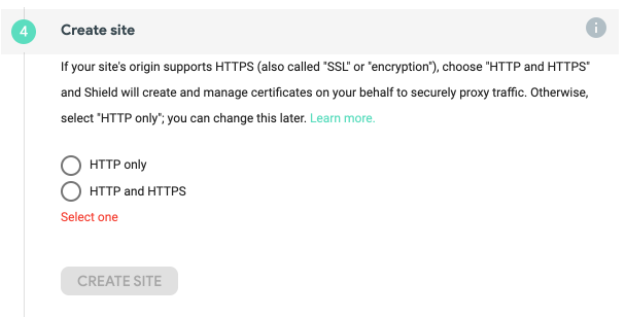
Step 4: Choose a protocol and create a website
Select HTTP only or HTTP and HTTPS to specify the type of traffic you want to support. Selecting HTTP and HTTPS automatically generates Shield-managed certificates for your site to support authorized HTTPS traffic. If you want to use your own SSL certificate and the private key is ready, you can choose HTTP only to continue with the setup process and add your certificate from the website once it is generated.
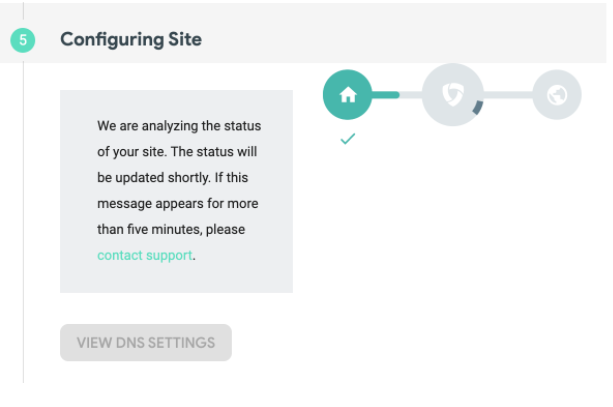
Step 5: Configure the site
After you click Create Site in step 3, you will immediately be directed to step 4, where Project Shield will configure your site. It takes a few minutes for Project Shield to finish configuring your site.
Step 6: Update DNS records
To enable Project Shield, you will change your Domain Name System (DNS) records to direct your traffic to the Project Shield servers. When this happens, Project Shield filters out harmful traffic and sends it safely to your website server.
1. Sign in to your DNS provider
Your DNS records may be accessible from your web hosting, domain registrar, or DNS host website.
2. Edit DNS records to point your domain to Project Shield
Edit the A record in the DNS record to point your domain to the unique IP address provided at the end of the Project Shield setup.
[Optional] Edit the AAAA record in the DNS records to point the domain to the unique IPv6 address given to you at the end of Project Shield setup. This record is mostly redundant with the A record you set up above, but can allow you to feed more traffic through Shield.
Check your site's status every few hours.
DNS changes usually take 1-2 hours to take effect, but can take up to 48 hours. DNS records affect servers worldwide, so there may be a delay in fully updating DNS record changes. Your site will remain active while the change is in progress.
Check out the Site Detail page on Project Shield
Check the Site Detail page for site status.
1. Sign in to Project Shield or go to g.co/shield and click Login.
2. On the left menu, click My sites .
3. Click on the website to view Site Details.
4. Read your site's status at the top of the Site Details page. If it shows 'Your site is actively proxying through Project Shield' , you have successfully configured your site.
If you see a different status, such as "There's more to do" or "Something's not right" , see how to deal with them in Project Shield's detailed website status error article.
Check out external sites
You can perform additional checks to see if your DNS changes have taken effect by running the "dig" command in a Terminal window to see where your site is hosted. You can also use Google to look up your domain and see if your A record is pointed at Project Shield.
Recommendation : Adjust the origin server's firewall rules to only allow traffic from Project Shield
The article recommends that you set up firewall rules to only allow Project Shield traffic to the website server. Firewalls can be set up through your software or hardware and used to filter the type of traffic that is allowed to your server.
Project Shield has 3 dedicated IP ranges:
- 35.235.224.0/20
- 34.96.0.0/20
- 34.127.192.0/18
When setting up your firewall rules, you can limit them to these ranges.
Conditions for participating in Project Shield
To be eligible for Project Shield, you must have a Google account and manage or own a website in one of the following areas:
- News or newspapers
- Human rights
- Election or information monitoring
- Political organizations of some countries (access is subject to local laws)
- Government organization in emergencies
Project Shield does not accept applications from other types of websites, such as gaming, commercial or personal sites.
Was this article helpful?
Your feedback helps us improve.
Related Articles
 Google launched DDoS 'unique'1 minutes read
 The DDoS attack culprit website Vietco shows up!7 minutes read
 Do you know what is the preferred 'prey' of DDoS attack?4 minutes read
 Learn about DoS and DDoS denial of service attacks13 minutes read
 Review Hotspot Shield: The fastest VPN available with proprietary technology8 minutes read
 5 Things You Didn't Know About DDoS attacks5 minutes read
Reader Comments 0
Sign in with email or Google to join the discussion.