How to Zip a File in Windows XP
Compressing, or zipping, a file is the process of creating smaller versions of large files. Zipping a file has several major benefits, such as saving storage space on your computer and making it easier to send large files through email....
Table of Contents
Method 1 of 5:
Zip a File
-
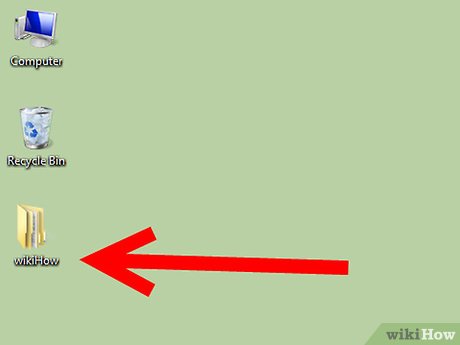 Navigate to the file on your computer that you want to zip.
 -
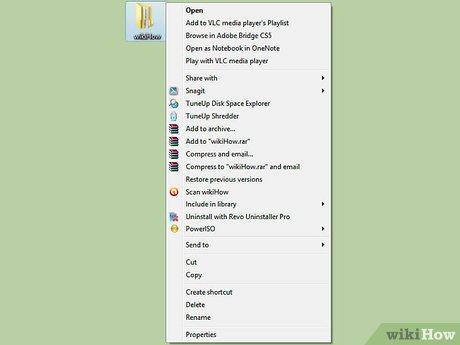 Right click on the file.
 -
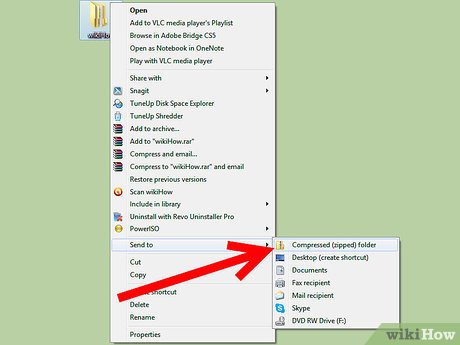 Point to "Send To" when the menu appears and click on "Compressed (zipped) Folder."
- This action will zip your file and give it an extension of .zip.
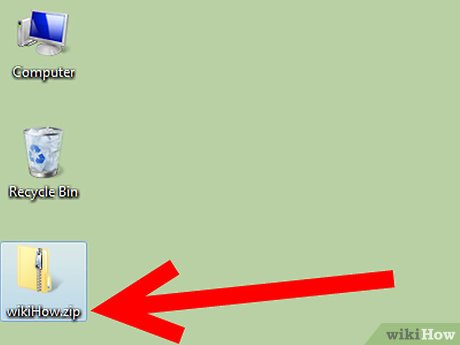
- This action will zip your file and give it an extension of .zip.
Method 2 of 5:
Create a Zipped Folder
-
 Point to a blank area on your desktop and right-click your mouse.
- To create a zipped folder in a specific location, navigate to it using the "My Computer" icon. Open "My Computer" by clicking on its icon located on your desktop or from your Start menu.

- To create a zipped folder in a specific location, navigate to it using the "My Computer" icon. Open "My Computer" by clicking on its icon located on your desktop or from your Start menu.
-
 Select "Compressed (zipped) Folder."
 -
 Type a name for the folder and press the Enter key on your keyboard to create your zipped folder.
Method 3 of 5:
Move Files to Zipped Folders
-
 Open the zipped folder you created from your desktop or from its location in "My Computer."
 -
 Navigate to the file you want to move to the zipped folder.
 -
 Click on the file, drag it with your mouse over to the zipped folder, and release your finger from the mouse to drop it into the folder.
- You can also right-click on your file and select "Copy." Right-click anywhere in the zipped folder. Select "Paste" to move it to the folder.

- These processes will automatically zip any files that you move to the zipped folder.

- You can also right-click on your file and select "Copy." Right-click anywhere in the zipped folder. Select "Paste" to move it to the folder.
Method 4 of 5:
Extract a Single File from a Zipped Folder
-
 Navigate to the zipped folder and point to the file you want to extract.
 -
 Click on the file and drag it to a location outside of the zipped folder.
- You can also right-click on the file and select "Copy." Navigate to a folder or location that is not zipped, right-click your mouse, and select "Paste."

- You can also right-click on the file and select "Copy." Navigate to a folder or location that is not zipped, right-click your mouse, and select "Paste."
Method 5 of 5:
Extract All Files from a Zipped Folder
-
 Navigate to and open your zipped folder.
 -
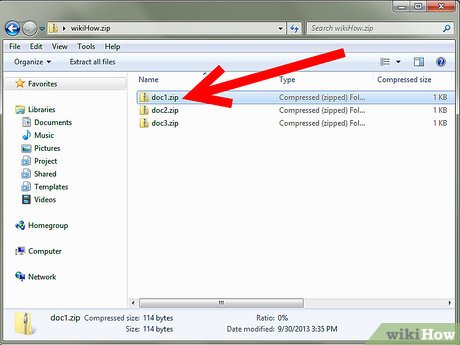
 Select "Extract all files" from the Folder Tasks list to begin the Extraction Wizard.
 -
 Click on "Next" in the wizard and type in the name of the destination or path you want all the files to be extracted to.
- You can also click on the "Browse" button to help you locate a destination.

- You can also click on the "Browse" button to help you locate a destination.
-
 Select "Extract" to begin the extraction process.
 - Click on the "Finish" button to view your extracted files.
- If you do not want to view your files immediately, remove the check mark next to "Show extracted files."

- If you do not want to view your files immediately, remove the check mark next to "Show extracted files."
Was this article helpful?
Your feedback helps us improve.
Related Articles
 How to open, run the .jar file on a Windows computer?3 minutes read
 What is file 000?5 minutes read
 Instructions to change DMG file to ISO file2 minutes read
 How to open and read the .DAT file?8 minutes read
 Learn About File Pilot: The Super Fast File Manager That Replaces Windows File Explorer8 minutes read
 How to edit the hosts file on Windows 108 minutes read
Reader Comments 0
Sign in with email or Google to join the discussion.