How to use the EXPAND function in Excel
There are many features built into Microsoft Excel to help you get the most out of the data in your spreadsheets.
Table of Contents
The variety of tools and functions available can solve problems in creative ways that you might not expect.
One of them is the EXPAND function, which can help you quickly and efficiently attach new data to your array. Read on to learn why this function can be useful and how to use it in your spreadsheets.
What is the EXPAND function in Microsoft Excel?
The main purpose of the EXPAND function is to use a data value to expand or add an array to the specified criteria (dimension) larger than specified. This can be useful in some situations, such as filling out spreadsheets for visualization purposes when incomplete data is present.
It can also be used to add additional information to an existing array without having to click and drag or re-enter the same data into every relevant cell. However, you can only add one value to the EXPAND function, so its flexibility is limited in this respect.
Learn the syntax of the EXPAND function in Excel
The EXPAND function consists of 4 arguments:
=EXPAND(array, rows, [columns], [pad_with])The array argument defines the data set to be used for the function. The rows argument specifies how many rows the new array will have. Likewise, the columns argument specifies how wide the new array should be.
The sizes listed inside the "rows" and "columns" arguments must be larger than the size of the original array, or the #VALUE ! . So, for example, if your original dataset contains 6 rows and 3 columns, you could enter "8" in the "rows" argument and tell it to resolve correctly, not "4".
If the "rows" or "columns (or both) arguments are empty, the formula will default to the size of the original array and no additional rows or columns will be added to the output.
The pad_with argument specifies the value the additional cells should contain in the new array. The default argument is "#N/A" , but you can add any text or numeric value.
How to use the EXPAND function in Excel
Let's say you have 3 tables of sales data coming in from each department. The sales manager wants to see the total sales of people from all departments, so you will have to merge these 3 tables together into one large data set.
(In reality, these could be separate files, but for convenience, let's assume they're all in the same place.)

Most of the table columns will be moved directly, but there is also a new "Department" column to fill in. The EXPAND function can easily be used to transfer data from all 3 tables and add data for a new column without much input.
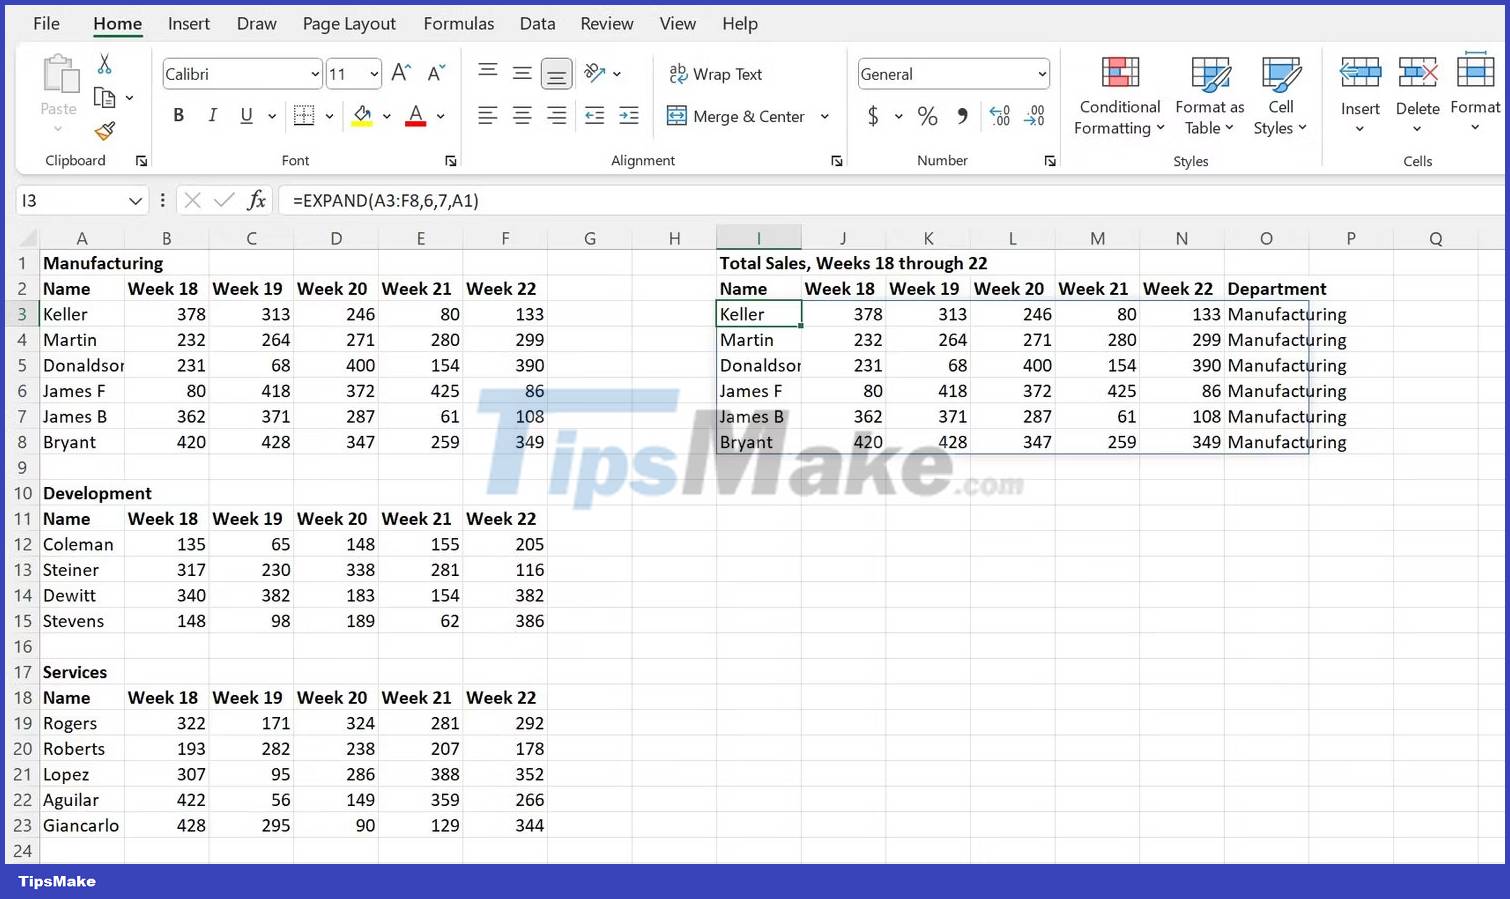
Move the data from the "Manufacturing" table by typing or pasting the following in cell I3 and pressing Enter.
=EXPAND(A3:F8,6,7,A1)This formula tells the function to use the data set under the heading "Manufacturing" cells A3 through F8 as the basis. There are 6 rows of data, so the example entered that number in the "rows" argument. Alternatively, you can leave that argument blank and get the same result.
There are also 6 columns, but need one more column for "Department" in the new table and let that argument contain the value "7" instead. What to populate the new column is the headers above the individual tables (department names), so only those cells (in this case, A1 ) can be referenced as values for the "pad_with " argument .
Now, the first table has been moved. Next, use the same formula, with a few adjustments to the cell references, to convert the remaining two tables.
For the second table, "Developmen" , type or copy and paste the following formula into cell I9 and press Enter.
=EXPAND(A12:F15,4,7,A10)
There are only 4 employees in this department, so the "rows" argument has been changed to reflect that. And for the third "Services" table , type or copy and paste the following in cell I13 and then press Enter.
=EXPAND(A19:F23,5,7,A17)The finished new dataset should look something like this:

Was this article helpful?
Your feedback helps us improve.
Related Articles
 The Index function in Excel: Formulas and usage.7 minutes read
 How to use the VALUE function in Excel - A function to convert a string to a number.1 minutes read
 Basic Excel functions that anyone must know10 minutes read
 How to use Hlookup function on Excel3 minutes read
 How to use the SUM function to calculate totals in Excel7 minutes read
 DATE Function: Converts numbers to a valid date format4 minutes read
Reader Comments 0
Sign in with email or Google to join the discussion.