How to use a PIN to log in in Windows 10
Instead of password protection on older versions of Windows, Windows 10 adds Windows Hello to help you protect Windows in many ways, such as fingerprint security, facial recognition, PIN, etc. Following instructions, TipsMake.com shared with readers how to use a PIN to log in on Windows 10. Please read along.
1. Create a PIN on Windows 10
Basically, a PIN is similar to a password but logging in with a PIN is faster than logging in with a password because you only need to enter the correct PIN and the computer will log in itself without having to press Enter .
Step 1: Click on Start (1) => Settings (2) .
Step 2: Next, select the Accounts section .
Step 3: Go to Sign-in options (1) to create a password.
Note: To create a PIN, we must create a password for Windows first. If you've already created your password, you can skip this step and move on toStep 5. If you have not created a password, clickAdd (2) in thePasswordoption.
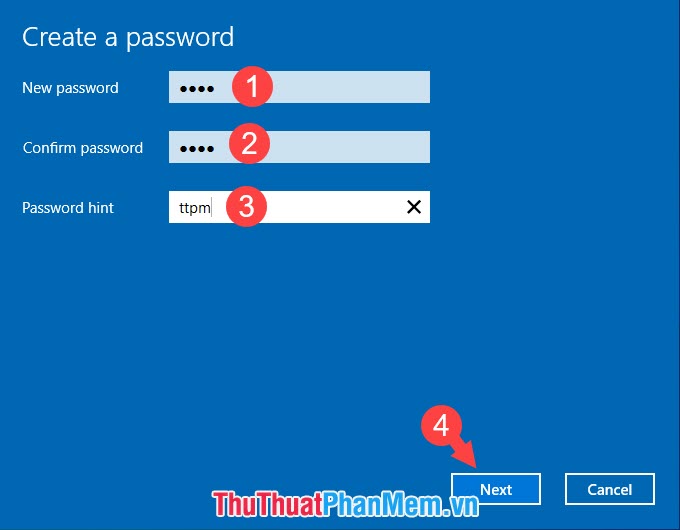
Step 4: You set a new password (1) , re-enter the password (2) and set password suggestions (3) in case you forget your password. Then click Next (4) to go to the next step.
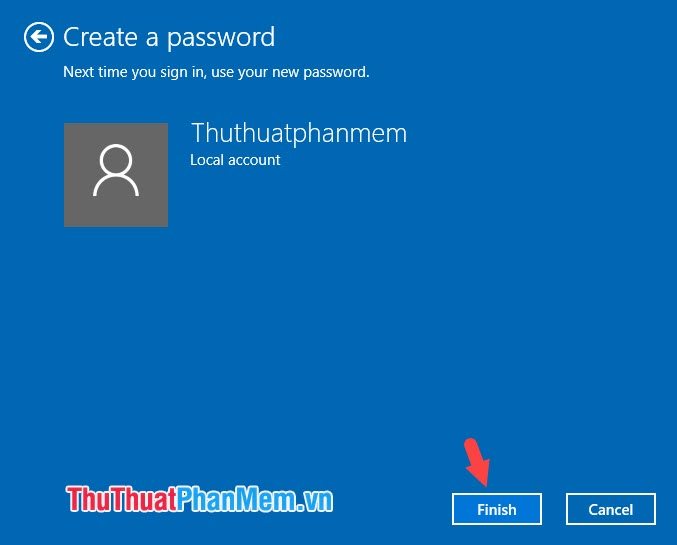
Then click Finish to complete.
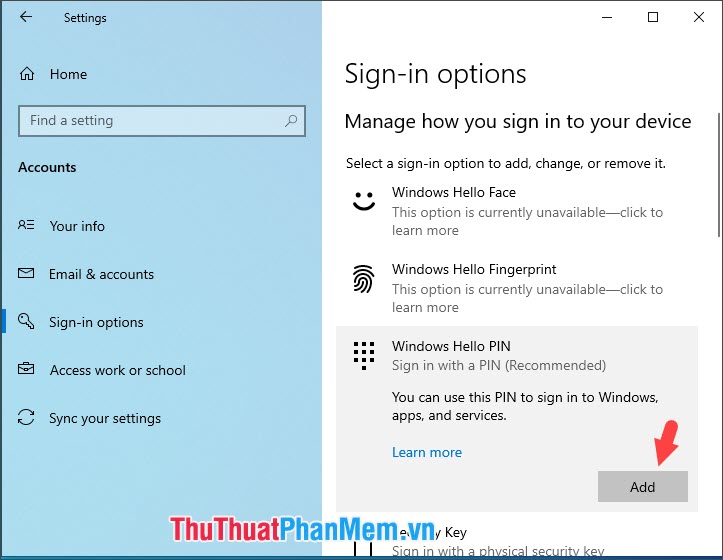
Step 5: After having the password, proceed to set a PIN to login. To set a PIN, click the Add button in the Windows Hello PIN section .
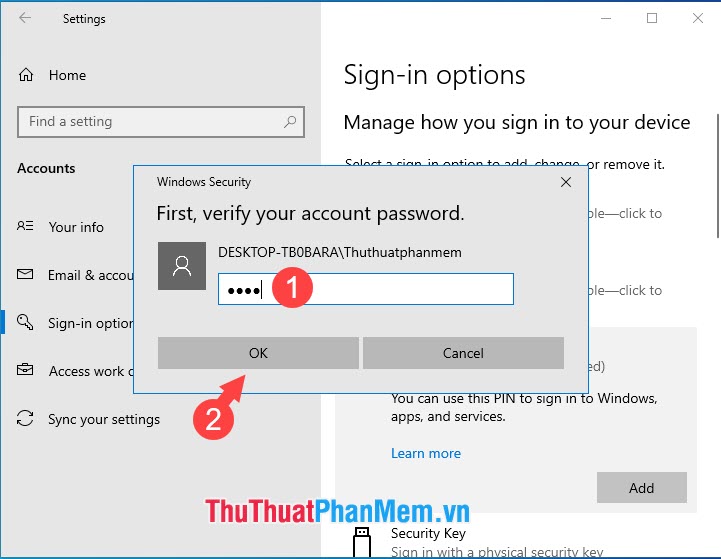
Step 6: Next, enter the Windows password (1) and click OK (2) to confirm the login.
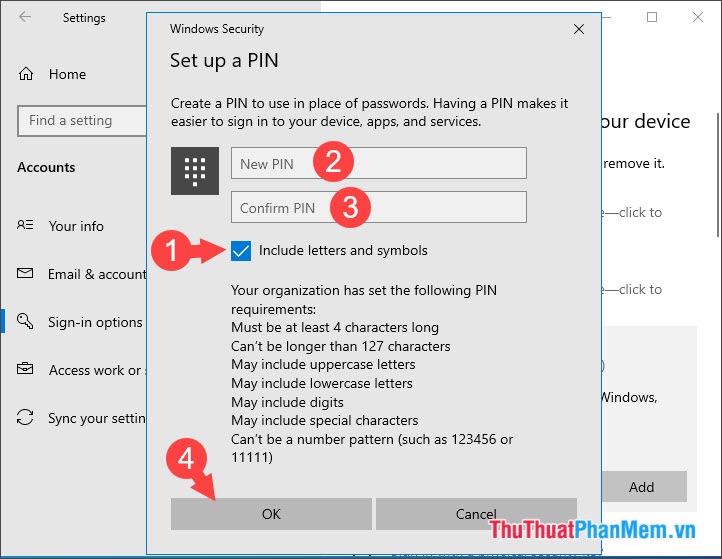
Step 7: By default, we can only create a pin code with a sequence of numeric characters. To improve the security of the pin code, check the box Include Include letters and symbols (1) . Next, enter the PIN in New PIN (2) and enter the PIN again in Confirm PIN (3) . Then click OK (4) to finish.
Note : The PIN will have the following requirements:
- Minimum length of 4 characters.
- Not longer than 127 characters.
- May include uppercase and lowercase letters.
- May include numbers.
- May include special characters.
- Can not set a simple sequence like 12345, 1111, . as a password.
2. Delete the PIN on Windows 10
Removing PIN on Windows 10 is very simple, please do as follows:
Step 1 : Go to Start => Settings => Accounts . Next you go to Sign-in options (1) => Remove (2) under Windows Hello PIN .
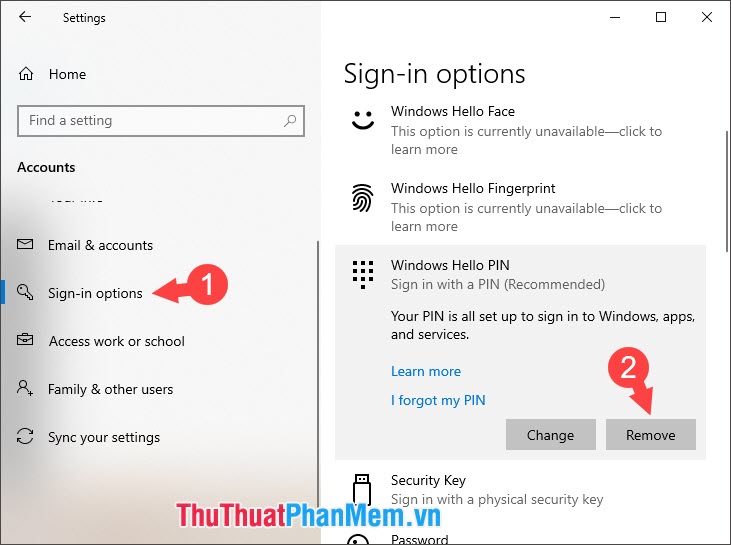
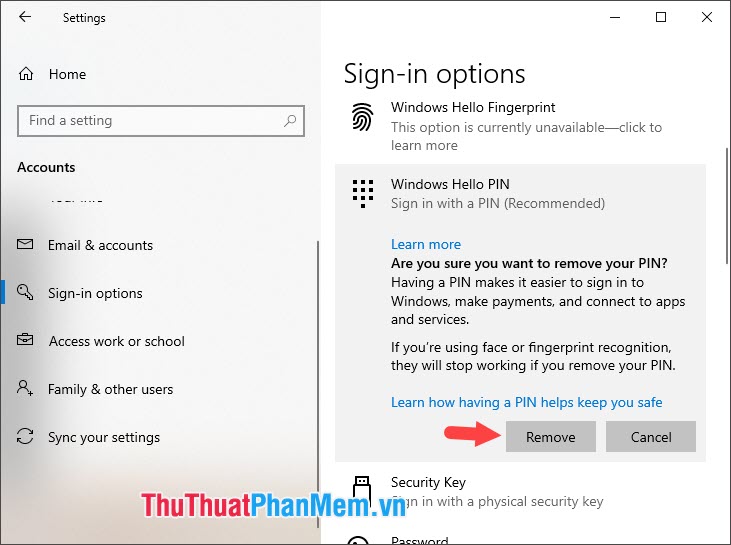
You continue to click Remove again.
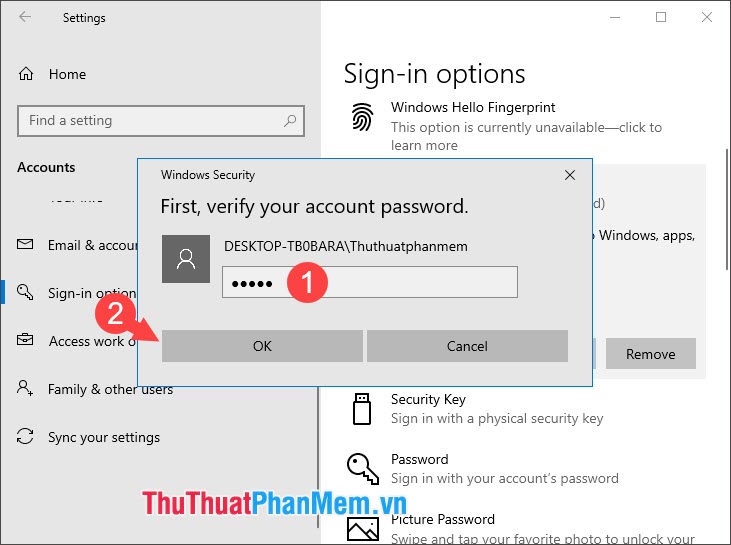
Step 2: Enter your Windows login password (1) and OK (2) to confirm it is complete.
Signing in to Windows 10 with a PIN will be much faster and simpler. In addition to the PIN, we can use USB, images as the key to login Windows. Have a nice day!
You should read it
- Windows revolution and breakthrough changes through each version
- Summary of several logout methods on Windows 8 and Windows 10
- Looking back at 27 years of 'evolution' of Windows
- Instructions on how to upgrade from Windows XP to Windows 8
- 4 ways to 'revive' Windows XP on Windows 10
- What is Windows Hello? How does Windows Hello work? How to install Windows Hello
- Instructions for setting up Windows Hello face recognition on Windows 10
- 9 Windows 8.1 errors have not been resolved
May be interested
- How to download Windows 10 Theme for Windows 7since the release of windows 10, many windows 7 and windows 8 users want to get the windows 10 interface in windows 7/8 by installing a visual style (theme). those looking for a good windows 10 theme for windows 7 will be happy to know that the windows 10 theme is available for windows 7.
- Compare Windows 10 and Windows 11windows 11 has officially launched. with it come some pretty big changes to the windows experience. whether it's brand new features or old functionality with a new look, windows 11 seems to have breathed new life into most people.
- Windows operating system is 35 years old, everything you need to know about Windows35 years ago on 11/20/2085, the first version of windows operating system appeared to replace ms-dos, which completely changed the history of computer technology. it is an important pillar paving the way for the modern versions of windows that we are using today.
- Instructions for upgrading Windows 7 to Windows 8 and Windows 8.1microsoft allows users running windows 7 and windows xp to upgrade directly to windows 8 or windows 8.1 without having to reinstall windows. in the article below, network administrator will guide you through the steps to upgrade from windows 7 to windows 8 and windows 8.1.
- Use Windows XP Mode on Windows 8windows xp mode is no longer active in windows 8. and so is the future. explaining this, microsoft simply stated that it will no longer support windows xp and does not want users to continue using it, even in a virtual machine. however, you can easily set up windows xp mode in windows 8.
- Instructions for using Snap feature on Windows 10 with shortcutsnap on windows 10 is completely different than on windows 7 and 8. with windows 10, you can flexibly move or resize open application windows throughout the screen position easily. based on new shortcut keys.
- How does Windows 7, 8 not automatically upgrade to Windows 10?for windows 7 and windows 8 users, if windows 10 is eligible to upgrade windows 10 will receive a notification to upgrade windows 10 in the system tray. however, if you don't want to use windows 10, you can still block windows 7 and 8 upgrades to windows 10.
- How to enter Windows XP mode from Windows 7 to Windows 10moving xp mode from windows 7 as a virtual machine to windows 10 is relatively difficult, because of the different drives and multiple files used. this tutorial will show you an easy workaround, the whole process takes less than 10 minutes.
- Even if you're tired of Windows 10, don't downgrade to Windows 8.1how to geek, after trying to reinstall windows 8.1 and experiencing it for a few hours, advised users that it should not be back to windows 8.1. try to find out why so.
- Working with windows in Windowsone thing is obvious but windows are an important part of microsoft windows. nearly everything users do in windows involves a certain window. however, if all you do with the window is just opening and closing and dragging them around the screen, you seem to be missing a little creativity.