How to Turn Off Windows Defender in Windows 10
This wikiHow teaches you how to turn off Windows Defender, both temporarily and 'permanently', in Windows 10. While Windows Defender can be disabled until you restart your computer from within Settings, you can prevent Windows Defender...
Table of Contents
Method 1 of 2:
Turning Off Windows Defender
-
 Open Start. Click the Windows logo in the bottom-left corner of the screen. The Start menu will pop up.
-
 Open Settings. Click the gear-shaped Settings icon in the lower-left side of the Start menu. Doing so opens the Settings window.
-
 ClickUpdate & Security. It's in the bottom row of Settings options.
-
 Click Windows Security. This tab is in the upper-left side of the window.
 -
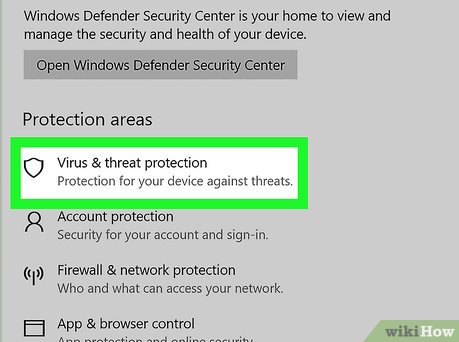 Click Virus & threat protection. It's the first option below the "Protection areas" heading near the top of the page. Doing so opens the Windows Defender window.
 -
 Click Virus & threat protection settings. You'll find this option in the middle of the page.
 -
 Disable Windows Defender's real-time scanning. Click the blue "On" switchbelow the "Real-time protection" heading, then click Yes when prompted. This will turn off the real-time scanning feature of Windows Defender.[1]
- You can also disable Windows Defender's cloud-based protection by clicking the blue "On" switch below the "Cloud-delivered protection" heading and then clicking Yes when prompted.
- Windows Defender will turn itself back on the next time you restart your computer.
Method 2 of 2:
Disabling Windows Defender
-
 Open Start. Click the Windows logo in the bottom-left corner of the screen. The Start menu will pop up.
-
 Open Registry Editor. The Registry Editor program allows you to make changes to your computer's core features. To open it, do the following:
- Type in regedit.
- Click the blue regedit icon at the top of the Start menu.
- Click Yes when prompted.
-
 Go to the Windows Defender folder's location. You'll do this by expanding each of the necessary folders in the left-hand section of Registry Editor as follows:
- Expand the "HKEY_LOCAL_MACHINE" folder by double-clicking it (skip this step if the folder is already expanded).
- Expand the "SOFTWARE" folder.
- Scroll down and expand the "Policies" folder.
- Expand the "Microsoft" folder.
- Click once the "Windows Defender" folder.
-
 Right-click the "Windows Defender" folder. You should see a drop-down menu appear.
- If your mouse doesn't have a right-click button, click the right side of the mouse, or use two fingers to click the mouse.
- If your computer uses a trackpad instead of a mouse, use two fingers to tap the trackpad or press the bottom-right side of the trackpad.
-
 Select New. It's near the top of the drop-down menu. Selecting it prompts a pop-out menu.
 -
 Click DWORD (32-bit) Value. This option is in the pop-out menu. Clicking it places a blue-and-white file in the "Windows Defender" window on the right side of the page.
 -
 Enter "DisableAntiSpyware" as the file name. When the DWORD file appears, type in DisableAntiSpyware and then press ↵ Enter.[2]
 -
 Open the "DisableAntiSpyware" DWORD file. Double-click it to do so. A pop-up window will open.
 -
 Replace the "Value data" number with 1. This essentially turns on the DWORD value.
 -
 Click OK. It's at the bottom of the window.
 -
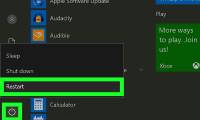
 Restart your computer. Click Start, click Power
 , and click Restart in the pop-up menu. When your computer finishes restarting, Windows Defender will be disabled.
-
 Re-enable Windows Defender when needed. If you decide that you want to re-enable Windows Defender in the future, do the following:
- Go back to the Windows Defender folder in Registry Editor.
- Click once the "Windows Defender" folder.
- Open the "DisableAntiSpyware" value by double-clicking it.
- Change the "Value data" from 1 to 0.
- Click OK, then restart your computer.
- Delete the "DisableAntiSpyware" value if you don't want it to be available later.
Was this article helpful?
Your feedback helps us improve.
Related Articles
 How to turn off the Windows Defender Summary notification on Windows 103 minutes read
 Instructions to turn off Windows Defender completely on Windows 103 minutes read
 How to turn off, turn on Windows Defender in Windows 103 minutes read
 How to Turn on Windows Defender5 minutes read
 How to Turn On Windows Defender5 minutes read
 How to turn off Windows Defender on the latest Windows 10 20247 minutes read
Reader Comments 0
Sign in with email or Google to join the discussion.