Table of Contents
This updated guide examines How to Disable Iphlpsvc in Windows 10 and organizes the essential facts, background, and practical takeaways in clear American English.
Disabling iphlpsvc will not damage the system, disrupt its general functionality or affect performance much.
Stop iphlpsvc in Services
If you want to disable iphlpsvc, there are a few ways to do that. The quickest and easiest way is to stop the service.
1. Search for Services in the Windows 10 search bar and select the corresponding results.
2. In the Services window, ensure that Services (Local) is selected in the left column. Then scroll down the list to find the IP Helper.
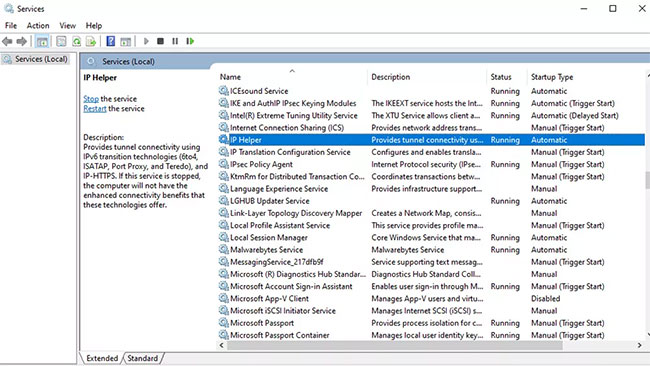
3. Double click on the IP Helper or right click and select Properties.
4. To temporarily disable the service, select the Stop button, then Apply and OK.
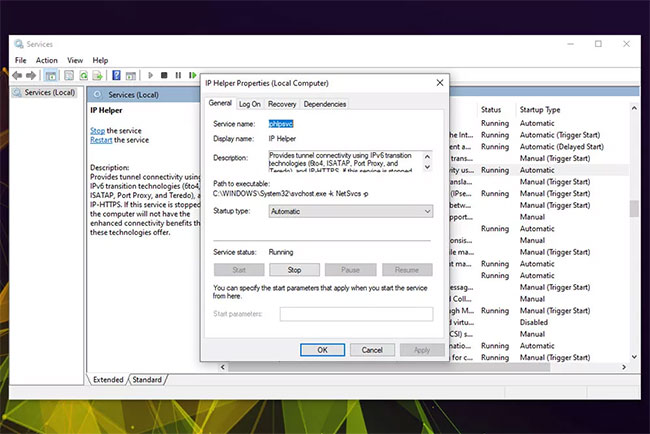
5. If you want to prevent it from running again, set Startup Type to Disabled using the drop-down menu. Then choose Apply and OK.
It is recommended to reboot the Windows 10 system after completing this step. When you return to Windows, open the Services menu again to make sure your changes take effect.
You can also reactivate iphlpsvc the same way, just revisit the Services menu and select the Start button. If you want iphlpsvc to automatically start with Windows, make sure that the Startup Type is selected as Automatic.
How to disable iphlpsvc by Registry Editor
You can also disable the iphlpsvc service using the Windows Registry Editor.
1. Open Registry Editor by pressingWin+Rkey and enter regedit in the Run box . Then click OK. Meet admin approval requirements.
2. Navigate to:
HKEY_LOCAL_MACHINESYSTEMCurrentControlSetServicesiphlpsvcThen right-click it and choose Modify.
3. To disable it on startup with Windows, change the Value data to 4 . Choose OK.
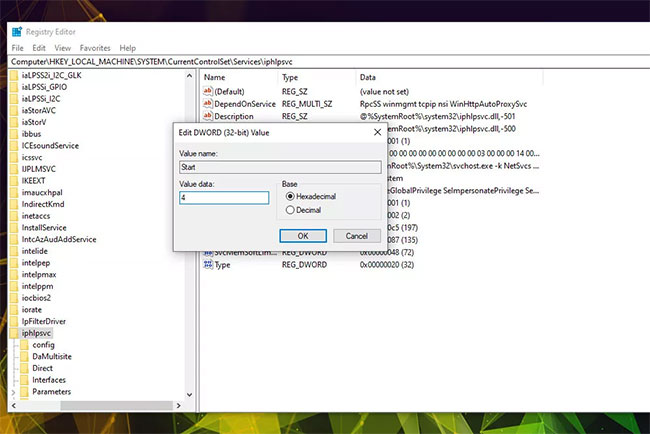
4. Close the window and restart the computer. Iphlpsvc will no longer start with Windows.
If you want to revert iphlpsvc to start automatically with Windows, repeat the steps above, but set the Value data to 2.
How to disable iphlpsvc using the Command Prompt
You can also disable the iphlpsvc service using the Windows Command Prompt.
1. Open Command Prompt with admin rights.
2. To turn off iphlpsvc on startup, enter the following and pressEnter:
REG add 'HKLMSYSTEMCurrentControlSetservicesiphlpsvc' /v Start /t REG_DWORD /d 4 /f3. Restart the PC. The iphlpsvc service will be disabled.
If you want to reactivate iphlpsvc at some point, follow these steps and enter the following information in CMD before pressing theEnterkey:
REG add 'HKLMSYSTEMCurrentControlSetservicesiphlpsvc' /v Start /t REG_DWORD /d 2 /fFAQ
What is How to Disable Iphlpsvc in Windows 10 about?
It provides a structured overview of Windows 10, explains the main context, and highlights practical takeaways for readers.
Why does this topic matter?
Understanding the main concepts helps readers evaluate the issue, avoid common mistakes, and make better-informed decisions.
How should readers use this information?
Use the guidance as a practical starting point, confirm details that may have changed, and follow current product, safety, or security recommendations.
Related Articles
 What Is Iphlpsvc?4 minutes read
 Disable, Remove Notification Icon Get Windows 104 minutes read
 How to Disable the Insert Key in Windows 106 minutes read
 Summary of Some Simple Ways to Disable USB Ports on Windows6 minutes read
 Disable Windows 10 Keyboard in 5 Simple Ways6 minutes read
 3 How to Disable BitLocker in Windows 103 minutes read
Reader Comments 0
Sign in with email or Google to join the discussion.