Table of Contents
This guide explains how to add Exceptions in Windows Defender on Windows 10, with clear steps, practical tips, and important checks before you begin.
Warning : Be careful about what you exclude. Windows Defender will not scan excluded files and folders for malware.
How to add exceptions in Windows Defender on Windows 10
Step 1:
First, you need to launch Windows Security to change some settings. Open the Start menu and enter Windows Security . Then select the Windows Security application .
Step 2:
In Windows Security , navigate to Virus & Threat Protection . Then click Manage Settings.
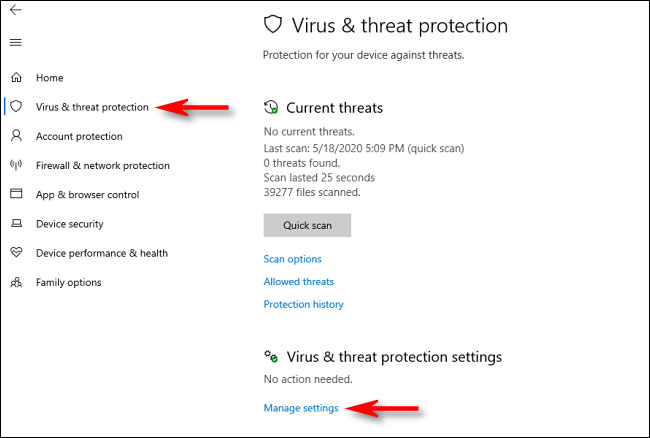 In Windows Security, navigate to Virus & Threat Protection
Step 3:
In Virus & Threat Protection Settings , scroll to the bottom of the page and click Add or Remove Exclusions .
Step 4:
On the Exclusions page, you can add or delete files that you want to exclude from the Windows Defender scan. To add an exception, click the Add An Exclusion button next to the large plus ( + ) symbol.
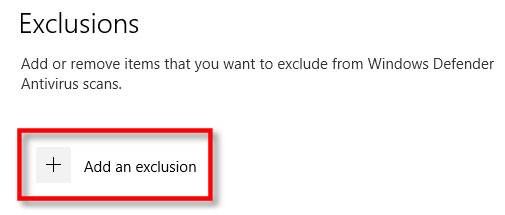 Click the Add An Exclusion button
Step 5:
A small menu will appear allowing you to specify exceptions by File, Folder, File type or Process (file, folder, file type or process).
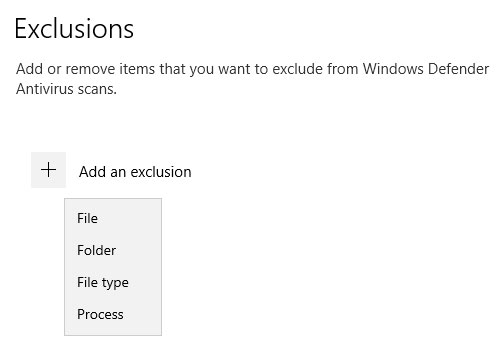 A small menu will appear allowing you to define exceptions
What you choose depends on the type of exception you are trying to make. This is what each option will do.
- File: If you select this item, a box will appear allowing you to browse the computer to select a file to be excluded from future scans. Select the file you like, then click Open.
- Folder: Like the File option, this will allow the computer to search for a specific folder and exclude it from the scan. Content and subfolders in this directory will also be excluded.
- File type : A box will appear asking you to enter the file extension (e. g. . MID ) representing the file type that you can exclude. All files of that type will be excluded from future scans. This is very dangerous, because you can accidentally exclude a large group of potentially malicious files, such as PDFs or DOCs.
- Process : A window will appear asking you to enter the name of a process (a running program, such as explorer. exe ) to exclude from the scan. If a program you know is safe, but it will be flagged by Defender, you can enter it here.
Choose one of these options and make the necessary selections in the following pop-up dialog box. When you add an exception, it will display in a list on the Exclusions page .
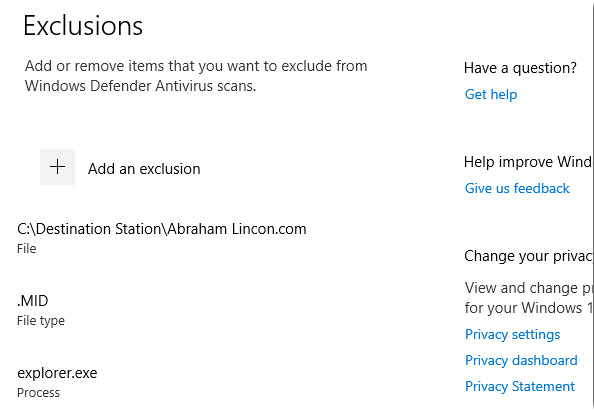 Exceptions will appear in a list on the Exclusions page
Step 6:
If you want to delete a specified exception, move the mouse pointer over the item until the down arrow appears, then click the Remove button.
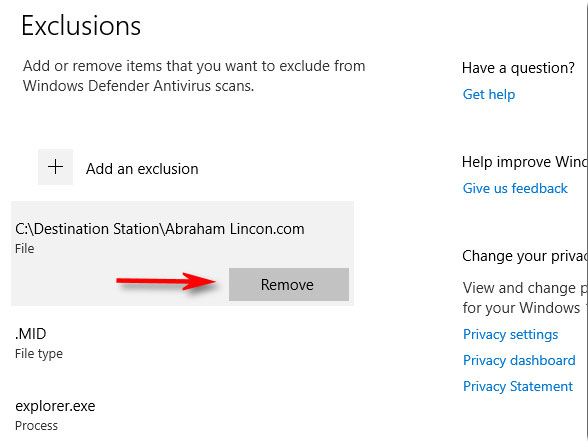 Click the Remove button to remove the exception
Step 7:
When done, close Windows Security and your settings will be saved. The next time the system performs a Defender scan, the items you have added to the exclusion list will no longer cause trouble.
FAQ
What should I know about Add Exceptions in Windows Defender on Windows 10?
Focus on the key features, requirements, limitations, and practical use cases explained in this guide.
How do I get the best results with Add Exceptions in Windows Defender on Windows 10?
Follow the recommended steps, use current software or information, confirm compatibility, and review settings before major changes.
Are there any risks or limitations?
Potential limitations depend on compatibility, data quality, cost, privacy, support, and how the product or method is used.
Related Articles
 Instructions for Using Windows Defender14 minutes read
 How to Turn Off the Windows Defender Summary Notification on4 minutes read
 How to Fix Errors Cannot Open Windows Defender on Windows 7/8/1013 minutes read
 Use Windows Defender with Command Prompt on Windows 105 minutes read
 How to Kill Viruses with Windows Defender Offline on Windows 104 minutes read
 Shadow Defender - Shadow Defender Download and Installation3 minutes read
Reader Comments 0
Sign in with email or Google to join the discussion.