Table of Contents
This updated guide explains how to Take a Screenshot of Your Computer on Windows through clear steps, practical examples, and important checks that help prevent common errors.
Take Screenshots on Windows XP
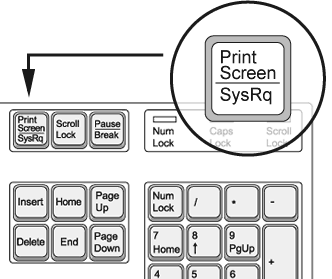
Just press the Print Screen key to take a screenshot of the full screen, or Alt + Print Screen to take a screenshot of the current window.
Quick Adsense WordPress Plugin: http://quickadsense. com/
It will not output to the image file directly but will be saved in the Clipboard , you must use an image processing software to paste out and save. Here, I use the Paint tool available in Windows.

Just open Paint and press Ctrl + V to paste. Then File> Save or Ctrl + S to save.
Take Screenshots with Windows 7 and 8, 8.1, 10
If you use Windows 7 / 8x or higher, you can follow the same method of Windows XP as above, that is, use the Print Screen Key to capture and open Paint or Photoshop,. to Paste in and then save.
However, from Windows 7 onwards you have a tool called Snipping Tool available in Windows. Just press Start and type the Snipping tool into the search box to find it. Or on Win 8, 8.1 you hover on the right corner of the screen, select Open Search in the Chambar bar and also search for the Snipping Tool.
This software has 4 options for taking screenshots:
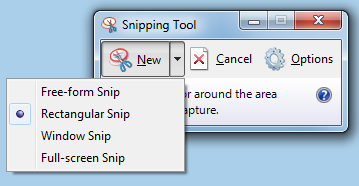
- Free-form Snip : Capture the screen in any shape you draw
- Rectangular snip : Take screenshots in any rectangular frame
- Window Snip : Screen capture is working
- Full-screen Snip : Capture full screen
By default, when you click New , you drag a rectangle and the area is captured.
Quick Adsense WordPress Plugin: http://quickadsense. com/

Finally press Ctrl + S to save.
ScreenShoter - Screen Capture Software
If you need software to take screenshots faster and more professionally, you can use ScreenShoter . The advantage of it is that it is quite easy to manipulate and export images directly , so it does not need many steps to have a screen image file.
Download here: http://www. inspire-soft. net/data/screenshoter. zip
The software is very compact and requires no installation, so just unzip and run the exe file.

Part Region you will choose to take full screen , windowcapture or capture an arbitrary area .
Filename is a place to choose a numbering (date and time) or ask every time (ask every time)
The Destination is where the image file will be exported.
Click Screenshot and you will get the screen image file like that.
If you may need to select an area to capture, click the button as shown below:

Then select the area you may need to capture and right-click to confirm, then click Screenshot .
By default, the software will save JPG images, if you may need to save with PNG or BMP image formats, go to Settings> Saving> Image Format and convert again. Or Settings> Image quality (JPG) if you may need to adjust the quality of JPG images.
* 133 * This is the end of the tutorial for using some of the built-in Windows tools and software to help you take the fastest and most professional computer screen capture. Do not forget to Like, Share and Comment support me!
Shareit
FAQ
What is the easiest way to Take a Screenshot of Your Computer on Windows?
Start with the requirements in this guide, then follow each step in order. Check the result after every major change so problems are easier to identify.
Can beginners follow these instructions?
Yes. The process is organized into practical steps, and you can repeat any step before moving forward.
What should I check if the method does not work?
Confirm your software or device version, permissions, settings, file format, and internet connection when the task depends on online services.
Related Articles
 Top Ways to Take Screenshots on Your Computer8 minutes read
 The Fastest Ways to Take Screenshots on a Computer or Laptop9 minutes read
 How to Take Screenshot on HP Windows 10 Computer7 minutes read
 How to Take a Screenshot on Windows 118 minutes read
 How to Take a Screenshot in Microsoft Windows15 minutes read
 12 Quick and Simple Ways to Take Screenshots of Acer Computers9 minutes read
Reader Comments 0
Sign in with email or Google to join the discussion.