10 Simplest Ways to Take a Screenshot on an ASUS Laptop
To share information on the laptop screen with others, taking a screenshot is the most common way. If you are using an ASUS laptop and do not know how to take a screenshot, please refer to the instructions below!.
ASUS laptops are a brand trusted and used by many customers today. If you are using this product line and do not know how to take a screenshot, please see the instructions below.
1. How to take screenshots on ASUS laptops using key combinations
Taking screenshots is a feature that is used quite often by computer and laptop users. And for convenience, this feature is also integrated into the Windows operating system. To quickly take screenshots on an ASUS laptop, you can use the following key combinations:
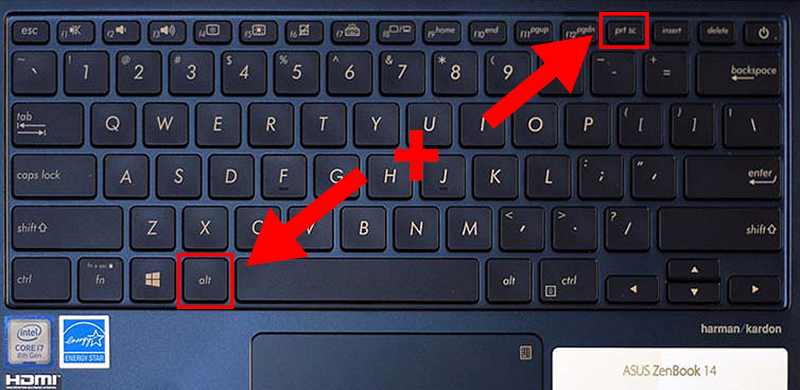
Alt + Print Screen key combination
To take a screenshot of a laptop or PC, you can press the Alt + Print Screen keys from the keyboard at the same time. At this time, the screen will flash quickly for about 1 second to notify that the screenshot has been taken. To view the image, you can open tools such as Paint, Microsoft Word, . and press Ctrl + V to paste the image.
Use Windows key + Print Screen
To activate the screenshot feature, you can also combine the 2 Windows + Print Screen keys
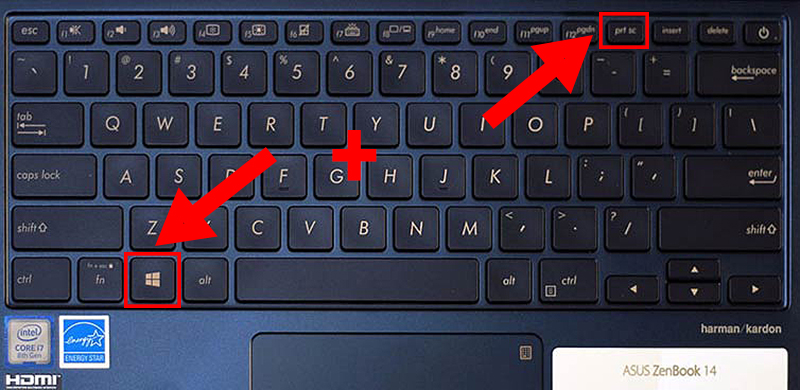
On the Windows platform, when using this shortcut key combination, the screenshot will be automatically saved. To use this screenshot, you can access the following path: go to This PC > Open the Picture folder > Select the Screenshot file to view the image just taken.
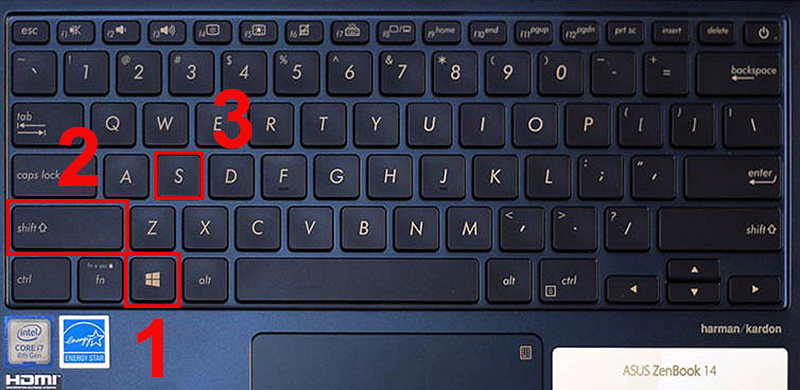
Windows key + Shift + S
This key combination will activate the Snipping Tool application available on Windows. When you press the Windows + Shift + S key combination on your computer keyboard, you will see a tool panel appear with a crosshair to scan and save the area of the screen you want to capture. After taking the photo, you can press Ctrl + C to copy the photo you just took and Ctrl + V to paste it into a third-party software such as Word, Excel, . or a chat message box if you want to send that image. If you want to save the photo directly to your computer, you can press Ctrl + S.
2. Take a screenshot of ASUS laptop using PrtSC shortcut key
As mentioned above, the screenshot feature is built into the Windows operating system. If you don't remember the key combinations, you can press the PrtSC key directly to take a screenshot. Not only applicable to taking screenshots on ASUS laptops, the function button can be used with any laptop or PC of other brands.
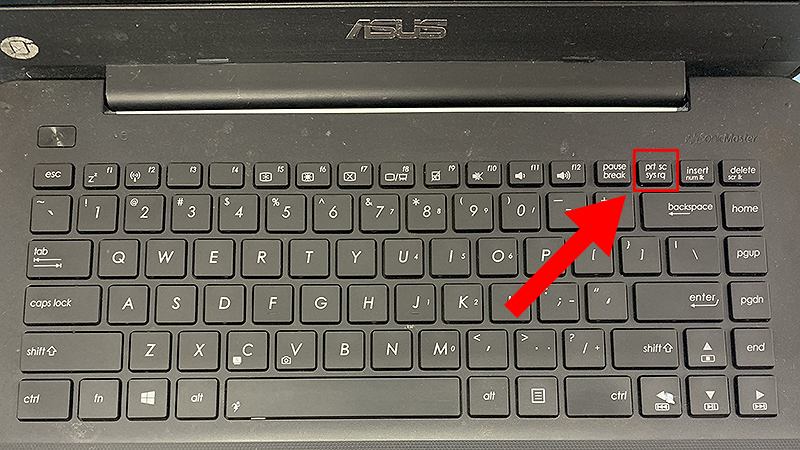
After taking a screenshot using this operation, the image will also be saved automatically. To view the image, access the following path: go to This PC > Open the Picture folder > Select the Screenshot file to view the image you just took.
3. Take screenshots of Asus laptops using software available on Windows
In addition to shortcuts, if you like using software, you can also apply these methods to take screenshots on ASUS laptops.
Snipping Tool Software
Most computers today have Snipping Tool software built in. To take a screenshot on an ASUS laptop, you can follow these steps:
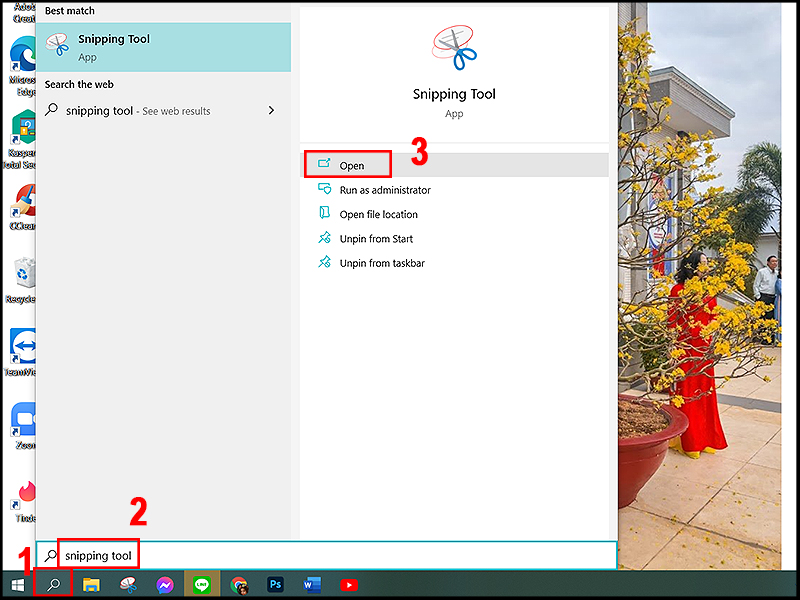
+ Step 1: Press the Windows + S key combination or go to Windows Search Tool on the taskbar > Enter the keyword Snipping tool > Click Open to open the Snipping Tool software.
+ Step 2: Go to Mode to select shooting mode. For example:
- Free-form Snip : you can freely circle the area you want to capture in any shape you like.
- Rectangle Snip : allows you to manually adjust the capture range according to the rectangular frame.
- Windows Snip : will capture the selected working window area.
- Full-screen Snip : this mode will capture your entire screen including the Taskbar.
+ Step 3: The photo you just took will be displayed in a new window. You can click the Save icon to save the photo to the file you want or press Ctrl + C to copy the photo.
Snip & Sketch Software
You can also use the Snip & Sketch tool that comes pre-installed on your device to take screenshots as desired. To do so, follow the steps below:
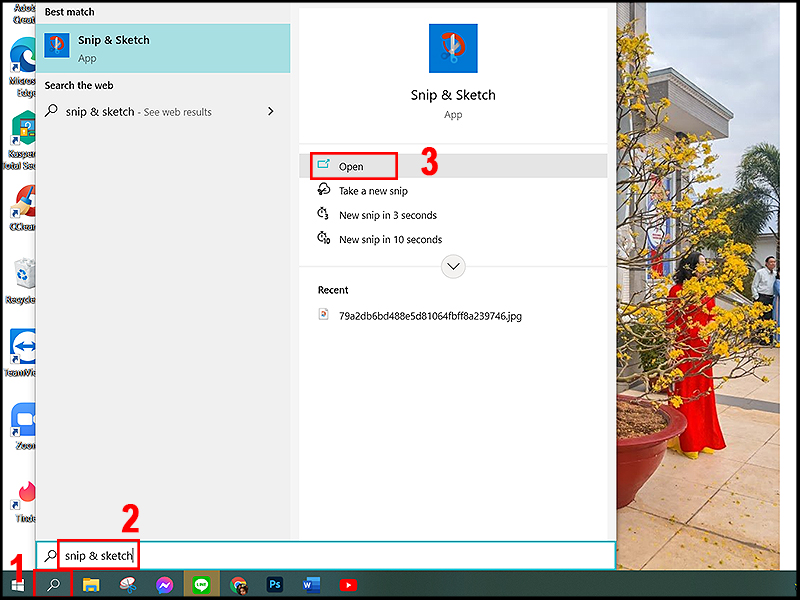
+ Step 1: Press the Windows + S key combination or go to Windows Search Tool on the taskbar > Enter the keyword Snip & sketch > Click Open to open the Snip & Sketch software.
+ Step 2: Click on New to start shooting. When the shooting interface appears, you can also change the shooting mode as desired.
+ Step 3: The photo you just took will be displayed in a new window. You can click the Save icon to save the photo to the file you want or press Ctrl + C to copy the photo.